
User Manual


6 Troubleshooting the NIC
40
11 Install the network driver, as described in “Installing the NIC Driver and Software in
Windows” on page 19.
If you are prompted for 3Com files when Windows restarts on Windows 95 and
Windows 98 PCs, open the drop-down box and select the following path:
\options\cabs
To verify successful installation, see “Verifying Successful Installation” on page 22.
Other Installation Problems
3Com has found that some PCI computers require additional configuration steps to install
a PCI NIC. 3Com recommends these steps:
1 Determine whether you have the latest BIOS version for your PC. Consult the PC
manufacturer to make sure that you are using the latest BIOS.
2 Make sure that the BIOS is set up correctly.
In some PCI computers, you may need to enable the PCI slot using the BIOS Setup program.
Enabling the PCI slot is especially common in PCI computers with a Phoenix BIOS.
a After installing the NIC, turn on the PC and enter the Setup program during system
initialization (usually by pressing the [F1], [F2], or [Ctrl]+[Alt]+[S] keys). The correct
key to press is usually shown on the screen.
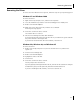
b Once in the Setup program, find the entry for PCI slots and set these parameters as
shown in the table below. The entry for the PCI slots may be in the main menu, or
sometimes in advanced system configuration.
BIOS System Parameters Setting
PCI Slot Number Slot where the 3Com PCI NIC is installed (1-3)
Master ENABLED
Slave ENABLED
Latency Timer 40
Interrupt Choose any one of several available interrupts that Setup provides.
Edge or Level Level Triggered Interrupt
NOTE: The exact wording of each of the parameters varies from computer to
computer. Save the changes, exit the Setup program, and continue with the
installation.