
User Manual
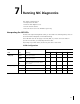


7 Running NIC Diagnostics
48
NIC Test
Run the NIC Test to check the physical components, connectors, and circuitry on the NIC.
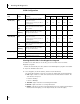
1 Click Run NIC Test on the Diagnostics screen.
The NIC Test screen appears.
2 Click Perform NIC Test.
While the test is running, a progress bar indicates test progress. If the test passes, the
NIC is functioning correctly. If the test fails, a message indicates the error type.
Click Help in the error message screen to obtain more information.
3 Click Close.
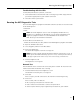
Viewing Network Statistics
To view statistical information about the network:
1 Make sure that the NIC, the network driver, and the 3Com NIC Diagnostics program
are installed.
2 Open the Windows Start menu.
3 Select Programs, and then 3Com NIC Utilities.
4 Click 3Com NIC Doctor.
The 3Com NIC Diagnostics General screen appears.
5 Click the Statistics tab.
The Statistics screen appears.
The information is updated by the NIC driver every 5 seconds.
For a description of each statistic, click the question mark (?) in the upper right corner
of the screen, drag it over a statistic and click once. A pop-up box appears, displaying
information about the statistic.
6 Click OK to exit the diagnostics program. To go to another diagnostics screen, click
the associated tab.
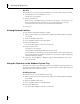
Using the 3Com Icon in the Windows System Tray
The 3Com icon, which can be enabled to appear in the Windows system tray, allows you
to start the 3Com NIC Diagnostics program. It also allows you to view the NIC’s link speed
and number of frames sent and received.
Enabling the Icon
To show the 3Com icon in the Windows system tray:
1 Make sure that the NIC, the network driver, and the 3Com NIC Diagnostics program
are installed.
2 Open the Windows Start menu.
3 Select Programs, and then 3Com NIC Utilities.
4 Click 3Com NIC Doctor.
The 3Com NIC Diagnostics General screen appears.