ADSL Ethernet & USB Combo Router Quick Guide Version 1.1 • Product warranty does not apply to damage caused by lightning, power surges or wrong voltage usage. • This product is for use only in UL Listed computers.
Lynx L-510 Quick Guide Contents Declaration Of Conformity ........................................................................... 3 Countries of Operation and Conditions of Use in the European Community................... 3 Radio Frequency Interference Warnings & Instructions .................................................. 4 RF Exposure ................................................................................................................... 4 Introduction .................................
Lynx L-510 Quick Guide Declaration Of Conformity Marking by the above symbol indicates compliance with the Essential Requirements of the R&TTE Directive of the European Union (1999/5/EC). This equipment meets the following conformance standards: EN300 328, EN301 489-17, EN60950 Countries of Operation and Conditions of Use in the European Community This device is intends to be operated in all countries of the European Community. Requirement is for indoors vs.
Lynx L-510 Quick Guide Radio Frequency Interference Warnings & Instructions (FCC ID: I38-DSL600EWR) This equipment has been tested and found to comply with the limits for a Class B digital device, pursuant to Part 15 of the FCC Rules. These limits are designed to provide reasonable protection against harmful interference in a residential installation.
Lynx L-510 Quick Guide Introduction Thank you on your purchase of the Lynx L-510! The Lynx L-510 provides you with a high-speed broadband Internet connection using your existing phone line that at the same time allows you to make phone calls. The Lynx L-510 can be connected to any computer/notebook with a USB Port or 10/100 Base-T Ethernet card for wired connection or an IEEE 802.11b/g Wireless adapter.
Lynx L-510 Quick Guide Lynx L-510 Package For any missing items, please contact your dealer immediately. 1 Quick Guide 1 Modem Lynx L-510 1 POTS Splitter3 1 Telephone 1Cable (RJ-11) 2 In-line Filters3 1 Installation CD 1 Ethernet Cable (Cat 5 UTP Straight Ethernet Network Cable) 1 Pre-installation requirements Guide 1 USB Cable 1 Power Adapter (DC 9V)2 1 The telephone extension cable used for this Lynx L-510 is a UL Listed Communication Circuit Accessory, minimum 26AWG.
Lynx L-510 Quick Guide Lynx L-510 Overview Front Indicators 1 2 3 4 5 6 1 POWER Lights up when power is supplied to the ADSL Router. 2 ETHERNET (E1 ~ E4) Lights up when the Ethernet cable is properly connected from your ADSL Router to the Ethernet Card. It flickers when the ADSL is transmitting/receiving data. 3 WIRELESS Flickers when the Wireless LAN is operational. 4 USB Lights up when the USB cable is properly connected from your ADSL Router to the USB slot.
Lynx L-510 Quick Guide Back Panel 2 1 4 3 5 6 7 1 DSL Connect the telephone jack (RJ-11) to your Telephone Wall Socket (DSL line). 2 USB Connect the USB jack to your PC’s USB slot. 3 RESET To reset your ADSL Router to factory default settings (all customized settings that you have saved will be lost!). To reset the ADSL Router, simply press the reset button for about 10 seconds.
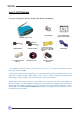
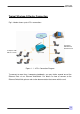
Lynx L-510 Quick Guide Typical Wireless-G Router Connection Fig 1-4 below shows up to 4 PCs connections. Computers with Ethernet Network Cards Computers with Wireless Cards Lynx L-510 Figure 1- 1 : 4 PCs Connection Diagram To connect to more than 4 computers/notebooks, you may further expand one of the Ethernet Ports via an Ethernet Hub/Switch. For details on how to connect to the Ethernet Switch/Hub, please refer to the documentation that comes with the unit.
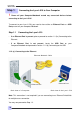
Lynx L-510 Quick Guide Step 1: Connecting the Lynx L-510 to Your Computer ! Power off your Computer/Notebook or/and any connected devices before connecting to the Lynx L-510! To connect to your Lynx L-510, you need to have either an Ethernet Port or a USB Port present on your computer/Notebook. Step 1.1 Connecting the Lynx L-510 • If an Ethernet Port is present, please proceed to section 1.1.2(a) Connecting to the Ethernet.
Lynx L-510 Quick Guide 1.1.2 (b) Connecting to the USB USB Cable USB Port USB Port Back view of a Computer Back view of the Lynx L-510 You may now proceed to Step 1.2. Step 1.2 Connecting to the ADSL Line To connect the Lynx L-510 to the ADSL line, carriy out Step 1.2(a). To connect the Lynx L-510 to the ADSL line and a Telephone Set, carry out Step 1.2(b).
Lynx L-510 Quick Guide 1.2.1 (a) To connect to the ADSL line Telephone Cable ADSL Port Telephone Outlet Back view of the Lynx L-510 1.2.1 (b) To connect to the ADSL line and Telephone Set You must install the POTS Splitter if you need to have a phone near the modem. The POTS Splitter (with built-in Microfilter) is a device that allows you to connect both your Telephone cable and Telephone Set to the same Telephone Wall Socket.
Lynx L-510 Quick Guide Telephone Outlet Splitter ADSL Port Phone Step 1.3 Back view of the Lynx L-510 Connecting to the Power Outlet Connect your Lynx L-510 to the Power Outlet via the Power adapter (that comes with your Lynx L-510 package).
Lynx L-510 Quick Guide Step 1.4 Powering On Power on the Power Outlet that is connected to your Lynx L-510. Power on your Computer(s)/Notebook(s). Please insert your Lynx L-510 installation CD. Please proceed to Step 2.
Lynx L-510 Quick Guide Configuring Your Ethernet Network Card/ Installing your USB Device Step 2: ! If your computer/notebook is connected to the Ethernet Port of the Lynx L-510, proceed with section 2.1. ! If your computer/notebook is connected to the USB Port of the Lynx L-510, proceed with section 2.2. ! If your computer/notebooks are connected to both the Ethernet Port and USB Port of your Lynx L-510, please proceed with both sections 2.1 and 2.2. Step 2.
Lynx L-510 Quick Guide Ensure that your Lynx L-510 is powered on. Restart your system. Proceed to Step 3. 2.1.2 For Windows® 2000 / Windows® XP Windows® 2000: i a) From your Windows desktop, right-click on the icon My Network Places and select Properties. b) At the Network and Dial-up Connections window, right-click on the Local Area Connection icon and select Properties.
Lynx L-510 Quick Guide Ensure that your Lynx L-510 is powered on. Restart your system. Proceed to Step 3. Step 2.2: Installing the USB Device Driver 1. Proceed with this section ONLY if your computer/notebook is connected to the USB Port of your ADSL Router! 2. The following screen shots illustrated serve only as examples. For any dissimilarity, please follow closely the instructions prompted on your Computer/Notebook. 3. For Windows®98 Second Edition users, you may be prompted for your Windows CD-ROM.
Lynx L-510 Quick Guide v. Read carefully the License Agreement. If you agree, select the option I Agree and click Next. vi. The following screen will appear. Please make sure that the modem is not connected to the computer. Click Next.
Lynx L-510 Quick Guide vii. Select the Installation Folder and click Next. viii. Click Next to proceed installation with indicated driver.
Lynx L-510 Quick Guide ix. Click Next to complete the USB Driver installation Depending on your system configurations, you may be prompted for your windows CD-ROM during installation. At the prompt, replace the Installation CD in your CD-ROM Drive with your Windows CD-ROM and click OK. At the Copying Files dialog box, enter the path of your Windows CD-ROM and click OK.
Lynx L-510 Quick Guide Step 3: Configuring Your Internet Browser Step 3.1: Microsoft® Internet Explorer™ (based on IE 5.5) i From your Windows desktop, double-click on your Internet Explorer icon launch your Browser. to ii From the Menu, click Tools and select Internet Options. iii Select the Connection tab. Click the field, 'Never dial a connection'. (This option will be grayed off if you have not installed an analog modem on your computer/notebook before. Proceed with 3.1 IV).
Lynx L-510 Quick Guide Modify the Settings of your Modem If you are instructed to modify the settings of your modem: i. Follow the instructions of your Operating System to set the IP address of your computer to 192.168.1.10, Netmask 255.255.255.0. ii. From your Internet Browser, key in http://192.168.1.1 at the address bar and hit . iii. You will be prompted for the Username and Password to login to the Web Management. Enter admin for the username and admin for the password (factory defaults).
Lynx L-510 Quick Guide Maintenance This section provides instructions on preventive maintenance necessary to ensure that the system and equipment are maintained at its optimum operating condition. Preventive Maintenance Preventive maintenance (PM) or Scheduled Maintenance is the systematic care, servicing and inspection of equipment to prevent failures, reduce downtime and maintain it in an optimum operational condition.
Lynx L-510 Quick Guide 3. Place equipment/accessories in a dry and clean area. DO NOT expose equipment to direct sunlight and moisture. 4. Report any signs of faulty cables to the higher maintenance authority for follow- up. Table 1-1 : PM Tasks and Schedule FREQUENCY PROCEDURE Monthly a. b. c. d. e. f.
© 2005 Starbridge Networks LLC. All rights reserved. www.starbridgenetworks.