3Com HomeConnect ® ADSL Modem PCI Quick Start Installation Guide Product # 3CP3617B Part # 10031805 Microsoft Windows 95/98/Me/2000 and NT 4.
Com HomeConnect ® ™ ADSL Modem PCI Quick Start Installation Guide Microsoft Windows 95/98/Me/2000 and NT 4.0 Internal Product # 3CP3617B http://www.3com.
3Com Corporation, 5400 Bayfront Plaza, Santa Clara, California, 950528145 Copyright © 2000, 3Com Corporation. All rights reserved. No part of this documentation may be reproduced in any form or by any means or used to make any derivative work (such as translation, transformation, or adaptation) without written permission from 3Com Corporation.
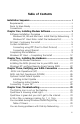
Table of Contents Installation Sequence ................................................................... i Requirements ............................................................................. ii Items to Have Ready .................................................................. ii Conventions ............................................................................... ii Chapter One, Installing Modem Software ................................ 1 Software Installation Procedure .................
Dial-Up Networking missing in Windows 95/98 .................. 31 Dial-Up Networking problems when trying to connect ....... 32 Appendix A, Installing Remote Access Service ...................... A-i Appendix B,Connecting using Dial-Up Networking ............ B-vii Creating a Dial-up Connection .............................................. B-vii Modifying the values of a Dial-up Connection ........................ B-x General Tab .......................................................................
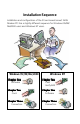
Installation Sequence Installation and configuration of the 3Com HomeConnect ADSL Modem PCI has a slightly different sequence for Windows 95/98/ Me/2000 users and Windows NT users.
Requirements The following list provides the minimum requirements needed for successfully installing and configuring your ADSL Modem. • • • • • Microsoft Windows operating system 95/98/Me or 2000 or NT 4.0. For NT 4.0, you will also need a copy of Service Pack 4 or higher. 32 Megabytes of RAM. Approximately 10 Megabytes of free hard disk space. One free PCI slot. ADSL service. In addition to the above, your DSL provider may require the use of ADSL micro filters.
Chapter One Installing Modem Software Windows 95/98/Me*/2000 users will install the CD-ROM first, following procedures in this chapter. Then, shut off the computer and install the PCI card. Windows NT users should go first to Chapter Two and install the card, then verify Remote Access Service (RAS) and, last, install the 3Com HomeConnect software as shown in this chapter. Chapter Three covers verifying the connection and,optionally, installing Instant Update. Chapter Four covers troubleshooting.
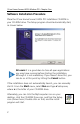
3Com HomeConnect ADSL Modem PCI: Chapter One Software Installation Procedure Place the 3Com HomeConnect ADSL PCI Installation CD-ROM in your CD-ROM drive. The Setup program should automatically start, as shown below. All users: It is a good idea to close all open applications you may have running before starting the installation, although it is not mandatory. If you haven’t done this, you can do so at this point by hitting the Cancel button.
Install Guide: Installing the Software Windows 95, 98 and Me Users: Install Dial-Up Networking In Windows 95, 98 and Me, if the Dial-Up Networking function hasn’t already been installed on your computer, you will be prompted to install it. The prompts will look a little different in different operating systems. In Windows 95, the first screen will ask if you want to install Dial-Up Networking.
3Com HomeConnect ADSL Modem PCI: Chapter One In the Communications screen (following), check the Dial-Up Networking box by clicking the little square to the left of the Dial-Up Networking icon. Then click OK. Windows may require you to reboot in order to establish the correct entries in the Windows registry. If you reboot and the program doesn’t resume automatically, just reinsert your CD-ROM and the install procedure will recommence and you will find the Dial-Up Networking capability has been installed.
Install Guide: Installing the Software Windows NT Users Note: install the hardware first When you click Next from the Welcome screen, NT users will see a slightly different sequence of screens from those viewed by Windows 95/98/Me or 2000 users. If you are using Windows NT as your operating system, you should have first installed the PCI Card in your computer, so, when you hit the Next button on the Welcome screen, you will be given a chance to exit the program in case you haven’t installed the card.
3Com HomeConnect ADSL Modem PCI: Chapter One Select your Internet Service Provider (ISP) from the list shown and proceed to Completing the Installation. Alternately, if your ISP is not listed or if instructed by your ISP, select Custom and proceed as directed in the next section: Custom Installation. Many of the listed ISPs will require no further action on your part (because the information that the install program needs has been supplied by the ISP and is in the software.
Install Guide: Installing the Software There are two choices in the category PPP (Point to Point Protocol) and two choices under Ethernet. Which you choose is determined by how your service provider will route your information. If you should make the wrong choice here, your modem will not be set up correctly. If you’re not sure which choice you need to make, it is advisable to exit the setup program and get the information from your ISP.
3Com HomeConnect ADSL Modem PCI: Chapter One The VPI (Virtual Path Identifier) and VCI (Virtual Circuit Identifier) shown on the screen are preset and shouldn’t be changed without checking with your service provider. You can name a second connection with the same VPI as your primary provider at this point. When you accept the information and click the Next button, the install program will prepare to copy files. Continue with the Completing the Installation section.
Install Guide: Installing the Software Completing the Installation The 3Com HomeConnect ADSL Modem PCI has been set up for ease of installation, but there are some choices that we preferred to let you make. Before copying files, you can choose whether you want to accept the default directory or change it. Click either Browse (to identify the directory you would prefer to copy files to) or Next to proceed. The install program will then check whether you would like to change the default program folder.
3Com HomeConnect ADSL Modem PCI: Chapter One Select Next to start copying the files from the CD-ROM to your computer. You will get a last chance to review your selections. Click Next to start copying files. Windows 95/98/Me users will see the following screen. Follow the instructionson the screen, turn off the computer and install the PCI card following the instructions in Chapter Two.
Install Guide: Installing the Software Windows 2000 users will see Windows “Digital Signature” procedure as follows: Microsoft identifies applications that haven’t applied for a Microsoft Digital Signature in order to protect you from programs that haven’t been adequately tested. The 3Com Modem has been adequately tested on all current Microsoft operating systems but we are still in the process of submitting for a digital signature.
3Com HomeConnect ADSL Modem PCI: Chapter One Windows 95/98/Me/2000 users are now finished with the software installation. You should now shut down your computer and insert the PCI card in an available PCI slot as covered in Chapter Two. Windows NT Users —Completing the Install Most NT users will not see the following screen, which will appear only if the PCI card has previously not only been inserted in the computer but also configured with its driver software.
Install Guide: Installing the Software Select Finish, and you will see the Windows NT Network applet as shown. The Adapter Tab should be shown. Unless the 3Com ADSL Modem PCI has been previously installed on your PC, you will not see a driver for it in this window. Select Add, and in the following window, select Have Disk.
3Com HomeConnect ADSL Modem PCI: Chapter One The Insert Disk screen will appear. You will type the information telling the computer where to find the correct driver, as shown. The letter D shown represents the letter of the drive where you have your install CD-ROM running. Then click OK. In the Select OEM Option window, you should see the 3Com ADSL PCI Modem LAN/RFC1483 or 3Com ADSL PCI Modem Dialup/PPP, depending on your access mode. Confirm by clicking OK.
Install Guide: Installing the Software If the PCI card has not been installed in your machine, Windows will warn you with the message shown here. If you get this message, exit and shut off your computer and install the PCI card. The Network Properties window will now be open. Click on the Services Tab and highlight Remote Access Service. (If you don’t see Remote Access Service as a choice in the Network Services window, go to Appendix A and complete the installation.
3Com HomeConnect ADSL Modem PCI: Chapter One In the Remote Access Setup window, click Add. The screen should list the ISDN1-USRPCIAWR device as shown on the following page. If not, select this device from the pull down menu. Click OK.
Install Guide: Installing the Software The new device is now listed in the Remote Access Setup window. Click Continue. Now click Close in the Network Properties window. Windows NT will now advise you to reboot. After the PC reboots, be sure to reinstall your Windows NT service pack. Windows NT users should go next to Chapter Three and confirm your ADSL Connection.
Chapter Two Installing the Hardware Windows 95/98/Me/2000 users will install the software and then the hardware (the PCI card). Windows NT users will install the hardware and then verify they have Remote Access Service (RAS) before putting the installation CD-ROM in the drive and running the Setup program. Instructions which pertain only to NT 4.
3Com HomeConnect ADSL Modem PCI: Chapter Two Removing the Cover from your PC Warning: Be sure to ground yourself by touching the metal case of the computer when installing the modem hardware. Electrostatic discharge can damage your computer or the 3Com ADSL Modem PCI. Locate a vacant PCI slot on one of the system boards. An example of a PCI slot is shown below. Your computer’s manual will also contain examples if you need assistance locating a PCI slot on your machine.
Install Guide: Installing the Hardware Using a screwdriver, remove the metal bracket on the rear of the computer corresponding to the vacant PCI slot you just identified. To loosen the screw, turn it counter-clockwise. Once the screw has been removed you should be able to lift the bracket out by pulling up on it (see following photo). This will expose a long narrow rectangular opening in the back of your computer perpendicular to the vacant slot.
3Com HomeConnect ADSL Modem PCI: Chapter Two Replace the cover of your computer and plug the computer back in. Insert one end of the ADSL cable into the jack on the PCI card in your computer. The other end of the cable should be inserted into the wall telephone jack which is enabling your ADSL service. Connecting your Telephone Cable to the Modem Turn your computer on.
Install Guide: Installing the Hardware A Typical Installation Computer to Power 2-for-1 Adapter Phone Jack Microfilter Modem PCI Card Phone or other Analog Device Note: Windows 2000 users may see the Windows Digital Signature screen on restarting the computer. If so, Click Yes to continue. Proceed to Chapter Three.
3Com HomeConnect ADSL Modem PCI: Chapter Two On your Windows NT desktop, click Start > Settings > Control Panel to open the Control Panel. When your Control Panel is displayed, double-click on the icon labeled Network and select the Services tab as shown in the following example. If Remote Access Service is listed under the Services tab, then it is already installed on your computer and you can continue with the software installation.
Chapter Three Verifying your ADSL Connection The ADSL Quick View application starts automatically when you enter Windows. An icon appears in the System Tray at the bottom right side of your screen. Quick View shows you, at a glance, whether or not you have a good physical connection with the ADSL line. A GREEN light in Quick View means your connection is operational. A RED light indicates that you have not connected yet. A YELLOW light means you are in the process of connecting.
3Com HomeConnect ADSL Modem PCI: Chapter Three This light must be green for you to make a connection to your Service Provider. To fully display Quick View, point your mouse to the Quick View icon in the System Tray and double-click your left mouse button. This displays Quick View as a full screen Window. ADSL Link Not Operational (DOWN) When you do not have a good physical connection with your ASDL line, Quick View will display a red light as shown.
Install Guide: Verifying your ADSL Connection When you have installed the files, the instant update tray icon will show up when you next reboot your computer. Configuring Instant Update You will need to complete one last step to ensure your Instant Update is running correctly. From the Start menu, select Start > Programs > Instant Update > Instant Update Configuration You will see the Instant Update Configuration window with four tabs available. You only need to be concerned with the Connection tab.
3Com HomeConnect ADSL Modem PCI: Chapter Three check the Internet for an update, you can go to the Scheduling tab and click Update Now.... For more information on Instant Update, consult the Online User’s Guide by clicking Start > Programs > 3Com ADSL Modem PCI > Online Help. Connecting to your ISP If you installed as Ethernet, The 3Com ADSL Modem PCI automatically connects to your ADSL service provider and to your network provider every time the computer is started. You are “always on.
Chapter Four Troubleshooting In the best of all possible worlds, you won’t need this chapter. We have included some of the situations you could possibly encounter while you are installing your 3Com ADSL Modem PCI.
3Com HomeConnect ADSL Modem PCI: Chapter Four QuickView Is showing a Red Light Check the following: • Are you plugged in? • check with your provider for possible access problems. QuickView is green but you can’t get to the internet. There may be a line problem. Contact your service provider. In 95 or Me, a message is asking for 1_4_1.bin. Just type the location of your Windows systems files (eg [drive]:\windows\system) and accept it. This will find the needed information.
Install Guide: Troubleshooting need to simply reinsert your installation CD-ROM and reinitiate the install process from the beginning. You are having problems with Dial-Up Networking Dial-Up Networking missing in Windows 95/98 If you are installing to Windows 95 or 98, and you have put the PCI card in the card slot before installing your software from the CDROM, you will get an error message on attempting to run the CD.
3Com HomeConnect ADSL Modem PCI: Chapter Four Continue the installation. You will need to have your Windows 95 or 98 install CD-ROM available when requested so that the necessary files can be copied to your system. Dial-Up Networking problems when trying to connect You may encounter some errors when attempting to connect using Dial-Up Networking. Most of the error messages you will see are selfexplanatory. Here are some of the messages you could receive.
Install Guide: Troubleshooting Contents of the phone number field are wrong. Check this. The phone number field should contain the number 35 (or other number specified by your service provider) only. • Error 691: • The Username and/or Password you entered is not correct for the connection you are dialing to. Windows NT Error 692: • Your physical connection to the ADSL line is down. This can be verified by using the Quick View application.
Appendix A Installing Remote Access Service 1. To install RAS, which is required in NT if you have a PPPoA setup, first right click on Network Neighborhood and go to Properties. Click on the Services tab and click the Add button. 2. Select Remote Access Service and click OK.
3Com HomeConnect ADSL Modem PCI: Appendix A 3. Next you will be required to insert your Windows NT CD-ROM and type the path to the necessary files such as [Drive]:\I386 (That’s i386 but with a capital “i”.) Note: Windows may come up with a screen telling you “there are no RAS capable devices to add. Do you want RAS setup to invoke the Modem installer to enable you to add a modem?” Answer No. 4. Next it will ask you to install a RAS Device.
Appendix A: Installing RAS for PPPoA 5. Check the box as shown below and click Next. 6. Next, choose any modem you want. This is going to be the "dummy" modem to ensure RAS installs correctly. You might arbitrarily choose the Standard 300 bps Modem. Choose it and click Next.
3Com HomeConnect ADSL Modem PCI: Appendix A 7. After you select the modem, choose a port to install it to. Again, this is random. Select the COM1 port and click Next. 8. You should receive this window saying the modem installed correctly. Click Finish.
Appendix A: Installing RAS for PPPoA 9. The newly installed “dummy” modem should appear in the window now. Click OK. 10. This shows the Remote Access Setup. Yours should be similar to this one, varying only by the modem you selected. Click Continue.
3Com HomeConnect ADSL Modem PCI: Appendix A 11. Now the Services tab in the Windows Network applet should show Remote Access Service installed. Click Close. After RAS is installed, you will need to re-start your computer. Once you have re-started your computer, re-apply your Service Pack 4 and again re-start your computer. This is necessary to ensure that Windows gets all the information stored correctly in its registries. Windows NT users are now ready to install the CDROM as described in Chapter One.
Appendix B Connecting using Dial-Up Networking When your modem was installed, the proper software for the operation of your modem with your service provider should have been set up. If you experienced difficulty and don’t see the dial-up icon on your desktop, you may have to complete the following procedure. Creating a Dial-up Connection The screens you see may vary slightly from those shown here, depending on your operating system, but you should be able to follow this procedure successfully.
3Com Home Connect ADSL Modem PCI: Appendix B If no dial-up networking icon appears, you may not have this feature installed. (Refer back to the discussion on installing Dial-Up Networking in Chapter One.) The procedure for installing Dial-Up Networking differs slightly in the different operating systems, but in general, you want to open the Windows Add/Remove Programs Applet found in the Control Panel. Proceed from there using the instructions in Chapter One.
Appendix B: Connecting using Dial-Up Networking Select the 3Com PCIA DSL Line (there may be several numbered choices) from the drop down list: Select a device. Press the Next button, which displays the following screen. In the Telephone number field, enter the VCI value given to you by your service provider. This may be the number “35”, as shown. Since you are establishing an ADSL connection, you will not use a standard telephone number.
3Com Home Connect ADSL Modem PCI: Appendix B Click Finish and the computer completes the process, creating a dial-up icon in the Dial-Up Networking window. (You can move this icon to the Desktop if you wish by holding down the right mouse button and dragging from the window to the desktop). Modifying the values of a Dial-up Connection To modify the options that your Dial-up Connection is using, open the connection by selecting its Properties.
Appendix B: Connecting using Dial-Up Networking Gener al Tab General The General properties screen allows you to choose or change the modem you are using for the connection and/or to change the phone number. Telephone number This field should be set to the VCI for your connection. For many service providers, this will be 35. Use area code and Dialing Properties This check box should NOT be checked. If it is, it may modify the Telephone number field and change your VCI settings.
3Com Home Connect ADSL Modem PCI: Appendix B Ser ervver Types Tab The Server Types properties screen is used to set various options related to your connection and to define the protocols for the computer you are dialing. Advanced Options You may or may not want to check the boxes Log on to Network and Enable software compression. Check with your service provider if unsure.
Technical Support 3Com provides easy access to technical support information through a variety of services. This section describes those services. Technical Support Hotline Technical Support representatives can answer technical questions about the 3Com ADSL Modem products. This hotline is not a tollfree call. Regular long distance or local toll charges will apply if you are outside the 847 area code.
3Com HomeConnect ADSL Modem PCI: Appendix C If you need to return the Modem to Us Contact 3Com Customer Support. If the support representative determines that you need to return the modem, you will receive an USO (User Service Order) number. You must have an USO number before returning the modem to us. Ship the unit, postage paid, in a strong box made of corrugated cardboard with plenty of packing material. DO NOT send the modem back in the original box. Send ONLY the modem (NOT manuals, diskettes, etc.
Appendix C: Technical Support and Information Manufacturer's Declaration of Conformity 3Com Corporation 3800 Golf Road Rolling Meadows, IL 60008 USA (847)262-5000 declares that the 3Com HomeConnect ADSL Modem PCI conforms to the FCC's specifications: Part 15, Subpart B, Class B Operation is subject to the following two conditions: (1) this device may not cause harmful electromagnetic interference, and (2) this device must accept any interference received including interference that may cause undesired oper
3Com HomeConnect ADSL Modem PCI: Appendix C FCC Part 68 Statement 3Com Corporation Model: 3Com HomeConnect ADSL Modem PCI There are no current FCC, Part 68, rules governing DSL modems however, care should be taken in connecting to a DSL network. A FCC compliant, 26 AWG, telephone cord with a modular plug is provided with this equipment. This device connects to the telephone network via a RJ -11 plug and jack. The plug and jack also comply with FCC part 68 rules.
Appendix C: Technical Support and Information Canadian Notice: This digital apparatus does not exceed the Class B limits for radio noise emissions from digital apparatus set out in the interference-causing equipment standard entitled Digital Apparatus, ICES-003 of Industry Canada.
3Com HomeConnect ADSL Modem PCI: Appendix C Translation: This is a Class B product based on the standard of the Voluntary Control Council for Interference from Information Technology Equipment (VCCI). If this is used near a radio or television receiver in a domestic environment, it may cause radio interference. Install and use the equipment according to the instruction manual.
Appendix C: Technical Support and Information 3Com Corporation Limited Warranty This warranty applies to customers located in the United States, Australia, Canada (except Quebec), Ireland, New Zealand, U.K.
3Com HomeConnect ADSL Modem PCI: Appendix C YEAR 2000 WARRANTY: In addition to the Hardware Warranty and Software Warranty stated above, 3Com warrants that each product sold or licensed to Customer on and after January 1, 1998 that is date sensitive will continue performing properly with regard to such date data on and after January 1, 2000, provided that all other products used by Customer in connection or combination with the 3Com product, including hardware, software, and firmware, accurately exchange da
Appendix C: Technical Support and Information 3COM SHALL NOT BE LIABLE UNDER THIS WARRANTY IF ITS TESTING AND EXAMINATION DISCLOSE THAT THE ALLEGED DEFECT OR MALFUNCTION IN THE PRODUCT DOES NOT EXIST OR WAS CAUSED BY CUSTOMER'S OR ANY THIRD PERSON'S MISUSE, NEGLECT, IMPROPER INSTALLATION OR TESTING, UNAUTHORIZED ATTEMPTS TO OPEN, REPAIR OR MODIFY THE PRODUCT, OR ANY OTHER CAUSE BEYOND THE RANGE OF THE INTENDED USE, OR BY ACCIDENT, FIRE, LIGHTNING, POWER CUTS OR OUTAGES, OTHER HAZARDS, OR ACTS OF GOD.
3Com Corporation 5400 Bayfront Plaza P.O.