
User manual
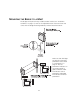
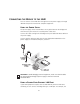
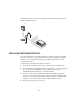

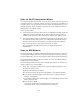
Table Of Contents
- Introduction
- Installing the Outdoor Bridge
- Configuring the Building-to-Building Bridge
- Using the 3Com Wireless Device Manager
- Saving Configuration Changes
- Changing System Properties
- Setting IP Network Properties
- Setting up Protocol and Port Filtering
- Setting Wireless Network Properties
- Setting Advanced Performance Properties
- Setting up an Ad Hoc Network
- Optimizing an Ad Hoc Installation
- Setting up an Access Point Infrastructure Network
- Changing Security Settings
- Resetting the Bridge
- Restoring a Bridge to Factory Defaults
- Upgrading the System
- Changing the Administration Password
- Backing up a Configuration
- Restoring a Configuration
- Viewing the Client List
- Viewing Connection Status
- Viewing the System Summary
- Interoperating with Third-Party Equipment
- Troubleshooting
- Technical Support
- Regulatory Compliance Information
- Index

15
CONNECTING THE BRIDGE TO THE LAN
You can connect to the LAN either through the 3Com power supply or through
IEEE 802.3af power-over-Ethernet compliant equipment.
USING THE POWER SUPPLY
The power supply can be located indoors at any point between the bridge and
the LAN access port where an accessible power outlet exists.
Connect the cable coming from the bridge to the port labeled To Access Point on
the power supply.
Connect another Ethernet cable from the port labeled To Hub/Switch on the
power supply to an Ethernet LAN port, as shown.
USING A POWER-OVER-ETHERNET LAN PORT
If your LAN equipment complies with the IEEE 802.3af power-over-Ethernet
standard, you can connect the bridge directly to a LAN port. For example, the
CAUTION: To avoid damaging network equipment, make sure that the cables
are connected from bridge to power supply to LAN as shown and
described above.