
User manual
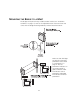
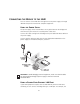
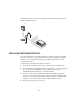

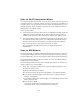
Table Of Contents
- Introduction
- Installing the Outdoor Bridge
- Configuring the Building-to-Building Bridge
- Using the 3Com Wireless Device Manager
- Saving Configuration Changes
- Changing System Properties
- Setting IP Network Properties
- Setting up Protocol and Port Filtering
- Setting Wireless Network Properties
- Setting Advanced Performance Properties
- Setting up an Ad Hoc Network
- Optimizing an Ad Hoc Installation
- Setting up an Access Point Infrastructure Network
- Changing Security Settings
- Resetting the Bridge
- Restoring a Bridge to Factory Defaults
- Upgrading the System
- Changing the Administration Password
- Backing up a Configuration
- Restoring a Configuration
- Viewing the Client List
- Viewing Connection Status
- Viewing the System Summary
- Interoperating with Third-Party Equipment
- Troubleshooting
- Technical Support
- Regulatory Compliance Information
- Index
16
illustration shows the connection through a 3Com Ethernet Power Supply to a
3Com SuperStack
®
Switch.
INSTALLING SOFTWARE UTILITIES
The 3Com installation CD includes the Wireless Infrastructure Device Manager
tool, which helps you set up and administer the wireless components of your
network. It also contains documentation, including the help files for device
configuration screens.
To install the tool and documentation from the CD:
1 Power up the computer and insert the 3Com CD in the CD-ROM drive.
2 The setup menu should appear when the CD autostarts. If no menu appears,
you can run the startup program from the Windows Start menu:
Start/Run/d:setup.exe (where d: is the CD-ROM drive)
3 From the menu, select Install the Tools and Documentation. This option
installls the 3Com Wireless Infrastructure Device Manager (WIDMAN) Tool,
which you can use to monitor bridges and select devices for administrative
changes. It also installs the User Guide in HTML and PDF formats.
4 Follow the instructions on the screen.