
IP Phone User Manual


166 CHAPTER 6: CONFIGURING TELEPHONE FEATURES FOR A USER
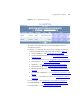
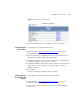
The Call Forward Ring No Answer feature page appears.
3 To enable the feature, ensure a check mark appears in the Enabled box.
To disable the feature, remove the check mark.
4 In the Phone Address field, enter the phone number or extension (for
example: 631002) of the phone that will receive incoming calls when this
phone does not answer a call within the specified Time Out interval.
5 In the Timeout (seconds) field, enter the time (in seconds) you want a
phone to ring before being forwarded.
6 Click Update.
The feature settings are applied to that user’s phone.
Configuring Call
Forward Universal
To configure the Call Forward Universal feature:
1 Follow the steps in Configuring ToS Phone Features
to access the
Assigned Phone Features page for a user.
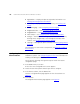
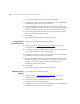
2 In the Action column, click Edit Feature in the Call Forward Universal row.
The Call Forward Universal feature page appears.
3 To enable the feature, ensure a check mark appears in the Enabled box.
To disable the feature, remove the check mark.
4 In the Phone Address field, enter the phone number or extension of the
phone that will receive all incoming calls for this phone, for example:
631002. In this case, the phone does not ring and all calls are
immediately redirected to 631002.
5 Click Update.
The feature settings are applied to that user’s phone.
Configuring Caller
Identity
To configure the Caller Identity feature:
1 Follow the steps in Configuring ToS Phone Features
to access the
Assigned Phone Features page for a user.
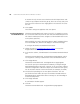
2 In the Action column, click Edit Feature in the Caller Identity row.
The Caller Identity feature page appears.
3 To enable the feature, ensure a check mark appears in the Blocked box.
To disable the feature, remove the check mark.