P H A S E R® 8 6 0 COLOR PRINTER Networking Setup Guide
Phaser® 860 Color Printer Networking Setup Guide June 2001
Copyright © Xerox Corporation 2000. All rights reserved. Unpublished rights reserved under the copyright laws of the United States. Contents of this publication may not be reproduced in any form without permission of Xerox Corporation. XEROX®, The Document Company® and the stylized X are trademarks of XEROX CORPORATION. Product and service names profiled herein are trademarks of Xerox Corporation.
Contents Network Printing with Xerox Color Printers . . . . . . . . . . . . . . . . . . . . . . . . . . . . 1 Configuration Page . . . . . . . . . . . . . . . . . . . . . . . . . . . . . . . . . . . . . . . . . . . . . . . . . . . . . . . . . . . . . 2 Networking Software . . . . . . . . . . . . . . . . . . . . . . . . . . . . . . . . . . . . . . . . . . . . . . . . . . . . . . . . . . . . 2 Connecting Your Printer to a Network . . . . . . . . . . . . . . . . . . . . . . . . . . . . . . . .
EtherTalk Configuration . . . . . . . . . . . . . . . . . . . . . . . . . . . . . . . . . . . . . . . . . . . 18 Setting Up the Macintosh Ethernet Port for EtherTalk. . . . . . . . . . . . . . . . . . . . . . . . . . . . . . . . .18 Setting Up the Printer for EtherTalk. . . . . . . . . . . . . . . . . . . . . . . . . . . . . . . . . . . . . . . . . . . . . . . .18 Finding the Printer’s Name in the Chooser . . . . . . . . . . . . . . . . . . . . . . . . . . . . . . . . . . . . . . . . .
Network Printing with Xerox Color Printers Network Printing with Xerox Color Printers This guide provides information to help you quickly install your printer in the following environments: ■ Windows 95, Windows 98 and Windows ME ■ Windows NT 4.x and Windows 2000 ■ Novell NetWare ■ EtherTalk For information on installing the printer in UNIX environments, see the CentreWare Services for UNIX Systems Quick Install Guide.
Network Printing with Xerox Color Printers Configuration Page The information supplied on the Configuration Page is helpful when you are installing and configuring the printer on a network. There are two ways to print the Configuration Page: Printing a Configuration Page From the Front Panel Use this method if your printer is not yet configured on the network. 1. With Menus highlighted, press the OK key. 2. Scroll to Printer Setup Menu by pressing the Scroll Up or Scroll Down key. 3.
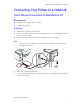
Connecting Your Printer to a Network Connecting Your Printer to a Network Direct Ethernet Connection to Macintosh or PC Requirements ■ Two RJ-45, twisted-pair, 10Base-T cables ■ An Ethernet-port hub Procedure 1. Turn off your computer and the printer. 2. Connect one end of an Ethernet cable to the Ethernet port on your computer. Connect the other end to the hub. 3. Connect the other cable to the hub and the Ethernet port on the printer. Note The printer is not a SCSI device.
Connecting Your Printer to a Network Ethernet Interface ■ Conforms to IEEE 802.3 and Ethernet II standards. ■ Twisted pair (10BaseT or 100BaseTx) connection. ■ Thick coax (10Base5) and thin coax (10Base2) connections require adapters; contact your dealer to obtain adapters, cables, and terminators. Caution To avoid damaging the Ethernet interface, turn off the printer before making any Ethernet connections. Ethernet Connections and Indicators 1 RCV XMT 2 3 Ethernet 0180-01A 1.
Installing Printer Drivers Installing Printer Drivers Running the Installer From the Printer’s Hard Disk If a hard drive is installed on the printer, you can run the installer from it. This method requires that you already have a TCP/IP connection to the printer. 1. Connect to your printer via CentreWare IS (see page 23). 2. On the printer’s main page, click Install Printer Drivers.
Novell NetWare Novell NetWare Configuration Software for NetWare Networks The Configuration Page reports information that you need for NetWare configuration. For information on printing a Configuration Page, see page 2. On the Configuration Page, all zeros in one or more of the IPX Networks fields indicates that the printer does not recognize the network connection; this probably indicates a faulty cable connection, an incorrect frame type, or Reply to Get Nearest Server has not been set to On.
TCP/IP Configuration TCP/IP Configuration The Configuration Page reports important information that you will need for TCP/IP configuration. For information on printing a Configuration Page, see page 2. Host (Computer) Configuration Choose the procedure appropriate for your environment: ■ For installation on workstations when print jobs are to be sent through a print server, see Installation on Workstations for Client-server Printing on page 9.
TCP/IP Configuration Windows 95/98/ME: PhaserPort Software TCP/IP Configuration If you don't already have a TCP/IP address configured for your PC, contact your system administrator to ensure that the configuration is made according to your company guidelines. If there is no TCP/IP network already in place, configure your PC with a unique address such as 192.1.1.1. To check the IP address for your PC, follow these steps: 1. From the Start menu, click Run. 2. Type: winipcfg.
TCP/IP Configuration Windows NT These procedures are valid for Windows NT 4.x. For information about driver installation for later versions of Windows NT, visit the Xerox web site: www.xerox.com/officeprinting/ The following procedures describe how to use the Xerox installer for Windows to set up the printer in Windows NT 4.x environments.
TCP/IP Configuration UNIX ■ For TCP/IP Unix Host configuration, see the CentreWare Services for Unix Systems Quick Install Guide. OS/2 Warp and LAN Servers ■ 10 For TCP/IP configuration for OS/2 Warp and LAN Server, refer to the web at: www.xerox.com/officeprinting/infoSMART.
TCP/IP Configuration Macintosh Setting Up the Macintosh Ethernet Port for TCP/IP If your Macintosh is not already set up for TCP/IP, perform the following procedure: 1. From the Apple menu, select Control Panels. Select TCP/IP. 2. From the Connect via menu, select Ethernet. 3. Specify how the Macintosh will obtain its IP address: Manually or by DHCP. 4. If you select Manually, specify the IP address in the dialog box. 5. Close the dialog box. Creating an LPR Printer With LaserWriter 8.5.
TCP/IP Configuration PhaserPort for MacOS System Requirements ■ Macintosh PowerPC. ■ Apple's LaserWriter version 8.6 or later, with Desktop Printing enabled. ■ OpenTransport version 1.1 or later networking. TCP/IP networking provided by MacTCP software is not supported. The Macintosh must be properly configured to communicate with the printer (see page 11).
Setting the Printer’s IP Address Setting the Printer’s IP Address Automatic IP Addressing The Xerox Installer for Windows sets the printer’s IP address under the following conditions: ■ The printer has a network connection. ■ TCP/IP is installed on the computer. ■ The IP address has not already been assigned (for example, from the front panel or by DHCP). During the installation process, you can accept the automatically assigned address or assign a different one.
Setting the Printer’s IP Address Other Methods for Setting the Printer’s IP Address You can set the printer’s IP address by any of the following methods: ■ Front panel — See page 15. ■ DHCP — See page 16. ■ Downloaded configuration file — see www.xerox.com/officeprinting/infoSMART. Can be used on hosts that do not have BOOTP, or DHCP. For UNIX, use a Xerox-provided shell script to prepare a configuration file.
Setting the Printer’s IP Address Setting the IP Address From the Front Panel 1. With Menus highlighted, press the OK key. 2. Press the Scroll Down key to scroll to the Network Setup Menu. 3. Press the OK key. 4. Scroll to TCP/IP Address. 5. Press the OK key. 6. Press the Scroll Down or Scroll Up key to scroll to the correct number for the first digit of the address, then press the OK key to accept that digit. 7. Repeat step 5 for each remaining digit. 8. Scroll to TCP/IP Network Mask. 9.
Setting the Printer’s IP Address Dynamic Host Configuration Protocol Dynamic Host Configuration Protocol (DHCP) is a system in which UNIX and Windows NT servers can dynamically allocate IP addresses. The printer is a DHCP client; when the printer is reset, it receives an IP address from the DHCP server. Enabling DHCP on the Printer Make sure that the printer’s DHCP protocol is enabled. You can do this from the front panel; see page 32.
Setting the Printer’s IP Address Domain Name Service (DNS) The printer supports DNS through an embedded DNS stub resolver. The DNS resolver protocol communicates with one or more DNS servers to request the IP address for a given host name or the host name for a given IP address. To use an IP host name for the printer, the system administrator must have already configured one or more DNS servers and a local DNS domain name space database.
EtherTalk Configuration EtherTalk Configuration Setting Up the Macintosh Ethernet Port for EtherTalk 1. From the Apple menu, select Control Panels. Select AppleTalk. 2. From the Connect via menu, select Ethernet built-in. Setting Up the Printer for EtherTalk 1. Print the Configuration Page (see page 2). Locate the printer’s default name. 2. Verify that the printer is in the Chooser. See below. 3. When you have located the printer in the Chooser, you may want to change the printer’s name or zone.
EtherTalk Configuration If the printer is not in the Chooser, check that the Configuration Page shows a printer name, a node number, and a zone. 1. If there is no node number, verify that the printer is properly cabled to the network. 2. Test the cable segment by plugging in a new cable segment or using the cable segment of a printer that is in the Chooser. 3. If your network uses zones, and there is no zone name on the Configuration Page, or if the Configuration Page shows the wrong zone, see page 21.
EtherTalk Configuration Changing the Printer’s Name (Optional) The name is displayed on the Startup Page and Configuration Page. The name also appears in the Chooser. The name can be up to 31 characters long. It may contain any printable characters; however, the characters @ : = * are deleted from the name used on AppleTalk. A change is persistent across printer power cycles. Using Apple Printer Utility 1. Locate the Apple Printer Utility, included on your printer’s CD-ROM. 2.
EtherTalk Configuration Changing the Printer’s EtherTalk Zone (Optional) Using PostScript utility files. See the ReadMe files on the printer’s CD-ROM. The Macintosh ReadMe file is in the Network Utilities folder; the PC ReadMe file is in the UTILS directory. Using CentreWare IS 1. Connect to the printer via CentreWare IS (see page 23). 2. From the main CentreWare IS page, click Properties. 3. In the Protocols group on the left side of the screen, click EtherTalk. 4.
Internet Printing Protocol (IPP) Internet Printing Protocol (IPP) Running the Xerox Installer 1. Run the Xerox installer as described under page 5. 2. When the prompted to select how your printer is connected, click Other. 3. Complete the installation by following the on-screen instructions. Obtaining the Printer’s URL (Network Path) 1. Connect to the printer via CentreWare IS (see page 23). 2. From the main CentreWare IS page, click Properties. 3.
CentreWare Internet Services CentreWare Internet Services CentreWare IS is a printer administration and support tool using World Wide Web technology. With CentreWare IS software, you can access printer status and manage your printer over a TCP/IP network using a web browser. CentreWare IS gives you the following capabilities: ■ Receive printer status and manage printers, independent of network servers and operating systems. ■ Define a link to your local web server’s support page.
Printer Management Printer Management Job Accounting The printer stores information about jobs printed in a log file. The log file is stored either in the printer’s memory or on a hard disk, if one is connected to the printer. If the log file is stored in the printer’s memory, it is lost when the printer is reset; therefore, it is recommended that a hard disk be used for job accounting. The log file is a list of job accounting records.
Printer Management Intelligent Ready Intelligent Ready is an automated system that monitors the printer’s usage and warms up the printer when you are most likely to need it. You can turn Intelligent Ready on or off from the printer’s front panel. CentreWare IS provides full control of the printer’s automatic warm-up and standby settings. Enabling and Disabling Intelligent Ready From the Front Panel To turn Intelligent Ready mode on or off, on the front panel: 1. With Menus highlighted, press the OK key.
Printer Management MaiLinX Alerts MaiLinX alerts allows the printer to automatically send e-mail to the system administrator and others under the following conditions: ■ When printer errors, warnings, and alerts occur. ■ When the printer requires attention (for example, when service is required). ■ When a reply to a CentreWare IS Remote Internet Printing message is desired. See the CentreWare Internet Services Setup and User Guide for more information on CentreWare IS Remote Internet printing.
Printer Management Usage Profile Reports The printer can generate reports detailing printer usage. Usage profile reports track over 160 items, including: ■ Unique printer information, such as printer name, date installed, total pages printed, options installed, and network ID. ■ Supplies usage data (for example, ink). By tracking supplies usage, you can order supplies in advance, so your printer will always be well-stocked with supplies.
Printer Management Printing Usage Profile Reports From the Front Panel 1. With Menus highlighted, press the OK key. 2. Scroll to Support Menu by pressing the Scroll Up or Scroll Down key. 3. Press the OK key. 4. Scroll to Usage Profile Menu. 5. Press the OK key. 6. Scroll to Print Usage Profile. 7. Press the OK key. 8. To exit the menu system, scroll to Exit and press the OK key. Using CentreWare IS 1. Connect to the printer via CentreWare IS (see page 23). 2.
Printer Management Sending Reports via E-mail From the Front Panel Note To send Usage Profile reports via e-mail, the printer must be properly set up via CentreWare IS. For more information, see Setting up Usage Profile Reporting on page 27. 1. With Menus highlighted, press the OK key. 2. Scroll to Support Menu by pressing the Scroll Up or Scroll Down key. 3. Press the OK key. 4. Scroll to Usage Profile Menu. 5. Press the OK key. 6. Scroll to Email Full Report or Email Job Report. 7.
Printer Management Xerox Usage Analysis Tool The Xerox Usage Analysis Tool is a Windows client/server application that allows system administrators to automatically track Xerox printer usage and obtain job accounting records. The tool supports large networks, with many users and printers. Job accounting and printer usage data is stored in a database. The application can be run on multiple clients using a single server. The data can be exported to a spreadsheet for viewing, analysis, and billing.
Network Protocols Network Protocols Determining Enabled Protocols All protocols can be enabled and disabled. The Configuration Page displays which protocols are enabled. If a protocol is enabled, the field for that protocol lists the current parameters. If the protocol is disabled, the field for that protocol contains an entry reading Off.
Network Protocols Disabling and Enabling Protocols Using the Front Panel 1. With Menus highlighted, press the OK key. 2. Scroll to Network Setup Menu by pressing the Scroll Up or Scroll Down key. 3. Press the OK key. 4. Scroll to DHCP/BOOTP, TCP/IP, EtherTalk, NetWare, or IPP. 5. Press the OK key. 6. Scroll to display either On or Off. 7. Press the OK key. 8. To exit the menu system, scroll to Exit and press the OK key. Disabling Protocols Using CentreWare IS 1.
Getting Help Getting Help Help From the World Wide Web Xerox Color Printer web site www.xerox.com/officeprinting Documentation www.xerox.com/officeprinting/support Technical support www.xerox.com/officeprinting/860support Color use tips for novices and experts www.colorconnection.xerox.com CentreWare IS http://www.officeprinting.xerox.com/phaserlink infoSMART™ Knowledge Base www.xerox.com/officeprinting/infoSMART Anonymous FTP server ftp://ftp.tekcolor.com/ E-mail update notices www.
Index A F Apple Printer Utility changing printer’s name 20 broadcast address 14 front panel printing a Configuration Page 2 sending Usage Profile reports by e-mail 29 setting Intelligent Ready 25 setting printer’s IP address 15 C G cables 4 CentreWare DP 6 CentreWare IS 23 accessing the printer 23 changing printer’s name 20 job accounting 24 printing a Configuration Page 2 printing Usage Profile reports 28 sending Usage Profile reports via e-mail 29 setting IP address 16 setting up Intelligent Ready
P W PhaserPort for Macintosh 11 for Windows 8 PostScript utility files 1 using to change printer’s EtherTalk zone 21 using to enable and disable protocols 31 using to set printer’s IP address 14 printer name blank on configuration page 18 changing 20 duplicates on a network 20 in the Chooser 18 Windows 95/98/ME 8 Windows NT/2000 9 World Wide Web 23 S Status Notification 26 T TCP/IP configuration 7 Macintosh 11 PC configuration 8 Windows NT 9 technical support 33 terminators Ethernet 4 U UNIX 1 URL Cen