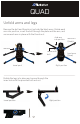
QUAD Unfold arms and legs Remove the bolt and thumb nut outside the black arms. Rotate each arm into position, insert the bolt through the plate and the arm, and secure each arm in place with the thumb nut. slide arm into position rear arms (black) remove secure with bolt travel position flight position Rotate the legs into place and secure through the inner hole with the provided bolt and nut.
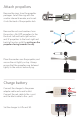
Attach propellers Remove the rings from the propeller packages. Select the ring with the smaller internal diameter, and insert it into the back of the propeller hub. Remove the nuts and washers from the motors. Add SFP propellers to the the front-left and back-right motors and SF propellers to the front-right and back-left motors with the writing on the propellers facing towards the sky. SFP SF SF SFP Place the washer over the propeller, and secure the nut tightly on top.
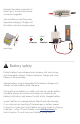
Connect the white connector to the 4S port. Join the two yellow connectors together. 4S Secure battery inside the guard bag while charging. Charge until the status indicator displays green. red green Charging Complete guard bag ! Battery safety Protect battery from extreme heat, extreme cold, puncturing, and flammable surfaces. Always transport, charge, and store battery in the guard bag. Charge battery using a designated LiPo balance charger only. Always monitor battery while charging.
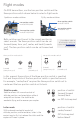
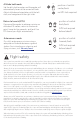
Flight modes On 3DR transmitters, use the two-position switch and the three-position switch shown below to select a flight mode. Spektrum mode switches FlySky mode switches three-position switch marked F MODE two-position switch marked GEAR/MIX two-position switch marked AIL D/R three-position switch marked FLAP/GYRO Stabalize Both switches must beStabalize set to the correct position to select a mode. The three-position switch can be set forward (away from you), center, and back (towards you).
Altitude hold mode Loiter Return to launch (RTL) X GPS Fly a fully autonomous mission using a computer or Android device as a ground station. For instructions on planning and flying missions, visit 3dr.com/learn.
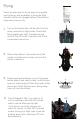
Flying Flight Checklist Pixhawk LED Initializing, please wait Autopilot ready, no GPS Autopilot ready, GPS locked Armed, ready to fly Loss of RC signal, automatic landing System error, see troubleshooting guide Select an open area for flying, away from people and buildings, and remember to bring the flight checklist and a fully charged battery. Follow these steps every time you fly.
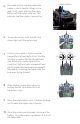
5 The safety button indicates when the copter is safe to handle. When you’re ready to fly, press and hold the safety button until it displays solid red. This indicates that the copter is now active. 6 To arm the motors, hold the left stick down/right until the motors spin. 7 Control your copter in flight using the transmitter’s left and right sticks.
Learning more Visit 3dr.com/learn for more instructions on flying, configuring, and using a ground station with your copter. Resources To learn more about the APM:Copter platform, including adding new flight modes and flying autonomous missions, visit copter.ardupilot.com. Support For customer support, contact us at help@3dr.com or call our support line at +1 (858) 225-1414 Monday through Friday, from 8 am to 5 pm, PST. Happy flying! QUAD Operation Manual V3 | ©3D Robotics, Inc.