
Instruction Manual

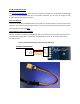

Connecting your Remzibi’s OSD 3DR to your computer
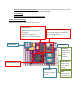
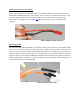
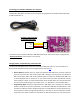
The Remzibi’s OSD 3DR is connected to your computer using the DIY Drones Remzibi’s OSD cable. Black
is GND and Yellow is TX.
You will also need to power the Remzibi’s OSD 3DR board with an external 12 V power supply (See the
“Powering the Board” section earlier in this tutorial).
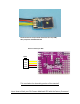
Changing Modes, and the Meaning of the Status LED
Your Remzibi’s OSD 3DR has two modes: Normal mode, and Manual mode. For more information on
Normal mode and Manual mode, refer to Happy Killmore’s manual (link).
Normal Mode: By default when you power your Remzibi’s OSD 3DR board, it will be in Normal
mode, and you will notice that the blue status LED is blinking. In Normal mode, your Remzibi’s
OSD has two video modes: PAL mode and NTSC mode. The mode your Remzibi’s OSD 3DR is set
to will be displayed next to “Video init” on your screen when you power the Remzibi, and will
either read PAL or NTSC. To switch between NTSC mode and PAL mode, press and hold the SW1
until you see the mode change on your video screen. To “Save Home,” press the SW1 switch.
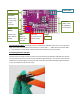
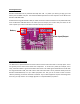
Programming Mode: Unlike the Original Remzibi’s OSD which has a red button for switching
between modes when the board is powered, on the Remzibi’s OSD 3DR, the SW1 switch is used
to switch from Normal mode to Programming mode. In Happy Killmore’s manual, whenever you
are prompted to switch to Programming mode, this is how you can do this: Hold down the SW1
switch while you power the board or hold down the SW1 switch while you reset the board to
Yellow
Orange
Red
Black
TX
RX
+5V
GND
Remzibi’s OSD 3DR Cable
or standard FTDI cable