CubeX TM 3D printer User guide See inside for use and safety information.
Important safety information Safety symbols and definitions . . . . . . . . . . . . . . . . . . . . . . . . . . . . . . . . . . . . . . . . . . . . . . . . . . . . . . . . . . . . . . . . . . . . . . . . . . . . . . . . . . . . . . . . . . . . . . 3 Safety guidelines . . . . . . . . . . . . . . . . . . . . . . . . . . . . . . . . . . . . . . . . . . . . . . . . . .
Cubex maintenance Restoring roughness to the Print Pad . . . . . . . . . . . . . . . . . . . . . . . . . . . . . . . . . . . . . . . . . . . . . . . . . . . . . . . . . . . . . . . . . . . . . . . . . . . . . . . . . . . . . . . . 20 Leveling the Jet Wiper height . . . . . . . . . . . . . . . . . . . . . . . . . . . . . . . . . . . . . . . . . . . . . . . . . . . . . .
important safety information safety symbols and definitions Hot Surface Hazard: A hot surface is accessible in the vicinity of this sign or at the Print Jet; avoid contact. Hot surfaces can cause severe burns. ! Caution: Indicates something may happen that could cause loss of data, damage to equipment, or could cause personal injury. Caution: Indicates a pinch point hazard that could cause person injury.
pla This is a hard plastic that has a low environmental impact. It is derived from renewable, starch-based resources. We recommend using PLA when printing extra-large parts on CubeX as it is a more stable print material. PLA is the optimal support material for industrial ABS parts. PLA has the ability to dissolve away in caustic soda solutions supported by an ultra-sonic tank. (see page 36 for more information) abs This is a well-known plastic known for its strength and industrial properties.
REQUIREMENTS FOR YOUR CUBEX Weight and dimensions: PC requirements: • 515mm (w) x 515mm (l) x 598mm (h) (20 ¼” x 20 ¼” x 23 ½” inches) • 36kg (79 lbs) • 37kg (81.
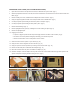
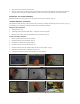
Unpacking Your CubeX (follow unpacking guide) 1. Open the box and take out the top lid of the CubeX, it’s between two layers of foam. (Fig. 1) 2. With two people take CubeX out of the box, lift from the metal frame on both sides of the machine. Place CubeX on a table. (Fig. 2) 3. Remove toolkit, power cord, CubeStick and Jet Wiper from bottom of the box. (Fig. 3) 4. Using the nippers supplied in toolkit cut the strap and take out the material boxes. (Fig. 4) 5.
Fig. 7 Fig. 8 Fig. 9 Fig. 10 Fig. 11 Fig. 12 Fig. 13 Fig. 14 Fig. 15 link your cubeX to your cubify account Creating an account on Cubify.com is easy and gives you access to all of the great designs and collections that will drive and inspire your creativity. Once you have set up an account you will be able to activate your CubeX by entering your CubeX’s individual serial number in the designated bar under the Activate My Cube tab.
3. Select to the ‘Home’ option on the main menu. 4. Click the ‘Home’ button. This will move the print jet carriage to each of the home switches, checking the XYZ axis and the Home function. The print jet carriage should stop in the home position in the back left corner of the machine. navigating the cubex main menu Navigate the main menu using the arrows on the bottom corners of the touchscreen. (Fig.
InstallIng the prInt paD 1 . Scroll to the “move” function screen located on the CubeX control panel. 2 . Using the Up and Down arrows move the Print Pad to its lowest position. 3 . To install the Print Pad, align the aluminum foot with front slot on the Print Pad base. 4 . Place the Print Pad into position, when properly installed the magnet will lock it in place.
eX-map Allows you to re-map your print jets. eX-Con Allows you to manually jet your print jets, giving you control of temperature and RPM. move Manually moves your print jet carriage in the X, Y and Z directions. home Sends the print jet carriage to its home position located in the back left corner of the printer. level Level your print pad in relation to the print tips. z-gap Set the distance between the print pad and print tips during the first layer of printing.
offset Set the relative distance between each print tip. ! Do not use the offset menu unless you have been advised to do so by Cubify support, changing this may affect the quality of multi-material prints. upDate Used to update CubeX firmware. DownloaDIng anD InstallIng CubeX software DownloaDIng CubeX software go to Cubify.com/cubex/index.aspx and click the download CubeX software link. InstallIng CubeX software 1 .
Fig. 29 Fig. 30 CUBEX SOFTWARE The CubeX software (Fig. 31) is used to create the .cubex files that your CubeX will use to create your parts. The software allows you to orient, scale, re-size and rotate the part before printing. • When you first open the CubeX software you will be greeted with a message asking you to configure your printer in the CubeX software. (Fig.
PICK SHELLS Select which Print Jets print which parts. The available options will vary depending on how many Print Jets you have active and what colors are loaded into them. BUILD Opens the build settings window.
Fig. 34 Fig. 35 Fig. 36 Fig. 38 Fig. 37 Fig. 39 Fig. 40 positioning multiple parts • Manual positioning: Right click and hold on one of the parts, you can now drag it around the bed (when using this method the bed will automatically switch to top view). (Fig. 41 & 42) • Autoplace: Clicking the auto place button will automatically position your parts on the bed for you. (Fig. 43 & 44) Fig. 41 Fig. 42 Fig. 43 Fig. 44 OPENING a multi-part assembly file 1. Select the open model assembly button.
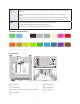
using the shell selector tool The Shell Selector tool is used to select which Print Jets print which parts of a multi-material part/multiple parts on a Print Pad. (Fig. 49) The color options available will correspond to the material colors you have set in printer configuration. 1. Select the shell color you wish to use. (Fig. 50) 2. Hover over the shell you wish to select. (Fig. 51) 3. Left click to color the shell. (Fig. 52) 4. Continue this process until all the shells are colored as desired.
PART DENSITY This is how much solid fill your part will contain. Hollow The part will have no internal structure. Thin The part will have a small amount of internal structure to give it support. Medium The part will have a good internal structure supporting it. Heavy A heavy part with a strong internal structure. RAFT MATERIAL Use this to select which material will print your raft or the raftless option.
• Turn the CubeStick upside down so the glue flows to the tip. (Fig. 60) • Apply 3 layers of CubeStick using a slow circular motion. (Fig. 61) 3. Select the ‘Print’ option from the main menu. 4. Using the arrows at the bottom of the screen, scroll to the .cubex files you wish to print and tap on the file name. (Fig. 62) 5. Your CubeX will now start printing your creation. Fig. 60 Fig. 61 Fig.
Removing supports with the ultrasonic support removal tank ! Caustic soda can burn if handled improperly. Never handle caustic soda without using all of the supplied Personal Protective Equipment (PPE): gloves, goggles and tongs. If caustic soda touches the skin, wash it away immediately. If caustic soda touches the eyes, immediately use an eyewash treatment. Never operate the unit without water in the cleaning tank. Damage may occur. Never use boiling water. Damage may occur.
caustic soda method Caustic soda can burn if handled improperly. Never handle caustic soda without using all of the supplied Personal Protective Equipment (PPE): gloves, goggles and tongs. If caustic soda touches the skin, wash it away immediately. If caustic soda touches the eyes, immediately use an eyewash treatment. ! Never operate the unit without water in the cleaning tank. Damage may occur. Never use boiling water. Damage may occur. 1. Position the unit on a flat and stable work surface.
CUBEX MAINTENANCE Restoring roughness to the Print Pad To restore roughness to the Print Pad, run the sandpaper included in your toolkit diagonally across the bed corner to corner in both directions. (Fig. 63) Fig. 63 Fig. 64 levelling the jet wiper height If your Jet Wipe is set too low or too high, you can adjust it using the orange capped bolt located under the print jet, screwing it into the floor to set the Jet wipe lower and unscrewing it to set the Jet Wipe higher. (Fig.
Fig. 66 Fig. 65 Fig. 67 Fig. 68 Fig. 69 Fig. 72 Fig. 73 Fig. 70 Fig. 71 Fine-Tuning Your Print Pad 1. Re-install the Print Pad before fine tuning. 2. Use the Up and Down arrows to reduce the gap between the print jet and Print Pad to approximately 2 mm. This will enable finer leveling. (Fig. 74) 3. Use the two remaining visible bolts to repeat the leveling process. 4. Click the ‘Function’ button to leave the ‘Level’ menu, and return to the main menu. ! 5.
Setting the Print Jet Gap After leveling the Print Pad, the print jet must be set to the correct height to ensure that the first printed layer sticks properly (if the print jet is too high, the filament will not stick to the Print Pad; if the print jet is too low, the Print Pad may obstruct the print jet). Use the ‘Z Gap’ function to accurately adjust the height of the print jet for the first layer. • Select the ‘Z-Gap’ function on the touchscreen. (Fig.
5. Plug your CubeX into the computer using the PC connection USB port (Fig. 85 & 86). Navigate to the settings tab on the CubeX software and press the Firmware update button. (Fig. 87) 6. The CubeX software will then open windows explorer. Navigate to the firmware you wish to install and open it. (Fig. 88) 7. The CubeX software will now install the firmware onto the CubeX printer. (Fig. 89) 8.
How to Contact Cubify Support If you have any problems with your CubeX that cannot be solved using this manual, please contact cubifysupport@cubify. com for your support related issues. Setting the CubeX Print Jet Offsets ! CAUTION: Do not use the offset menu unless you have been advised to do so by Cubify Support, as changes to this may affect the quality of multi-material prints.
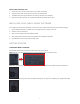
PRINT JET 3 X OFFSET Compare the lines on “X scale 1” and “X scale 3” to find the ones that most accurately line up. Because variation is small, it may be easiest to spot 3 that look like they all line up. If this is the case, use the middle one as the correct one. Mark this line with a pen for easier identification. On “X scale 3” count from the center line (with the arrow) to the marked line. If you are counting left, the scale the number is negative.