
Manual


Installation and User’s Guide 17
13. Now accept your changes and activate your new driver by clicking
the “Apply” button in the lower right corner of the Display
Properties applet.
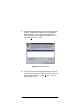
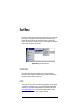
14.
The System Settings Change window appears (Figure 11),
instructing you that you must restart your computer for your new
driver to take effect.
If you have already installed your new Oxygen card:
• Remove the Oxygen CD-ROM from the drive; and
• Click the “Yes” button to reboot your computer and start
using your new Oxygen card.
If you have not installed your new Oxygen card:
• Click the “No” button and close any open applications.
• Remove the Oxygen CD-ROM from the drive; and
• Shutdown your system.
• Once you turn your computer’s power off, install your
Oxygen card and reboot your system.
NOTE: Please be advised that you have only installed the Oxygen
software drivers for Windows 95. If you are running Windows NT and
Windows 95 in a dual-boot configuration, you must also install the
Oxygen software drivers that support OpenGL under Windows NT.
Refer to the Installing your Oxygen software on Windows NT 4.0 section
on page 6 or Appendix A: Installing Oxygen on Windows NT 3.51 on
page 56 for instructions and additional information.
Figure 11: System Settings Change