3Dlabs, Inc. Wildcat4 Graphics Accelerator Card User’s Guide 3Dlabs®, Inc. 1901 McCarthy Blvd. Milpitas, CA 95035 www.3dlabs.
Copyright 2002 by 3Dlabs, Inc. – A Creative Company 3Dlabs and Wildcat are registered trademarks, and Wildcat4, SuperScene and ParaScale are trademarks of 3Dlabs, Inc. or 3Dlabs Inc. Ltd. Pentium is a registered trademark of Intel. OpenGL is a registered trademark of Silicon Graphics, Inc. Soft Engine is a trademark of Vibrant Graphics, Inc. AutoCAD is a registered trademark of AutoDesk Inc. Microsoft, Windows 2000 and Windows XP are registered trademarks of the Microsoft Corporation.
CONTENTS Chapter 1– Introduction ...................................................................................................... 1 Welcome to 3Dlabs!........................................................................................................ 2 System Requirements ...................................................................................................... 2 Features ...................................................................................................................
Configuring Dual Monitors ........................................................................................... 22 Enabling the Dual Monitor Feature..........................................................................................................22 Optimizing the Wildcat Driver...................................................................................... 24 Enabling application-specific optimizations .....................................................................................
CHAPTER 1– INTRODUCTION 3Dlabs Graphics Accelerator Card User's Guide
Introduction Welcome to 3Dlabs! Thank you for selecting a 3Dlabs® Wildcat4TM Graphics Accelerator Card! This User Guide is designed to provide information about Wildcat4 Graphics Accelerator Cards. In addition to this guide, you are strongly encouraged to use the online help included in the 3Dlabs driver software Help screens. System Requirements · Intel® AGP 8x motherboard · Microsoft Windows 2000 (SP2) or Windows XP (32-bit).
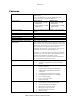
Introduction Features Card Interface AGP Pro 50 card designed for systems that have a 50-watt AGP Pro slot. NOTE: THE WILDCAT4 7210 OR WILDCAT4 7110 CANNOT PLUG INTO A STANDARD AGP SLOT. Video Memory Wildcat4 7210 § Frame Buffer: 128 MB DDR memory § Texture Buffer: 256 MB DDR memory Graphics Controller High-speed Wildcat4 chipset technology with dual display support.
Introduction Features, cont. Texture Modes OpenGL (1.
Introduction Features, cont.
CHAPTER 2 – SETUP 3Dlabs Graphics Accelerator Card User's Guide
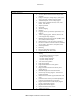
Software Configuration Preparing for Installation NOTE: If you purchased your Wildcat4 Graphics Accelerator Card as part of a system, it was installed and configured prior to shipment. The following instructions for hardware installation are necessary only if you purchased a customer kit or need to reinstall your video card. Before you begin your installation 1. Save any work in progress and exit any open applications. Always back up your system before you install any new hardware or software. 2.
Software Configuration 4. Remove the cover from your system so you can access the slots into which you will be installing your Wildcat4 Graphics Accelerator Card. If you have not already removed any existing graphics card(s) from your system, then do so now. 5. If necessary, remove the back panel covers from the slots into which you are installing your Wildcat4 Graphics Accelerator Card, using a Phillips-head screwdriver.
Software Configuration 8. Place the card into the correct slots and seat firmly. See your system documentation for instructions on securing the card to the chassis. Loose cards and connections can cause grounding and operating problems. 9. Remove the anti-static wrist strap, if used, and replace the cover on your system. 10. Reconnect the power cord.
Software Configuration If you are upgrading the graphics card in your system NOTE: 1. 2. 3. These instructions may be different than how you normally upgrade your graphics card or other devices, but have been found to be the best method of insuring a successful installation of your new hardware and software. Uninstall the drivers for your old graphics card. Refer to your old graphics card’s documentation or Help files for instructions on removing or uninstalling the old graphics card’s driver software.
Software Configuration 4. Turn on power to the workstation. If the monitor’s Power On LED does not illuminate or the monitor does not display the startup sequence, consult Chapter 4, “Troubleshooting.” CAUTION: If you are connecting only one monitor to the Wildcat4, you must plug that monitor into the Primary DVI-I port (labeled “1” on the I/O panel of your card).
Software Configuration Attaching a Stereo Device Power off your system and connect the stereo hardware to the round, stereo connector on the card. See the documentation that came with your stereo hardware for information on how to use stereoscopic display. Plug in and start up your system, including peripherals, and log on to your operating system. NOTE: To configure the display settings for stereo display, see Chapter 3, “Using the Video Card” for step-by-step instructions.
Software Configuration Removing an existing driver under Windows XP 1. Log on to Windows XP using an account that has administrative privileges. Please consult your system administrator or Windows XP User's Manual for more information on Administrator privileges. 2. From the Start menu, go to Control Panel. 3. Under Change or Remove Programs, highlight the current Display Driver and click Change/Remove. 4. Click Yes when prompted to confirm the driver removal. 5.
Software Configuration NOTE: If setup is not able to find 3ds max in the system registry, it will not install the driver and will exit. Consult your 3ds max application's documentation to verify that the application is installed correctly. The driver setup program will only install for a registered application. Verify the Default Video Display Driver Verifying under Windows 2000 1. From the Windows Start menu, go to Settings/Control Panel/Device Manager. 2.
Software Configuration Verifying under Windows XP 1. From the operating system Start menu, go to Control Panel/Performance and Maintenance/System/Advanced. 2. Click the Settings button under Startup and Recovery. 3. On the Startup and Recovery dialog box, verify that "Microsoft Windows XP Professional" is the listed as the Default operating system. It is IMPORTANT that your operating system matches the driver you installed. Click OK. 4. Click OK again to close the System Properties dialog box.
CHAPTER 3 – SOFTWARE CONFIGURATION 3Dlabs Graphics Accelerator Card User's Guide
Software Configuration The 3Dlabs Wildcat4 Driver The 3Dlabs Wildcat4 driver software allows you to optimize the working relationship between your card, your system, and your applications. This chapter contains instructions for configuring the video display, stereo display, and dual monitors. Configuring the Video Display Once the Wildcat driver is installed properly, the Display Properties dialog box will have two additional tabs: Wildcat Configuration and Wildcat Monitor.
Software Configuration Using the Wildcat Monitor tab 1. On the Display Properties dialog box, click the Wildcat Monitor tab. This tab contains commands for adjusting the resolution, color depth, and refresh rate. See the steps under Using the Wildcat Configuration tab if you need instructions on opening the Display Properties dialog box.
Software Configuration 2. Click Color Calibration to modify the color settings. Make modifications to the Color Calibration dialog box, then check the Apply Gamma Color Calibration to 3D Windows Only box if you don’t want the desktop affected. Click OK to accept the changes and dismiss the Color Calibration dialog box, or click Cancel to close the Color Calibration dialog box without making any changes. You are returned to the Wildcat Monitor Display Properties dialog box.
Software Configuration 3. On the Wildcat Monitor Display Properties dialog box, click Configure Monitor to change the display mode, select a monitor type, or change the resolution/refresh rate. Once you have made the changes you require, click OK to accept the new configuration and dismiss the Configure Monitor dialog box or Cancel to reset to the default settings. You are returned to the Wildcat Monitor Display Properties dialog box. 4. Click OK on the Display Properties dialog box to accept the changes.
Software Configuration Enabling stereo display If you connect a device to the stereo port on the Wildcat4, you must change the display mode to view in stereo. See Chapter 2 “Setup” for an illustration of the stereo output port. 1. Make sure your stereo display device is properly connected to the stereo output port on the Wildcat4. See Chapter 2 “Connecting a Stereo Display Device” for more information. 2. On the Wildcat4 Monitor tab under Display Properties, click Configure Monitor.
Software Configuration Confirming multiview cables are detected 1. On the Slave workstation(s), right click on the Windows desktop (or left click if you’ve altered the default mouse setup) and choose Properties from the menu. Click the Settings tab, then click Advanced. 2. Click the Wildcat4 Monitor Tab, then click Multiview. 3. The Input Cables will show as Detected under Multiview Information. Enabling genlock features 1.
Software Configuration 4. When asked if you want to reboot, choose No. Follow the directions below for your operating system: · Windows 2000 -- go to the Start menu and choose Shutdown, then choose Shutdown from the displayed menu. · Windows XP -- go to the Start menu and select Turn off computer. 5. If you have not already done so, connect the second monitor, then turn on power to the workstation. The primary monitor will display the startup sequence.
Software Configuration Adjusting colors or resolutions of either monitor 1. Click the icon for that monitor or select the monitor from the pulldown menu under Display. 2. With the monitor to adjust selected, click Advanced. Select Wildcat Monitor and make changes to the Colors or Screen area. Click OK. 3. Select the other monitor icon or select from the pulldown menu under Display to change the color or resolution of the other monitor.
Software Configuration Creating a Custom Optimization 1. Right click on the Windows desktop (or left click if you’ve altered the default mouse setup) and choose Properties from the menu. Click the Settings tab, then click Advanced. 2. Under the Wildcat Configuration tab, select Configuration Wizard. Click Next to continue. 3. Select New Configuration on the pulldown menu, then click Next. 4.
CHAPTER 4 – TROUBLESHOOTING 3Dlabs Graphics Accelerator Card User's Guide
Troubleshooting Troubleshooting If you have trouble using your 3Dlabs Wildcat4 Graphics Accelerator Card or a 3D application, you may find the answer to your problem in the following sections. Always start your problem- solving efforts with the simplest solution and work up to the more complex ones. Monitors and Display Resolutions Problem: My monitor is either blank, or the displayed image is distorted, scrambled or smaller than I expected.
Troubleshooting Obtaining a Usable Video Resolution The system operates in VGA mode when the video display driver is not running to accommodate all monitor types. VGA mode is used during initial installation of the video display driver and when experiencing video problems. If you select a resolution that causes the monitor to display incorrectly, try the following proceedures to obtain a usable video resolution.
Troubleshooting Removing an existing driver under Windows 2000 1. Log on to Windows 2000 using an account that has administrative privileges. Please consult your system administrator or Microsoft Windows 2000 User's Manual for more information on Administrator privileges. 2. From the Start menu, go to Settings/Control Panel and click Add/Remove Programs. 3. Under Change or Remove Programs, highlight the current Wildcat Display Driver and click Change/Remove. 4.
APPENDIX A – SPECIFICATIONS 3Dlabs Graphics Accelerator Card User's Guide
Specifications A Specifications General Manufacturer Model number Functional System 3Dlabs Wildcat4 7210 or Wildcat4 7110 NOTE: IF YOU ORDERED THIS VIDEO CARD WITH A SYSTEM, IT WAS PREINSTALLED AND CONFIGURED FOR USE IN YOUR SYSTEM PRIOR TO SHIPMENT.
Specifications Supported Resolutions Note: These are MAXIMUM supported monitor resolutions and refresh rates. Resolutions and refresh rates may vary depending on your monitor. SuperScene antialiasing is available at resolutions under 1920 x 1080 on a single display Key 1 – Refresh rate not supported in dual display mode. 2 – Resolution not supported in frame sequential stereo mode.
Specifications Supported Resolutions (con’t) Resolution Aspect Ratio Analog Refresh Rates (Hz) Digital Refresh Rates (Hz) Stereo Refresh Rate (Hz) Genlock Refresh Rate (Hz) Single Display Dual Display SS Off SS Off 128 1280 x 1024 5:4 85,84,75, 70,60 85,84,75, 70,60 1280 x 960 4:3 85,75,60 85,75,60 1280 x 800 16:10 90,85,75, 60 90,85,75, 60 1280 x 720 16:9 75,60 75,60 1152 x 864 4:3 1152 x 720 16:10 85,75,70, 60 - 85,75,70, 60 - 1024 x 768 4:3 85,84,75, 70,60 85,84,75, 7
APPENDIX B – SOFTWARE LICENSE 3Dlabs Graphics Accelerator Card User's Guide
Software License Agreement SOFTWARE LICENSE AGREEMENT THIS IS A LEGAL CONTRACT BETWEEN YOU, THE END USER, AND 3DLABS, INC. BY USING THE SOFTWARE ACCOMPANYING THIS GUIDE OR PRE- INSTALLED ON YOUR SYSTEM, YOU ARE ACCEPTING AND AGREEING TO BE BOUND BY THE TERMS OF THIS SOFTWARE LICENSE AGREEMENT.
Software License Agreement Limited Warranty 3Dlabs, Inc. warrants that the SOFTWARE AND FEATURES licensed to you under this AGREEMENT will perform in accordance with 3Dlabs, Inc. published specifications for use on the same operating system as used by you at the time of purchase of the SOFTWARE or the system on which the SOFTWARE is initially mounted or installed (WARRANTY) for a period of ninety (90) days after the date of delivery to you as evidenced by your receipt (WARRANTY PERIOD).
Software License Agreement Termination You may terminate the license granted hereunder at any time by destroying all copies, [mergers or modifications] of the SOFTWARE, FEATURES and accompanying materials. 3Dlabs, Inc. may immediately terminate the license granted to you hereunder upon notice for failure to comply with the terms and conditions of this AGREEMENT. Upon such termination, you agree to destroy all copies, mergers and modifications of the SOFTWARE and FEATURES and accompanying documents.
APPENDIX C – REGULATORY STATEMENTS 3Dlabs Graphics Accelerator Card User's Guide
Terms and Definitions DECLARATION OF CONFORMITY Manufacturer’ s Name: Manufacturer’ s Addre ss: 3Dlabs Ltd, a Creative Labs subsidiary 9668 Madison Blvd., Madison, AL 35758 declares that the product Product Name: Wildcat4 7110/7210 Graphics Accelerator Cards conform s to the following product specifications: Following provisions of the 89/336/EEC Directive Specification Class / Level EN 55022:1994 (CISPR 22 limits) Class B EN 55022:1994 (CISPR 22 limits) Class B 47 CFR Part 15,Subpart B (ANSI C63.
Terms and Definitions APPENDIX D – TERMS AND DEFINITIONS 40 3Dlabs Graphics Accelerator Card User's Guide
Terms and Definitions Terms and Definitions AGP Advanced Graphics Port. A dedicated graphics bus that transfers data at significantly higher speeds than the PCI bus. Alpha Blending This means to create transparent objects by allowing for the blending of pixels to simulate the transparency characteristics of an object. With alpha information, an object can be designed from being totally transparent to opaque.
Terms and Definitions Digital Flat Panel Display A digital, flat-panel display uses a digital (instead of analog) cable connection to transfer data to the display screen. This can eliminate some display artifacts. Flat panel displays occupy less desk space than conventional monitors. DirectX Microsoft’s APIs developed to access various system hardware. Dithering The process of converting an image with a certain bit depth to one with a lower bit depth.
Terms and Definitions Heidi The API developed by Autodesk to work with its products, such as AutoCAD. MIP-Mapping (for texture processing) A feature that delivers photo-realistic images by wrapping 2D bitmaps around 3D objects closely matching the texture to the object. MIP-Mapping allows different versions of a texture to be used for objects of different sizes. It also enables faster performance as textures do not need to be scaled in real time.
Terms and Definitions Stencil Buffer Similar to stipple masking, the stencil buffer assists with the creation of transparent effects. Stipple masking A technique that spatially creates transparent effects by rendering an object through various patterns. Streaming SIMD An instruction set developed by Intel for Pentium -processor based systems. Streaming SIMD can improve 3D vertex transformation and lighting, among other operations.
INDEX 3Dlabs Graphics Accelerator Card User's Guide
Index API, 41, 43 Attaching a stereo device, 12 Configuration tab Display properties, 17 Configuring the display, 17 connecting a DVI monitor, 10 connecting a VGA monitor, 11 Creating a custom optimization, 25 Determining a defective unit, 28 Diagnostics, 27 Display Dual monitors, 22 Monoscopic, 21 Stereo, 21 Stereoscopic, 21 Display properties Configuration tab, 17 Configuring, 17 Monitor tab, 18 Drivers Installing, 12 Dual monitor display, 22 DVI monitor connecting, 10 Enabling application-specific optim