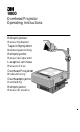
9800 Overhead Projector Operating Instructions Rétroprojecteur Manual Opérateur Tageslichtprojektor Bedienungsanleitung Retroproyector Manual del operador Lavagna Luminosa Manuale d’Uso Overhead Prosjektør Bruksanvisning Overheadprojector Handleiding Retroprojector Manual do usuário
Go to Main Menu Go to Operator Guide Table of Contents Thank You GB F D E I N NL P Thank you for choosing 3M overhead projection equipment. This product has been produced in accordance with 3M’s highest quality and safety standards to ensure a smooth and troublefree use in the years to come. Your purchase of this product proves that you appreciate this. For optimum performance we kindly ask you to follow these operating instructions carefully.
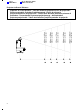
Go to Main Menu Go to Operator Guide Table of Contents Projector to Screen Distance Projector to screen distance - Liste de distances projecteur/écran de projection Entfernungstabelle Projektor/Projektionswand - Escala de distancia proyector/superficie de proyección - Tabella delle distanze proiettore/schermo di proiezione - Avstandstabell eyskastor/projeksjonregg - Afstandstabell projector/projectieviak - Tabela de diståncias projector/pantalha de projecão 2
9800 EVD FL = 342 mm 13.5I 9800 EVD FL = 342 mm 13.5I 9800 EVD FL = 292 mm 11.5I 127 cm x 127 cm 152 cm x 152 cm 177 cm x 177 cm 213 cm x 213 cm 243 cm x 243 cm 50I x 50I 60I x 60I 70I x 70I 84I x 84I 96I x 96I 187 cm (74I) 217 cm (86I) 248 cm (98I) 291 cm (114I) 327 cm (129I) x x x x x 50I 60I 70I 84I 96I x = 21.3 cm (8.4I) 239 cm (94I) 279 cm (110I) 320 cm (126I) 377 cm (148I) 426 cm (168I) x = 24.1 cm (9.
GB Go to Operator Guide Table of Contents 9. IMPORTANT SAFEGUARDS When using your overhead projection equipment, basic safety precautions should always be followed, including the following: 1. Read and understand all instructions before using. Pay particular attention to areas where this symbol ! is shown. 2. Close supervision is necessary when any appliance is used by or near children. Do not leave appliance unattended while in use. ! 3. Care must be taken as burns can occur from touching hot parts. 4.
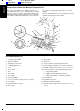
ENGLISH Go to Main Menu Go to Operator Guide Table of Contents Product Description and Machine Characteristics accessories, and lamp interrupt switches to prevent damage. Refer to the illustration below to identify the external machine characteristics for the 9800. The 3MtOverhead Projector 9800 is designed to be safe, efficient and easy to use. It features an open head, triplet projection lens with 1.
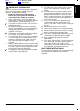
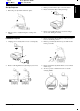
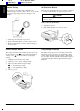
Go to Operator Guide Table of Contents Set Up Projector 1. Raise the post (1) until it locks into place. 3. Raise projection mirror (3) to screen elevation. 4. Rotate focus knob (4) for sharpest image. ENGLISH Go to Main Menu 3 4 2. Plug in power cord (2) and depress on/off power switch. Fold Down Projector 1. Unplug power cord (1) and coil onto cord wrap (2). 5. Rotate colour tuning knob for colour-free image. See Colour Tuning for details. 3.
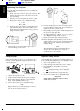
ENGLISH Go to Main Menu Go to Operator Guide Table of Contents Operating The Projector Read the Important Safeguards before operating the 9800 projector. 1. Position projector in front of projection screen. The distance from the screen controls the size of the projected image. 2. Uncoil power cord and plug into electric outlet. 3. Push power switch “On” to illuminate lamp. | = ON O = OFF 4. Rotate projector (1) until projected light beam is perpendicular (90_) to the screen surface.
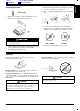
Go to Operator Guide Table of Contents Lamp Replacement EVD 400W 36V 5. Push new lamp (3) fully and squarely into socket. Do not touch bulb glass with fingers. 6. Close condenser lens frame and secure with spring clip. 1. Push power switch to “Off” and unplug projector. 2. Release cover latch and lift up top cover. 7. Look through condenser lens and check lamp filament for correct alignment. If filament and its reflection are not aligned, repeat steps 3, 5 and 6.
ENGLISH Go to Main Menu Go to Operator Guide Table of Contents Colour Tuning AC Electrical Outlets Rotate the colour tuning dial to eliminate any yellow/orange to brown or blue corners. A colour-free projection stage will produce the sharpest colour images. There are two unswitched AC power outlets, connected to a 5 amp circuit breaker, for powering accessories. ! Caution Do not overload outlets with accessories that exceed a total of 5 amps. To Reset the Circuit Breaker: 1. Unplug accessories. 2.
Go to Operator Guide Table of Contents Troubleshooting Problem Lamp does not illuminate but fan motor runs. Probable Causes c. Control Panel door open. d. Lamp changer dial not engaged. e. Lamp not seated properly. f. Burned out lamp. Neither lamp nor fan energize. a. Projector not plugged in. b. Stage cover not completely closed. Solution a. Close control panel door. b. Fully rotate lamp changer dial until it stops. c. Seat lamp squarely in socket. d. Replace lamp. c. No power at wall outlet. a.
Go to Main Menu Go to Operator Guide Table of Contents Service Information Service Information - Service Information - Service - Información de Servicio Servizio assistenza - Service - 3M–Service - Serviço informativo GB Contact your supplier or 3M sales office where you purchased your unit. F D Contactez votre distribution ou le bureau de vente 3M où vous avez acheté votre appareil.
Go to Main Menu Go to Operator Guide Table of Contents Safety Points to Note SAFETY POINTS TO NOTE: – Use an alternating current only. Check that the supply voltage is the same as that stated on the rating plate of the appliance. U.K.
Go to Main Menu Go to Operator Guide Table of Contents Accessories Accessories - Accessoires - Zubehör - Accesorios - Accessorio - Tilbehør - Accessories Accessórios Lens Cleaner Nettoyant à lentilles Linsenreiniger Limpiador para el Lente Detergente Rengjøringsmiddel for linsene Schoonmaakmiddel voor de lens Limpador de lentes Lamp Lampe Lampe Bombilla Lampadina Lampe Lamp Lâmpada 78-6969-7086-8 EVD DY-0210-0010-3 HA5795 TA 200 Cart Standard XX-0034-1165-7 TA 300 Cart Deluxe XX-0034-1164-0 - Char
Visual Systems Division 6801 River Place Boulevard Austin, Texas 78726-9000 Printed in U.S.A. E3M 6/96 78-6970-6472-9 Rev.