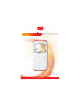
projector user manual Shoot and Share
English 3M™ Camcorder Projector CP45 Table of Contents Getting Started................................................................. 1 Product Overview.................................................................................. 1 Package Content................................................................................... 2 Charging the Battery.............................................................................. 3 Reading LED indicators...............................................
M™ Camcorder Projector CP45 Thank You For Choosing 3M This product has been produced in accordance with 3M quality and safety standards to provide smooth and trouble-free use in the years to come. For optimum performance, please follow the operating instructions carefully. Important Notice All statements, technical information, and recommendations related to 3M’s products are based on information believed to be reliable, but the accuracy or completeness is not guaranteed.
Care and Safety Information: Please read, understand, and follow all safety information contained in these instructions prior to the use of this Camcorder Projector. Retain these instructions for future reference. INTENDED USE The 3M™ Camcorder Projector CP45 is designed to operate in a normal office and home environment.
3M™ Camcorder Projector CP45 WARNING To reduce the risk associated with fire and explosion: • Do not immerse the Camcorder Projector in any liquid or allow it to get wet. • Use only 3M approved power supply provided. • Do not dispose of the Camcorder Projector by incineration or fire. • Do not operate this Camcorder Projector in any environment above 35°C (95°F). • Do not expose or store Camcorder Projector in direct sunlight, or excessive heat (>60°C or 140°F) moist or caustic environments.
Usage Notice: Do: • Turn off the power switch and unplug the power adapter before cleaning the Camcorder Projector. • Use a soft dry cloth with mild detergent to clean the display housing. • Unplug the power adapter if the Camcorder Projector will not be used for a long period of time. • Operate the Camcorder Projector when the ambient room temperature is within 5 ~ 35°C. • Operate the Camcorder Projector when the Relative Humidity is 5°C ~ 35°C (41°F ~ 95°F), 80% (Max.), non-condensing.
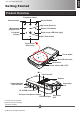
English 3M™ Camcorder Projector CP45 Getting Started Product Overview Projection button Camera button Record button Up arrow (Zoom in) Menu button (Keypad lock) Return / Exit button Right arrow (LED flash light) Left arrow (Folder) OK / Enter button Down arrow (Zoom out) Focus wheel Micro SD card slot# IR receiver* Power switch (ON / OFF) Mic Tripod socket† Speaker Camcorder lens Power/Charging LED Indicator HDMI out DC In/USB connector AV input / Headphone output LED flash light microSD card no
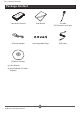
3M™ Camcorder Projector CP45 Package Content Camcorder Projector User Manual AV cable (RCA female to mini jack) AC power adapter Interchangeable Plugs USB cable CD which includes: (a) User Manual (b) ArcSoft Media Converter Software 2 © 3M 2011. All Rights Reserved.
English 3M™ Camcorder Projector CP45 Charging the Battery 1 Connect one end of the supplied AC adapter to the USB port of the Camcorder Projector and the other end to a wall outlet. OR Connect one end of the supplied USB cable to the USB port of the Camcorder Projector and the other end to a powered PC. Note: The Camcorder Projector power switch must be Off to charge the battery. 2 The Power LED turns orange and the charging starts. 3 When the Power LED turns green, the battery is fully charged.
3M™ Camcorder Projector CP45 Inserting a Memory Card (optional) 1 Open the Micro SD card cover. 2 Gently insert the card as indicated (contacts facing upward) until the card reaches the end of the slot. 3 When the card is fully inserted, the icon ( appear on screen. ) will Note: The Micro SD card is spring loaded. To remove the card, gently push inward to release the card and then slide it outward to remove it from the Camcorder Projector. 4 Replace the Micro SD card cover.
English 3M™ Camcorder Projector CP45 Sensitivity Calibration 1 Power on the Camcorder Projector. 2 Press the Menu button ( ), and then press the Left/Right ( / ) arrows to navigate to Setting Screen ( ). 3 Press the Up/Down ( item. / ) arrows to navigate to the Sensitivity Calibration 4 Press the OK button to enable the calibration process. 5 The screen will show “Calibration Start”. Do not touch the Camcorder Projector during the calibration process.
3M™ Camcorder Projector CP45 Menu Navigation How to Action Display a menu Press the Menu button ( Select a menu option Press the Up/Down/Left/Right button. Execute action (go to highlighted sub menu or select highlighted menu item) Press the OK button. Exit menu or go back to previous menu Press the Return button ( Enable/Disable keypad lock Press and hold the Menu button ( seconds. ). ) (when in sub-menu).
English 3M™ Camcorder Projector CP45 Basic Operations Recording a Video Clip 1 Press the Up/Down ( / ) arrows to zoom in or zoom out. 2 Press the Record ( ) button to start recording. The Record ( ) button will turn red in recording mode, and the video recording timer will start rolling. 3 Press the Record ( ) button again to stop recording. The Record ( button will turn white to indicate is in standby mode. ) 4 While in recording mode, press the OK ( ) button to pause recording.
3M™ Camcorder Projector CP45 Projecting Pictures/Videos 1 Press the OK ( ) button or the Left ( ) arrow. 2 Press the Up/Down arrows to select target folder. 3 When selecting one file, press the OK button to play it. 4 Press the Projection button ( projection mode) ) to project. ( will turn blue when in • There are two ways to view the files. Please refer to Figure 1 for steps to view the files.
English 3M™ Camcorder Projector CP45 During Playback • Playing Video 1 Press the Left/Right arrows to move to the previous/next file. Press and hold the Left/Right arrows button to rewind and fast forward. 2 Use the Up/Down arrows to control volume. 3 Press the OK button to pause the video (press OK again to resume). The following status information will display. Icon Item Description Fast Rewind Press the Left arrow to scroll to previous video. Press and hold the Left arrow to rewind.
3M™ Camcorder Projector CP45 Adjust the Focus Turn the Focus wheel to adjust the image sharpness and clarity. Adjusting the Projected Image Projection Distance (A) Screen size - Width (B) Screen Size - Height (C) Screen Diagonal (D) (cm) (inch) (cm) (inch) (cm) (inch) (cm) (inch) 33.0 13.0 20.3 8.0 15.2 6.0 25.4 10.0 79.2 31.2 48.8 19.2 36.6 14.4 61.0 24.0 122.1 48.1 75.2 29.6 56.4 22.2 94.0 37.0 138.6 54.6 85.3 33.6 64.0 25.2 106.7 42.0 155.1 61.1 95.5 37.
Connecting Camcorder Projector to Media Devices Composite AV Cable This Camcorder Projector connects to most DVD players, SAT-Receivers, Portable Media Players and Game consoles with the Camcorder Projector AV cable (supplied) and the composite AV cable that came with the media device.
3M™ Camcorder Projector CP45 HDMI Cable This Camcorder Projector connects to most HD Digital TV’s with an optional (not included) HDMI cable. TV HDMI In HDMI Out HDMI cable (Optional) 1 Turn on your HDTV. 2 Connect the HDMI-in connector (the bigger end) of the HDMI cable to the HDTV. 3 Turn on the Camcorder Projector. 4 Connect the other end of the HDMI cable to the HDMI Out jack on your Camcorder Projector. 5 Switch the HDTV to “HDMI input” mode.
English 3M™ Camcorder Projector CP45 Advanced Operations Menu Setting Items The menu is divided into four categories: Playback, Projection, Video, and Setting. • Navigating the Menu 1 Press the Left/Right arrows to switch between page tabs. 2 Press the Up/Down arrows to move through the sub-menu, then press the OK button to enter the sub-menu. 3 Press the Up/Down arrows to select an option, then press the OK button to confirm. Or, press the Return button ( ) to go back the previous screen.
3M™ Camcorder Projector CP45 Menu Category Submenu Item Beep Option Off/Low/ Medium/High Description Adjust the keypad beep sound level. Clock - Set the date and time. Language - Select the language used for the On Screen Display. Keypad Sensitivity Sensitivity Calibration -2/-1/0/+1/+2 Adjust the keypad sensitivity level. OK Enable keypad sensitivity calibration process. Display Icon On/Off To show/hide all icons on the display screen.
English 3M™ Camcorder Projector CP45 Battery Life Indicator Icon Description Full battery Half-Full battery Low battery Empty battery Note 1: When the “Battery Low” message appears, the Camcorder Projector will automatically power off. Note 2: When the battery icon indicates “low battery”, you may continue using the Camcorder Projector without interruption by plugging the AC power adapter. 15 © 3M 2011. All Rights Reserved.
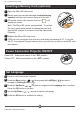
3M™ Camcorder Projector CP45 Converting Video Files Use ArcSoft Media Converter™ software (included in the CD) to convert video files into formats compatible with your Camcorder Projector. To convert video files, install the software to your computer and then perform the following steps. 2 1 Figure 2: Steps to convert video files on ArcSoft Media Converter™ 3 4 1 Click , and then select the video files from your local drive that you want to convert. The video file is added to the list.
English 3M™ Camcorder Projector CP45 Specifications Item Description Light Source RGB LED LCD Display 2.4” (6 cm) LCD Brightness 20 Lumens Aspect Ratio 4:3 Camcorder Projector Resolution 800 x 600 (SVGA) Pixels Projection Image Size 25.4 cm ~ 165.
3M™ Camcorder Projector CP45 Item Description Dimension (LxWxH) 125 x 62 x 24 mm Weight 180 g Package Content AV cable (RCA female to mini jack), USB cable, AC power adapter, Plug, User Manual and CD Note: Specifications are subject to change without notification. Supported file types for conversion (Input file formats) - Windows AVI files (*.AVI) - Advanced Systems Format (*.ASF) - Video CD (*.DAT) - MP4 files (*.MP4; *.M4V) - MPEG (*.MPG; *.MPEG; *.MPE) - RealMedia Video (*.
English 3M™ Camcorder Projector CP45 Troubleshooting If your Camcorder Projector does not seem to be functioning properly, check the items below before you contact an authorized service center. Symptom Check Point The Camcorder Projector can’t be turned on. • Ensure the battery is fully charged or the AC power adapter is properly connected. The projected image is too dark. The projected image is blurry. • Use the Camcorder Projector in a darker environment.
3M™ Camcorder Projector CP45 Limited Warranty This warranty applies to the continental US only. The warranty terms, conditions, remedy and limitations may vary in other countries. Contact your local 3M company for warranty information. • The 3M™ Camcorder Projector CP45 (the “3M product”) is warranted to be free from defects in material or manufacture for a period of 1 year from the date of purchase.
b. 3Mproductisdesignedtooperateinthetypicalindoorenvironment.Thiswarrantydoesnot cover 3M product used outside of the following circumstances: • • • • c. 100V ~ 240V AC, 50/60 Hz 5˚C ~ 35˚C (41˚F ~ 95˚F) 10 ~ 80% RH (without condensation) 0 ~ 1829 m (0 ~ 6000 feet) above sea level Thiswarrantydoesnotcoveranyadditionalcostsincluding,butnotlimitedto,thoseassociated withremoval,cleaningorinstallationofthe3Mproduct,adjustments,(mechanicalorelectronic) made to the 3M product. d.
3M™ Camcorder Projector CP45 EXCEPTASSPECIFICALLYSTATEDINTHEAPPLICABLE3MPRODUCTMANUAL,3MSHALLNOTBE LIABLEFORANYINDIRECT,INCIDENTAL,SPECIALORCONSEQUENTIALDAMAGES(INCLUDING, BUT NOT LIMITED TO, LOSS OF PROFITS, REVENUE OR BUSINESS) RESULTING FROM, OR IN ANY WAY RELATED TO PERFORMANCE, USE OR INABILITY TO USE ANY OF THE 3M PRODUCT. This limitation applies regardless of the legal theory upon which damages are sought.
3M™ Camcorder Projector CP45 © 3M 2011. All Rights Reserved.
Mobile Interactive Solutions Division 3M Austin Center 6801 River Place Blvd. Austin, TX 78726-9000 866-631-1656 Please recycle. Printed in China. © 3M 2011. All rights reserved Made in China 78-6971-1591-9 Rev. A 82-802-90010v1.