Model C1060 Headset Intercom System Replacement Parts and Service Replacement Parts List Ordering Replacement Parts Technical Service The following pages show replacement parts for the model C1060 Headset Intercom. Order parts by the model number, part number, part name and quantity required.
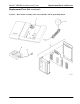
Model C1060 Headset Intercom System Replacement Parts and Service Replacement Parts List (continued) Section 1 – Base Station Assembly, Interconnect Module, and Programming Station ©3M 2005 November 2
Model C1060 Headset Intercom System Item No. Part Number Description Replacement Parts and Service Qty. 0 .......................78-9236-6826-9 ............BASE STATION ASSEMBLY, Model C922 (w/o Power Supply)...1 1 .......................78-8095-0500-7 ............CABINET, Base Station .....................................................................1 1A.....................78-8095-0965-2 ............HINGE, Assembly, (Replacement) ....................................................1 2 .............
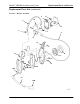
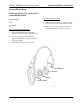
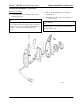
Model C1060 Headset Intercom System Replacement Parts and Service Replacement Parts List (continued) Section 2 – Headset Assembly 9 11 10 7 13 12 19 6 8 4 1 17 16 2 15 3 5 14B 18 20 14C 14A 14 14D ©3M 2005 November 4
Model C1060 Headset Intercom System Item No. Part Number Description Replacement Parts and Service Qty. 0 .......................78-6911-4723-1 ............Headset Model C1060 .............................................................1 1 .......................78-6911-4727-2 ............Headband Pad, for Model C1060 (pkg of 10)..........................1 2 .......................78-6911-4728-0 ............Ear Pad, for Model C1060 (pkg of 10) ....................................1 3 ...................
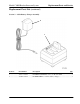
Model C1060 Headset Intercom System Replacement Parts and Service Replacement Parts List (continued) Section 3 – 3-Slot Battery Charger Assembly 2 1 Item No. Part Number Description Qty. 1 .......................78-6911-4724-9 ............BATTERY CHARGER, 3-Slot,.for Model C1060 ............................1 2 .......................78-8028-9283-2 ............POWER SUPPLY, 14 VAC (battery charger) ...................................
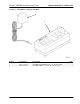
Model C1060 Headset Intercom System Replacement Parts and Service Section 4 – 6-Slot Battery Charger Assembly 2 1 Item No. Part Number Description Qty. 1 .......................78-6911-4725-6 ............BATTERY CHARGER, 6-Slot, for Model C1060 ............................1 2 .......................78-8028-9283-2 ............POWER SUPPLY, 14 VAC, (Battery Charger).................................
Model C1060 Headset Intercom System Replacement Parts and Service Service Procedures Replacing the Ear Cup, the Ear Pad, or the Headband Pad Tools Required: Headband Pad Replacement: None 1. Peel the Headband Pad away from the Battery Holder Cover. Clean off any adhesive residue. Procedures: 2. Remove the protective backing from a new Headband Pad, align and press into place. Ear Cup and Ear Pad Replacement: 1. Twist and pull the Ear Cup and Ear Pad together free of the speaker on the Inner Case. 2.
Model C1060 Headset Intercom System Replacement Parts and Service Service Procedures (continued) Replacing Inner Case Assembly or Outer Case Assembly Removing Outer Case: Tools Required: 1. Disconnect the power connector located at the top of the Main PWA. 1 - Small size Phillips Screwdriver 1 – External retaining ring pliers Procedure: IMPORTANT Always be careful to avoid pinching wires between case halves when reassembling the case. Damaged wiring may cause the headset to fail during use.
Model C1060 Headset Intercom System Replacement Parts and Service Service Procedures (continued) Mic Boom Assembly: 1. Locate and remove the retaining ring using the retaining ring pliers. Caution Make sure you set the retaining ring tool adjustment screw to limit how far the retaining ring is expanded. Unless this is done, the retaining ring will stretch out of shape to a point where it will not stay in its groove. ©3M 2005 November 2. Remove the Spring Washer, Nylon Washer, and Mic Boom. 3.
Model C1060 Headset Intercom System Replacement Parts and Service Service Procedures (continued) Reassembly procedure 1. Replace Mic Boom assembly as described. (see previous section Mic Boom Assembly:) 2. Install Main PWA and antenna in Outer Case. 3. Connect Mic Boom cable to bottom connector on PWA. 12. Reinstall the battery, power up and checkout operation of the headset, including Headband slide. 13. Replace three case screws, Ear Cup and Ear Pad on Inner Case. 4.
Model C1060 Headset Intercom System Replacement Parts and Service Service Procedures (continued) Replacing the Headband Assembly Tools Required: 1 - Small size Phillips Screwdriver 1 – Soldering iron Procedure: 1. Make sure power is off and remove the battery. 2. Remove the Ear Pad and Ear Cup. 3. Remove three screws from the Inner Case. 4. Separate the case halves by pulling the Inner Case down, then apart at the bottom.
Model C1060 Headset Intercom System Replacement Parts and Service Service Procedures (continued) Replacing Battery Holder Parts 1 – Soldering iron. 5. Press the Battery Latch Spring onto the top peg of the Battery Latch. Insert the Latch with Spring down through the top of the Base as shown. The beveled bottom edge of the Latch MUST face the battery. Procedures: 6. Press the top of the Spring into the small molded ribs located inside the top of the Base.
Model C1060 Headset Intercom System Replacement Parts and Service Service Procedures (continued) Checking out Headset Operation Tools Required: Functioning Wireless Intercom System with at least one additional model C1060 Headset. Procedure: NOTE Check headset operation before replacing the case screws. It is a good idea to simply snap the case together without the screws until the headset is completely checked out. 1. Make sure a fully charged battery is installed in the headset being tested. 2.