Digital Staff Workstation Model 795 Staff Guide 3M Library Systems 3M Center, Building 225-4N-14 St. Paul, Minnesota 55144-1000 www.3M.com/library Copyright © 2002, 3M IPC. All rights reserved. 75-0500-4450-4, Rev.
This page is intentionally left blank.
Table of Contents Safety Information 3M Digital Staff Workstation............................................................ 1 Intended Use Statement .......................................................................... 1 Safety Messages ...................................................................................... 2 Safety Message Format ...................................................................... 2 Safety Messages for the Digital Staff Workstation..............................
Processing Items ................................................ 17 Standard Configuration ......................................................................... 17 Local and Remote Configurations ....................................................... 19 Item Placement................................................... 21 Placement of Bar-coded Items ............................................................. 22 Placement of Bar-coded Items (Parallel Bar Codes)..........................
Safety Information 3M Digital Staff Workstation We provide important safety information and warnings to assist you in understanding and avoiding potential harm to yourself, and possible damage to equipment, during the installation and use of the 3M Digital Staff Workstation.
Safety Messages We include safety messages and safety labels in this manual to help you protect your safety and the safety of others. This section contains important information to help you recognize and understand these safety messages. NOTE: BEFORE YOU PROCEED WITH THE INSTALLAT ION, PLEASE READ ALL SAFETY MESSAGES. Safety Message Format Safety messages are designed to alert you to potential hazards that can cause personal injury to you or others.
Safety Messages for the Digital Staff Workstation The following safety messages appear in this manual: DANGER This equipment contains high voltage. Risk of electric shock. Do not remove protective panels. Only certified 3M technicians should service this equipment. Make sure power is off before disconnecting monitor. If power is not off, the monitor will be damaged. WARNING Possibility of personal injury. The operation of the Staff Workstation involves repeated body movements.
pounds (32 Kg). Attempting to lift the Staff Workstation may cause personal injury. To avoid any possibility of injury, the Staff Workstation should be lifted by more than one person. The Staff Workstation should be lifted more with the leg muscles and less with back and arm muscles. CAUTION Using controls or adjustments or performing procedures other than those specified herein may result in hazardous laser light exposure.
Safety Labels We include safety labels on the devices for your safety and the safety of others. Safety labels are designed to alert you to potential hazards associated with a piece of equipment that can cause personal injury to you or others. Safety labels can also indicate the possibility of property damage. Please read all safety labels.
Safety Label Locations LASER APERTURE This product complies with 21 CFR Subchapter J, IEC 60825-1:1977 and EN 60825-1:1996 Model 795 Staff Workstation 100-120V/200-240 V~ 50/60 Hz 2.5/1.5 A 110 W L 0678 S/N: 3M Library Systems St.
EMC Compliance USA and Canada FCC Radio Frequency Rules and Regulations This equipment has been tested and found to comply with the limits for a Class A device, pursuant to Part 15 of the FCC Rules. These limits are designed to provide reasonable protection against harmful interference when the equipment is operated in a commercial environment.
Introduction The 3M™ Digital Staff Workstation consolidates a number of library functions to enable staff to process items identified by either digital identification tags or bar codes. The workstation reads item identification information from existing media and passes it to the library terminal connected to the library circulation system. ™ The system secures and un-secures 3M Tattle-Tape Security Strips in items as required.
Digital Staff Workstation Configurations There are three Digital Staff Workstation configurations. Please note your system's configuration. Certain information in this guide is specific to configuration. This is noted throughout the guide. Standard Configuration In this configuration, the main user interface controls the functions of the Digital Staff Workstation. The circulation system software runs on the library computer.
Digital Identification Tags versus Bar Codes Bar codes on patron cards or library items may be read to provide item identifier information to the library circulation system. Digital identification tags also contain information about the type of media being processed. This enables the workstation to inhibit security operations for magnetic materials. Magnetic Materials Recorded magnetic media, such as audio or video tapes, may be damaged by security operations of the Digital Staff Workstation.
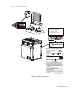
The memory card drive (Figure 3) is used to access memory cards containing the memory card database, which contains Search Lists and other information. Figure 3: Memory Card Drive Workstation Upper Unit The workstation upper unit (Figure 4) can be set on the counter top and moved as needed or permanently installed in-counter so that the deck surface is flush with the counter top.
Software Wedge (Local and Remote Configurations only) The software wedge is part of the Companion user interface and is responsible for sending ID information from barcodes, or Digital ID tags to the library circulation system. It works similarly to a hardware wedge, sending ID information to the currently active application. Normally this is your library circulation system.
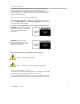
Using the KVM Switch (Remote Configuration only) The KVM switch box allows the Digital Staff Workstation and a library computer to share one monitor, mouse, and keyboard. Select button The KVM switch box is typically configured as follows: § Computer 1 represents the library computer. § Computer 2 represents the Digital Staff Workstation computer. Operating the KVM Switch Using the Keyboard § Press the Ctrl key twice in rapid succession to change the selected computer.
Startup Procedure To apply power to the Digital Staff Workstation: § Move the On/Off switch located on the front of the cabinet to the On position. (Figure 6). Only 3M-trained service technicians should remove the cover of the unit. Standard Configuration § On/off switch The main user interface appears on the screen after you apply power to the Digital Staff Workstation. The software will take a few seconds to load.
Exit/Shut Down Procedure Standard Configuration 1 On the Staff screen, click the Exit button. § The Exit window appears. Staff screen 2 Select one of the following: • Exit – Exits the Staff Workstation application and returns to the Windows desktop. • Exit and shut down computer – Does a complete shut down of the Digital Staff Workstation computer. You’ll need to turn off the power switch on the workstation once Windows has shut down. • Exit and restart computer – Restarts the computer.
Local Configuration 1 Click Exit in the Operations menu of the Companion user interface. 2 Click Shutdown in the Windows Start menu. 3 Click Shutdown the computer, then click Yes. 4 When Windows has completely shut down, switch off the Digital Staff Workstation power switch. Companion UI - Operations menu Remote Configuration 1 Make sure the KVM switch is set to the library computer. 2 Click Exit in the Operations menu of the Companion user interface (UI).
Processing Items The following procedures allow you to process items using the Digital Staff Workstation. The procedures vary according to your Digital Staff Workstation's configuration. Refer to the appropriate procedure for your configuration: h Standard configuration i Local and Remote configurations Standard Configuration Use the following procedure to process items using the Digital Staff Workstation - Standard configuration.
When a confirmation for an action is required, a button will be displayed on the right side of the message area. The example to the right shows a case where the edge sensors are covered and a confirmation is required for the SECURE action. The Check-in button is the default action so the user can press the Enter key on the keyboard to select it, or touch the Check-in button on the screen. 4 Place the Item on the Deck.
Local and Remote Configurations Use the following procedure to process items using the Digital Staff Workstation - Local and Remote configurations. Check-in/Check-out The check-in and check-out functions send IDs to the circulation system and secure, or un-secure the item. Check-in (a) and checkout (b) may be selected using the buttons to the right, or through the Operation menu. If you configured the Administrative Settings to not allow choices (e.g.
4 Place the Item on the Deck. § Place the book or other item on the deck in the correct position for processing (shown at right). See Placement of Items on the Deck – General Guidelines. Correct Position For Processing The system checks for a digital identification tag or bar code. j If a digital identification tag is present, the workstation reads the tag.
Item Placement There are six sensors on the workstation deck. Sensors 6 and 1 are “edge sensors.” Sensors 5, 4, 3, and 2 are “inner (or non-edge) sensors.” Correct Placement Items correctly placed on the deck must be (Figure 8): § touching the back wall (a) (for books, the spine should be touching the back wall), § within (inside of) the edge sensors on the deck (b), and § covering at least two adjacent inner sensors (c).
Placement of Bar-coded Items Correct Placement for Barcoded Items Incorrect Placement for Barcoded Items Patron Card Move Item to Back Wall CD Move Item Under Scan Line Book 795_OG_001 Scanner and bar code placement in your library may be different than shown above.
Placement of Bar-coded Items (Parallel Bar Codes) Correct Placement for Barcoded Items Patron Card Incorrect Placement for Barcoded Items Move Book Left CD Move Book Left and to Back Wall Book 75-0500-4450-4 C, 060-A Move Book Left 23
Placement of Items with Digital ID Tags (Correct) Covering two adjacent non-edge sensors left Covering three adjacent non-edge sensors right Covering three adjacent non-edge sensors left Covering two adjacent non-edge sensors center Covering two adjacent non-edge sensors right For books, the spine or binding must be against the back wall of the deck.
Placement of Items with Digital ID Tags (Warnings) Oversize Book − Right Oversize Book − Left Oversize Book Covering Deck Oversize books will produce a warning sound. On-screen instructions will assist you in processing the items.
Placement of Items with Digital ID Tags (Incorrect) Move Item to Back Wall Move Item to Back Wall Covering Only One Sensor Edge Condition For books, the spine or binding must be against the back wall of the deck.
Operations The standard user interface is factory set to display the Check-in and Check-out buttons, the Settings button, the Verify button and the Help button. The library Administrator may choose to change the configuration settings and may select additional functions. 1 2 3 4 5 6 14 7 8 9 10 11 12 13 Standard user interface 1 Message area Displays instructions, conditions, and messages that prompt the user, such as “Present Items” or “Select Operation.
The Companion user interface (UI) for the Digital Staff Workstation allows you to perform the same functions as the standard user interface. Refer to the table on page 30 for user interface control descriptions. The Companion UI uses a software program called a software wedge to send keyboard input and item IDs to the circulation system. Refer to the Digital Staff Workstation Administrator's Guide for information on administrative settings.
Check-In To check items into the library: 1 Go into Check-in mode: For the Standard configuration: § Select the button and follow the instructions on the screen. For Local and Remote configurations with the Companion UI: § Select the 2 button and follow the instructions on the screen. Place an item on the deck within the designated area.
Check-Out To check items out of the library: 1 Go into Check-out mode: For the Standard configuration: § Select the screen. button and follow the instructions on the For Local and Remote configurations with the Companion UI: § Select the 2 button and follow the instructions on the screen. Place an item on the deck within the designated area.
Secure/Un-secure Only (if enabled) Item types can be secured/un-secured automatically, secured/unsecured only after confirmation, or never secured. These settings can be modified in administrative settings. Refer to the 3M Digital Staff Workstation Model 795 Administrator Guide. To secure items only The following steps will secure an item without sending the item ID to the library circulation system. 1 Go into Check-in mode: For the Standard configuration: § Select the button.
To un-secure items only The following steps will un-secure an item without sending the item ID to the library circulation system. 1 Go into Check-out mode: For the Standard configuration: § Select the button. § Select the (Send ID) button to turn off sending IDs. You will receive the messages “Present items and Un-secure Only.” Follow the instructions on the screen.
Send ID Only (if enabled) To send item IDs to the library circulation system: 1 Go into Check-in or Check-out mode. For the Standard configuration: § Select the button or the button. § Select the (Security) button to turn OFF the security function. This will turn ON the Send ID Only function. Follow the instructions on the screen. For Local and Remote configurations with the Companion UI: § Click Send ID in the Operations menu and follow the instructions on the screen.
Number of Items (if enabled) To select the number of items to process at one time For the Standard configuration: Select the appropriate item number button: § (to process one item) § (to process two items) § (to process three items) For Local and Remote configurations with the Companion UI: § Click the desired number of items in the Items menu. The number will appear in the menu bar next to Items.
Staff Settings Library personnel have access to various configuration settings in the Staff Settings window.
Adjusting the Sound Volume For Standard Configuration: 1 Click the Sound Volume button. A sound volume adjustment pop-up appears. 2 Adjust the sound volume by using the mouse to drag the volume adjustment bar (up or down) to the desired setting. You can also press the Up and Down arrow keys on the keyboard to adjust the setting. 3 Click the Close button. Loud Moderate Soft (Default) For Local and Remote Configurations: 1 Click the Volume icon in the Windows taskbar. The volume control appears.
For Local and Remote Configurations: 1 From the Settings menu, click Language. 2 From the Language list, select one of the supported languages. § The text in the Companion UI will be displayed in the selected language. Select the language for the menus and messages on the Companion UI. Using the Always on Top setting If you select Always on top The Companion UI is always visible on the screen. You can still use the Minimize button to remove the Companion UI from the screen.
Search Lists (All Configurations) A search list is a list of items the library would like to find. Search lists can include missing or lost items, items that are on hold, or items to be removed from circulation or “weeded.” Several search lists can be active at the same time. Alerts display on the Staff screen for any items found on active search lists.
Enabling and Disabling Search Lists The Search List window displays search lists for the Memory Card Database and allows you to enable and disable search lists. To view the Search Lists window, click in the Staff Settings window. Click the check boxes next to search lists to enable and disable them. A red check mark indicates that the list is enabled. A notification appears in a message box on the screen when an item included in an enabled search list is processed.
Appendix Items That Don’t Fit on the Deck (Standard Configuration only) If an item doesn’t fit on the deck, you can still process the item using the light pen. To process an item using the light pen, move the tip of the light pen across the surface of the item’s bar code. The item’s identification information is passed on to the library circulation system. Sets A set is two or more items – with or without a case and with the same item identifier – that will always be checked in, or checked out together.
For Local and Remote Configurations: 1 To exit the Digital Staff Workstation application: § Click Exit in the Operations menu. 2 If you're using the Remote configuration, use the KVM switch to change the selected computer to the Digital Staff Workstation computer. 3 To start the conversion software: § Click the Digital Conversion Station icon on the desktop. or § At the Windows desktop, select Start > Programs > 3M Library Systems > 3M Digital Conversion Station > 3M Digital Conversion Station.
Inserting a Memory Card Ensure that the memory card is properly oriented and then insert it into the memory card drive. Removing a Memory Card Always use the following procedure to remove the memory card from the memory card drive. CAUTION DO NOT remove a memory card while the activity light on the memory card drive is flashing. § If you remove the memory card before the activity light stops flashing, you may corrupt the data files on the memory card, making it impossible to read the data.