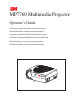
MP7760 Multimedia Projector Operator’s Guide MP7630 Projecteur multimédia Guide de l'opérateur MP7630 Multimedia-Projektor Benutzerhandbuch Proyector de Multimedia MP7630 Manual del Usuario MP7630 Proiettore Multimediale Manuale dell'operatore MP7630 Bruksanvisning för multimediaprojektor MP7630 Multimedia Projector Gebruiksaanwijzing © 3M IPC 2000 3M™ Multimedia Projector MP7760 1
3M™ Multimedia Projector MP7760 © 3M IPC 2000
Table of Contents Please click on any section to jump to that section Introduction Safeguards .................................................................................... 4 Warranty ........................................................................................ 6 Section 1: Unpack 1-1. Contents of Shipping Box ...................................................... 7 1-2. Keep Your Packing Materials ................................................. 7 1-3. What’s Next? ......................
Introduction Intended Use Before operating the machine, please read the entire manual thoroughly. The 3M Multimedia Projector MP7760 was designed, built, and tested for use indoors, using 3M lamps and nominal local voltages. The use of other replacement lamps, outdoor operation, operation in environments containing heavy cigarette smoke or different voltages has not been tested and could damage the projector or peripheral equipment and/or create potentially unsafe operationg conditions.
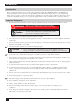
Introduction Product Safety Labels Safety labels are used on or within the 7760 projector to alert you to items or areas requiring your attention. Inside of projector gets very HOT! Allow internal parts to cool before replacing the lamp. Location of Product Safety Labels Save These Instructions The information contained in this manual will help you operate and maintain your 3M™ MP7760 Multimedia Projector.
Introduction Thank you for choosing 3M Thank you for choosing 3M multimedia projection equipment. This product has been produced in accordance with 3M’s highest quality and safety standards to ensure smooth and troublefree use in the years to come. For optimum performance, please follow the operating instructions carefully. We hope you will enjoy using this high performance product in your meetings, presentations, and training sessions.
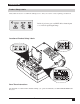
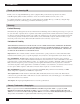
Section 1: Unpack 1-1. Contents of Shipping Box The MP7760 is shipped with the necessary cables required for standard VCR, PC or laptop computer connections. Carefully unpack and verify that you have all of the items shown below in Figure 1-1. If any of these items are missing, please contact your place of purchase. Item 1. MP7760 Multimedia Projector 2. IR Remote Control transmitter (Two AAAbatteries included) 3. Power cord set (US, UK, Europe) 4. VGA-RGB cable (2m) 5. RCA Composite video cable (3m) 6.
Section 2: Production Description 2-1. Machine Characteristics The MP7760 integrates NTP lamp and Digital Light Processor (DLP) technology. It accepts input from computer and/or video sources and projects a super bright image. The MP7760 Multimedia Projector is easy to set up and use.
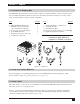
Section 3: Set-Up/Connections 3-1. Terminal Connection Panel The MP7760 projector has terminal connections on the backside of the projector. Refer to Section 3.4-Cable Connections for more detail. Figure 3-1. Input Connection Terminals Figure 3-1. Input Connection Terminals 1. 2. 3. 4. 5. 6. 7. 8. SVHS: S-VHS video input. VIDEO IN: Composite video input. AUDIO IN: Audio input (Stereo converted to mono). AUX IN: Auxilary/Camera input. Only compatible with 3M devices.
Section 3: Set-Up/Connections 3-3. Mouse Connection The MP7760 has mouse emulation capability. Connect your computer mouse to the MP7760 and control computer mouse functions using the remote control. 1. Power down the computer and projector. 2. Remove the mouse cable connection from your computer mouse port. 3. Connect the 9-pin D-Sub plug on the mouse cable to the RS-232 port on the projector. (Not necessary for USB mouse emulation!) 4.
Section 3: Set-Up/Connections Cable Connection, continued *PC-Audio cable optional ***USB Mouse cable optional **MAC cable and adapter optional Figure 3-3.
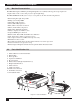
Section 3: Set-Up/Connections 3-5. Image Size (Projector-to-Screen Distance) Adjust the size of the projected image by using the zoom ring on the upper side of the projection lens. Figure 3-4. The projected image size values, as they relate to the distance-to-screen value, are shown for focal lengths of f=28mm and f=36.2mm. Figure 3-5. . Figure 3-4. Adjusting Focus and Zoom Distance to Screen m (ft.) Maximum (f = 28 mm) Minimum (f = 36.2 mm) Image Width m (in.) Image Height m (in.) Image Width m (in.
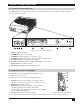
Section 4: Operating Instructions 4-1. Power Up Projector Read the Important Safeguards before operating the MP7760 projector. After all cable connections have been completed, the projector can be powered up. During operation, keep the exhaust and intake air vents clear of obstructions to allow proper cooling. Caution Allow a projector that has been stored in a cold place to warm up to room temperature before applying power. Figure 4-1. Power Up Projector 1. Press the Main Power switch ➊ to ON.
Section 4: Operating Instructions 4-2. Standby Mode When the projector is not being used, place it into standby mode. 1. Press the Standby button. 2. The lamp will switch off and the red LED will illuminate. ü Note: The fan motor will continue to run for a few minutes until the projector cools down and then the fan will turn off. 3. Press the Standby button again to illuminate the lamp and project an image on the screen. 4-3. Projector Power Down 1.
Section 4: Operating Instructions Sub-Menu: Select the desired sub-menu (see Main Menu). Press the Disc Pad or Joystick to the right or the Enter button to display the sub-menu. The sub-menu name is on the top line. A check box field at the right of a sub-menu line indicates that you can toggle that value On/Off by pressing the Enter button. A slider bar at the right of a sub-menu line indicates you can increase or decrease the value.
Section 4: Operating Instructions 4-5.
Section 4: Operating Instructions 4-5. Menu Adjustments/Settings, continued In active PC/RGB mode Advanced Set-Up (PC/RGB) Description / Action Default Setting Select projection orientation (Standard / Rear / Rear/Top Down / Top/Down) Standard Sub-Menu Items Projection (drop-down window) Remote Control Remote control receiver -on / -off RC Address Select remote control address (1 / 2 / 3 / 4) Sync Mode (drop-down window) Select Sync Mode for PC/RGB (separate TTL / composite TTL / separate ana.
Section 4: Operating Instructions 4-5.
Section 5: Remote Control 5-1. Remote Control Functions Aim the remote control toward the projection screen or at the sensor. Press desired remote button to send a signal to the projector. Mute: Toggle On/Off the audio sound. *Standby: Switch the projector between Standby mode (lamp off, fan off) and Operation mode (lamp on, fan on). PC: Switch displayed image to PC/RGB input. *Volume: Decrease (-) or increase (+) speaker volume. Brightness: Decrease (-) or increase (+) brightness of the displayed image.
Section 5: Remote Control 5-2. Meaning Of The Icons An icon will display to indicate a presentation tool is active. Pointer mode Activate with Pointer key on IR-Remote control In the Pointer mode you can move a pointer over and around the picture area. By pressing the Pointer key on the remote control a second time it will be turned off. Freeze mode Activate with Freeze key on IR-Remote control In the Freeze mode the picture will be frozen.
Section 5: Remote Control 5-2. Meaning Of The Icons, continued Question mark A question mark in a box will appear if the projector can’t recognize the mode of the data input source. Even if you select a standard VESA mode on your system this can happen, because some device drivers of the graphic cards in the PC using timing parameters which differ from the parameters given out from the VESA organization.
Section 5: Remote Control 5-3. Battery Replacement The remote control uses two AAA batteries. The battery cover is located on the back of the remote control. 1. Press the locking button to release door. (Figure 5-1) 2. Move the door to the right to remove it and set it to the side. 3. Remove old batteries. 4. Install new batteries. Make sure the polarity (+/-) on each battery matches the decal. 5. Replace battery compartment door. Figure 5-1. Replacing Batteries 245 IR~2.
Section 6: Maintenance 6-1. Replacing The Air Filter For best performance, replace the air filter each time the projection lamp is changed. ü Note: Periodically check air filter for excess dust or dirt. Replace or clean as needed! 1. Switch off the unit and unplug the power cord 1 of the projector. 2. Remove the back panel 2 : 1 Press the left and the right tabs of the back panel with your finger tips to the middle of the back panel. 2 Pull the lower end of the back panel towards yourself.
Section 6: Maintenance 6-2. Replacing Projection Lamp The metal halide lamp of the projector has a limited lifetime of approximately 1500 hours. If the projected image appears dark or a red lamp life indicator bar displays during projector startup, you should change the lamp and air filter. ü Important Note: This lamp contains mercury. Consult your local hazardous waste regulations and dispose of this lamp in a proper manner.
Section 6: Maintenance 6-3. Lamp Life Indicator The elapsed operating time of the lamp is displayed on the Info sub-menu. From the Main menu, select INFO to display the lamp life. As long as the lamp indicator bar is green, the lamp is good. When the bar changes to red, the lamp should be changed. After changing the projection lamp, the lamp life indicator must be reset to zero. To reset the lamp life indicator: 1. 2. 3. 4. 5. 6. Press the Menu button to display the main menu.
Section 7: Troubleshooting 7-1. Troubleshooting Problems and Solutions Problem Probable Cause Possible Solution Image is disturbed or unstable. • Wrong Sync setting. • Wrong Tracking value. • Set to factory default setting. (See below.) • Change Sync setting in the Picture menu for optimum performance. • For vertical interference stripes, change the Tracking in the Picture menu for optimim performance. No computer image projected. Message “ Looking for signal...” displays. • Loose cable.
Section 7: Troubleshooting 7-2. Service Information For product information, product assistance, service information, or to order accessories or spare parts, please call: • In U.S. or Canada: 1-800-328-1371 • In other locations, contact your local 3M Sales office.
Section 8: Product Specifications 8-1. Technical Specifications Display Technology Single DMD Resolution 1,024 x 768 (total 2,359,296 pixels) 625 (PAL) / 525 (NTSC) video lines to full screen size magnification Brightness 1000 ANSI lumens (typical) Colors 16,770,000 colors Contrast Ratio 300:1 (typical) Projection Lens Throw Ratio = 1.6 - 2.1 / f = 28.0 - 36.2 mm, Manual Zoom / Manual Focus Picture Size 0.58 - 7.75 m (23 - 305 in.) diagonal, 2.3 m diagonal at 3.
Section 8: Product Specifications 8-2. Accessory & Spare Parts List Part Description Part Number Projection Lamp Kit - NTP Lamp (200 W) - Air Filter 78-8118-8081-0 Air Filter (included in lamp kit 78-8118-8081-0) 78-8118-8501-7 Power Cords (U.S., UK, Europe) For special cords, see Appendix D-3. DY-0205-1356-9 (U.
Section 8: Product Specifications 8-3. How to Order Please order these parts through your dealer, or contact 3M Customer Service at the following number: • In U.S. or Canada: 1-800-328-1371 • In other locations, contact your local 3M Sales office.
Appendix A-1. Power Cord Sets A standard power cord set (US, UK, or European) will be included with each MP7760. If you need a special power cord set, contact your local 3M authorized dealer. The power cords must be in accordance with the regional and corresponding national safety regulations and be properly approved. Examples of these power cords are shown below.
Appendix A-2. Factory Default Settings The factory default settings of the projector can be restored by pressing Enter/Source and Menu simultaneously on the control panel when switching on the main power switch of the projector and pressing the Standby button afterward. The projector will start immediately and the message “Parameter factory settings restored” will display in the starting screen to indicate the default settings are reset.
Appendix A-3. Example of Computer Signals Table of the predefined Data modes: Data Mode Name Resolution Hor. x Vert.
Appendix A-3. Example of Computer Signals, continued Table of the predefined Resolutions for User-Mode 1...3: Predefined Resolutions 640 x 480 720 x 350 640 x 400 720 x 400 640 x 480 800 x 600 832 x 624 1024 x 768 1152 x 864 1152 x 870 1152 x 900 1280 x 960 1280 x 1024 For more information, please refer to the CD-ROM.
© 3M IPC 2000 3M™ Multimedia Projector MP7760 35
Important Notice All statements, technical information, and recommendations related to 3M’s products are based on information believed to be reliable, but the accuracy or completeness is not guaranteed. Before using this product, you must evaluate it and determine if it is suitable for your intended application. You assume all risks and liability associated with such use.