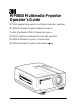
MP8030 Multimedia Projector Operator’s Guide MP8030 Appareil de projection multimédia Guide de l’opérateur MP8030 Multimedia-Projektor Bedienerhandbuch Portatil Multimedia MP8030 Manual del usuario MP8030 Projettore multimedia Manuale dell’operatore MP8030 Multimedia-Projektor Instruktionsbok MP8030 Multimedia Projector Gebruiksaanwyzing
Table of Contents Table of Contents Warranty . . . . . . . . . . . . . . . . . . . . . . . . . . . . . . . . . . . . . . . . . . . . . . . . . . . . . . . . . . . . . . . . . . . . 1 Safeguards . . . . . . . . . . . . . . . . . . . . . . . . . . . . . . . . . . . . . . . . . . . . . . . . . . . . . . . . . . . . . . . . . . 2 Section 1: Unpack . . . . . . . . . . . . . . . . . . . . . . . . . . . . . . . . . . . . . . . . . . . . . . . . . . . . . . . . . . . . 3 1-1. Contents of Shipping Box . . .
Table of Contents, continued Section 6: Lamp Replacement . . . . . . . . . . . . . . . . . . . . . . . . . . . . . . . . . . . . . . . . . . . . . . . . . . 19 6-1. Metal Halide Projector Lamp . . . . . . . . . . . . . . . . . . . . . . . . . . . . . . . . . . . . . . . . . . . . . . . . 19 6-2. Replacing the Lamp . . . . . . . . . . . . . . . . . . . . . . . . . . . . . . . . . . . . . . . . . . . . . . . . . . . . . . . . 19 Section 7: Maintenance . . . . . . . . . . . . . . . . . . . . . . . . . .
Warranty THANK YOU FOR CHOOSING 3M Thank you for choosing 3M multimedia projection equipment. This product has been produced in accordance with 3M’s highest quality and safety standards to ensure smooth and troublefree use in the years to come. For optimum performance, please follow the operating instructions carefully. We hope you will enjoy using this high performance product in your meetings, presentations and training sessions.
Safeguards IMPORTANT SAFEGUARDS 1. Read and understand all instructions before using. Pay particular attention to areas where this symbol ! is shown. ! WARNING – Indicates a potentially hazardous situation which, if not avoided, could result in death or serious injury. ! Caution – Indicates a potentially hazardous situation which, if not avoided, could result in minor or moderate injury. It may also be used to alert against unsafe practices. 2.
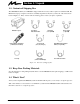
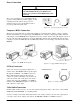
Section 1: Unpack 1-1. Contents of Shipping Box The 3MMultimedia Projector MP8030 is shipped with the necessary cables required for standard VCR, PC, MAC II or laptop computer connections. Carefully unpack and verify that you have all of the items shown below in Figure 1-1. If any of these items are missing, please contact your place of purchase. MP8030 Projector 3-Conductor Video/Audio Cable Remote Control Transmitter (2-AA batteries included) 3-Power Cords (U.S., U.K.
Section 2: Product Description 2-1. Machine Characteristics The 3MMultimedia Projector MP8030 integrates metal halide lamp and polysilicon display technology into a single unit. It accepts input from two different computer sources and two video/audio sources and projects a bright super crisp image. Switching your presentation from a computer to a video image back to a computer simply requires the push of a button on the remote control keypad or control panel keypad.
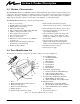
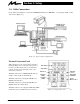
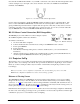
Section 3: Setup 3-1. Cable Connections It only takes a few minutes to connect the 3MMultimedia Projector MP8030 to your computer, VCR or other video device (Figure 3-1). Desktop Computer CRT Display Laptop Computer Figure 3-1. Typical Cable Configuration Terminal Connection Panel Take a moment to look over the input connection terminals (Figure 3-2) on the side of the projector. Connect your first input source to the Terminal 1 connectors and your second input source to the Terminal 2 connectors.
Power Connection ! Caution To prevent damage to equipment, all power to the 3MMultimedia Projector MP8030 and input sources must be turned OFF during cable hook up. The power cord (Figure 3-3) is detachable from the projector and has different connection plugs on each end. Plug the female end into the power cord terminal on the projector and the male end into a properly grounded electrical outlet. Figure 3-3.
Next, find the AUDIO OUT terminals on your VCR or other audio source. Insert the left and right audio cable connectors (Figure 3-7) to the input source, and connect the other end to the AUDIO-L and AUDIO-R terminals on the MP8030. Figure 3-7. 3-Conductor Video/Audio Input Cable Use the Audio-Out terminal to disable the MP8030 speaker and channel sound to external speakers. The remote control VOLUME and MUTE buttons will control the external speaker volume levels.
Projector-to-Viewing Screen Alignment The size of the projection screen and the distance of the projector to the screen are important considerations for determining the best placement of the projector. After the best projector-to-screen distance has been determined, the position of the projection screen in relation to the center of the projection lens must be considered. a = Distance to viewing screen b = Center of lens to bottom of projected image 90° 90° b a Figure 3-9. Top View Figure 3-10.
Adjusting the Projector Elevation The elevation of the projected image can be adjusted by pushing the lock lever (Figure 3-11) on each projector leg to the unlock position. Raise or lower the projector body to extend or retract the projector leg until the desired elevation (1 to 7°) is obtained. Push the lock lever to the lock position to secure each projector leg. UNLOCK LOCK Lock Lever Foot Figure 3-11.
Section 4: Operating the Projector 4-1. Turning On the Projector Read the Important Safeguards before operating the 3MMultimedia Projector MP8030. Refer to Section 3 to make all cable connections. When the input cables and power cords are connected, turn on the power, adjust the size and focus of the projected image and begin your presentation. Power On: Turn on the projector power, then turn on the power to your input sources.
Mute: Press the MUTE button to turn off the sound to the speakers. Press again to restore the sound. Note The volume level is controlled from the remote control transmitter. Zoom: Press the ZOOM button to adjust the image size to fill the screen. Press and hold down + or – until the image is the desired size. If you cannot make the image fill the screen, move the projector further back from the screen. button to adjust the sharpness of the image.
4-4. Adjusting the Picture The projected image can be adjusted from on-screen menus using either the projector control panel or remote control transmitter buttons.
Some menu options will have an arrow at the end of the line (VIDEO1, VIDEO2). This arrow indicates that a sub-menu (Figure 4-4) with additional options will display if you select that option. SETUP PRESS RGB1 RGB2 VIDEO1 → VIDEO2 → TEST PATTERN ↓↑ or INPUT IMAGE OPT. SYSTEM AUTO NTSC PAL SECAM NOTE: VIDEO1 has an arrow to the right. If you select this option the sub-menu SYSTEM will display. The options are: AUTO, NTSC, PAL and SECAM. Figure 4-4.
4-7. Input Menu 4-7-1. Selecting the Input Source The input source is selected from the Input menu. The 3MMultimedia Projector MP8030 has an automatic video selection function that will choose the correct video system or you can manually select the video system. Press the left/right menu arrow (← MENU →) or move the stick switch left/right to select the INPUT menu and the VIDEO1/2 SYSTEM sub-menu. If you select an input source that is not connected, the start-up screen with an error message will display.
4-8-2. Changing the Screen Background Color (Blank Button) The background color of the system menus can be white, blue or black. Press the left/right menu arrow (← MENU →) or move the stick switch left/right to select the IMAGE menu and the BLANK sub-menu. SETUP INPUT → → → → → MIRROR BLANK REVEAL MENU SIZE MESSAGE Select this option: WHITE BLUE BLACK IMAGE OPT.
4-8-5. Display Startup Screen/Error Message If no input is detected when switching to an RGB or video source, either the startup screen and error message “NO INPUT DETECTED” or a blank screen with no error message will display. Press the left/right menu arrow (← MENU →) or move the stick switch left/right to select the IMAGE menu and the MESSAGE sub-menu. SETUP INPUT MIRROR BLANK REVEAL MENU SIZE MESSAGE Select this option: MESSAGE ON MESSAGE OFF IMAGE → → → → → OPT.
4-9-3. Mouse Speed Press the left/right menu arrow (← MENU →) or move the stick switch the MOUSE sub-menu. SETUP INPUT IMAGE OPT. → → → → → → COM. SPEED COM. BITS MOUSE TIMER LANGUAGE AUTO OFF Select this option: Mouse Speed left/right to select the OPT. menu and MOUSE FAST ↑ MEDIUM ↓ SLOW To adjust the following: Mouse speed of movement (slow, medium, fast) 4-9-4. Set Countdown Timer Press the left/right menu arrow (← MENU →) or move the stick switch left/right to select the OPT.
4-9-6. Auto Power Off This function can be set to automatically switch the projector to standby mode if no input is detected within a set period of time. Press the left/right menu arrow (← MENU →) or move the stick switch left/right to select the OPT. menu and the AUTO OFF sub-menu. To disable function, set the wait period to 0. SETUP INPUT COM. SPEED COM. BITS MOUSE TIMER LANGUAGE AUTO OFF Select this option: Automatic Off 18 → → → → → → IMAGE OPT. AUTO OFF 0 min.
Section 5: Remote Control 5-1. How to Operate the Remote Control The remote control keypad (Figure 5-1) has the same buttons as the projector control panel, plus additional buttons to control different projector functions. To use the remote control, aim the remote toward the projection screen and press the desired button. The remote signal will bounce off of the projection screen and back to the sensor on the front of the 3MtMultimedia Projector MP8030.
Section 6: Lamp Replacement 6-1. Metal Halide Projector Lamp If the projected image appears dark or the LAMP indicator light comes on, the lamp may be getting old and in TIMER need of replacement. Press and hold the TIMER button for two seconds to display the number of operating hours for the current projector lamp. Under normal operating conditions, the lamp should last approximately 2000 hours. After that time, the lamp will slowly grow dimmer.
Retaining Screws: Use a standard screwdriver to unscrew the lamp module retaining screws (Figure 6-2). Note There are four lamp module screws that must be loosened. These screws are self-containing screws that cannot be removed from the lamp module. Screws Screws Lamp Module Figure 6-2. Lamp Module Retaining Screws Remove Lamp Module: Grasp the lamp module with one hand and the projector body opening with the other hand (Figure 6-3). Apply upward pressure to the projector body as you slide the lamp out.
Section 7: Maintenance 7-1. Cleaning For best performance, keep your projector free of excess dust and surface dirt. Daily Cleaning Use a soft cloth to remove dust from the projector housing. Cleaning the Projection Lens Use 3M Overhead Cleaner 676 to remove surface dirt and smudges from the projection lens (Figure 7-1) . Figure 7-1. Cleaning the Lens Cleaning the Air Filter For best performance, clean the air filter every 10 hours of operations.
Insert the air cleaner in the door (Figure 7-5), position the retaining frame over the air cleaner and push the tabs down into the tab slots to hold the air cleaner and frame to the door. Tab Slot Figure 7-5. Insert Frame and Air Cleaner Insert the hinge tabs on the door into the slots in the projector body and swing the door down. Push on the handle to fully engage the door latch and then tighten the retaining screws to secure the door. (Figure 7-6).
Section 8: Troubleshooting The 3M Multimedia Projector MP8030 has been designed to be as simple and trouble-free to use as possible. If you should run into problems operating the projector, please review the troubleshooting information below. Problem Possible Solutions Power does not come on D Power cord must be plugged into an electric outlet. D Power switch must be turned on. No picture and sound D Set the projector to the correct input source.
Section 9: Technical Specifications 9-1. Specifications Width Height Depth Weight Panel size Number of pixels per panel Zoom lens Metal halide lamp Speaker Power supply Power consumption Storage temperature range Operating temperature range Input terminals Output terminals Input signals Output signals Batteries for remote control 32 cm (12.59 in.) 17.5 cm (6.9 in.) 46.2 cm (18.2 in.) 10.9 kg (24.3 lbs) 3.3 cm (1.3 in.) 311,696 pixels (H644 X V484), 3 panels = 935,088 total pixels F/Number: F/3.0–F/3.
9-3. Physical Dimensions The 3MMultimedia Projector MP8030 has the following physical dimensions: 114 mm (4.5 in.) 232 mm (9 in.) 320 mm (12.6 in.) 89 mm (3.5 in.) 13 mm (.5 in.) 175 mm (6.9 in.) 26 mm (1 in.) 30 mm (1.2 in.) 196 mm (7.7 in.) 196 mm (7.7 in.) 432 mm (17.3 in.) 165 mm 211 mm (6.5 in.) (8.3 in.) 135 mm (5.3 in.) 386 mm (15.2 in.) 193 mm (7.6 in.) 9-4.
9-5. Computer Video (RGB) Input Terminal The following illustration (Figure 9-1) shows the terminal connections for the D-sub 15 pin HD connector. Refer to the table below for a description of the wire to pin connections. 1 6 10 11 15 Figure 9-1.
We’re easy to reach http://www.mmm.com/office e-mail: presentations@mmm.com 3M Austin Center 3M Canada 3M Mexico, S.A. de C.V. 3M Europe Building A145-5N-01 6801 River Place Blvd. Austin, TX 78726-9000 P.O. Box 5757 London, Ontario N6A 4T1 Apartado Postal 14-139 Mexico, D.F. 07000 Mexico Boulevard de l’Oise 95006 Cerge Pontoife Cedex France Let us help you make the most of your next presentation. We offer everything from presentation supplies to tips for better meetings.