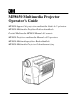
MP8650 Multimedia Projector Operator’s Guide MP8650 Appareil de projection multimédia Guide de l’opérateur MP8650 Multimedia-Projektor Bedienerhandbuch Portatil Multimedia MP8650 Manual del usuario MP8650 Projettore multimedia Manuale dell’operatore MP8650 Multimediaprojektor Brukerhåndbok MP8650 Multimedia Projector Gebruiksaanwÿzing
All statements, technical information, and recommendations related to Seller’s products are based on information believed to be reliable, but the accuracy or completeness thereof is not guaranteed. Before utilizing the product, the user should determine the suitability of the product for its intended use. The user assumes all risks and liability whatsoever in connection with such use.
Safeguards . . . . . . . . . . . . . . . . . . . . . . . . . . . . . . . . . . . . . . . . . . . . . . . . 1 Warranty . . . . . . . . . . . . . . . . . . . . . . . . . . . . . . . . . . . . . . . . . . . . . . . . . . 2 Section 1: Unpack . . . . . . . . . . . . . . . . . . . . . . . . . . . . . . . . . . . . . . . . . . . . . . . . . . . . . . . . . 3 1-1. Contents of Shipping Box . . . . . . . . . . . . . . . . . . . . . . . . . . . . . . . . . . . . . . . . . . . . . . . . . . . . . 3 1-2.
Section 8: Troubleshooting . . . . . . . . . . . . . . . . . . . . . . . . . . . . . . . . . . . . . . . . . . . . . . . . . . 19 8-1. Service Information . . . . . . . . . . . . . . . . . . . . . . . . . . . . . . . . . . . . . . . . . . . . . . . . . . . . . . . . . . 19 Section 9: Technical Specifications . . . . . . . . . . . . . . . . . . . . . . . . . . . . . . . . . . . . . . . . . . . . 20 9-1. Specifications . . . . . . . . . . . . . . . . . . . . . . . . . . . . . . . . . . . . . . . . . . .
Safeguards INTENDED USE Before operating the machine, please read the entire manual thoroughly. The 3M Multimedia Projector MP8650 was designed, built and tested for use indoors, using 3M brand lamps and nominal local voltages. The use of other replacement lamps, outdoor operation or different voltages has not been tested and could damage the projector or peripheral equipment and/or create a potentially unsafe operating condition. IMPORTANT SAFEGUARDS 1. Read and understand all instructions before using.
Warranty THANK YOU FOR CHOOSING 3M Thank you for choosing 3M multimedia projection equipment. This product has been produced in accordance with 3M’s highest quality and safety standards to ensure smooth and troublefree use in the years to come. For optimum performance, please follow the operating instructions carefully. We hope you will enjoy using this high performance product in your meetings, presentations and training sessions.
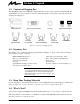
Section 1: Unpack 1-1. Contents of Shipping Box The 3MMultimedia Projector MP8650 is shipped with the necessary cables required for standard VCR, PC, Apple Macintosh or laptop computer connections. Carefully unpack and verify that you have all of the items shown below in Figure 1-1.
Section 2: Product Description 2-1. Machine Characteristics The 3MMultimedia Projector MP8650 integrates metal halide lamp and dichroic optics display technology into a single unit. It accepts input from two different computer sources and two video/audio sources and projects a bright super crisp image.
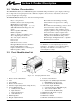
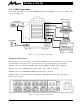
Section 3: Set Up 3-1. Cable Connections It only takes a few minutes to connect the 3MMultimedia Projector MP8650 to your computer, VCR or other video device (Figure 3-1). Desktop or Laptop Sound System Laptop or Desktop Laserdisc or VCR (S-VHS output) Electric Outlet VCR (VHS output) Figure 3-1. Typical Cable Configuration Terminal Connection Panel Take a moment to look over the input connection terminals (Figure 3-2) on the back of the projector.
Power Connection ! Caution To prevent damage to equipment, all power to the MP8650 and input sources must be turned OFF during cable hook up. The power cord (Figure 3-3) is detachable from the projector and has different connection plugs on each end. Plug the female end into the power cord terminal on the projector and the male end into a properly grounded electrical outlet. Figure 3-3.
S-Video Connection Some video devices can generate S-VHS video, or S-Video (Y/C). The MP8650 will accept this signal through the S-VIDEO1 or S-VIDEO2 connectors. The S-VHS cable has identical round four-pin connectors on either end (Figure 3-6). Connect one end to the S-Video jack on the input source device, and the other end to the S-VIDEO1 or S-VIDEO2 terminal on the MP8650. Remember to connect the audio cables for sound output. Four-Pin Connector S-VHS Cable Figure 3-6.
RS-232C Serial Cable/Mouse Receiver Connection The MP8650 remote control transmitter can be used to control the mouse button functions on your personal computer (requires serial cable included) or Apple Macintosh type computer (requires Apple Macintosh mouse receiver which is an accessory). n Note Always power down your PC or Apple Macintosh computer before making any cable connections.
3-2. Projector Set Up The meeting room is your operating environment and any stray light hitting the projection screen will become glare. It is best to use a meeting room without wide-open windows. If there are “light stripes” from venetian blinds, try to find a viewing area that’s away from them – and remember, the light stripes will move as the hour changes. Ambient Light Whenever you have a choice, light the room from the rear, away from the projection screen.
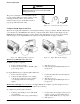
Adjusting the Projector Elevation The elevation can be adjusted by turning the foot adjuster (Figure 3-12) to raise or lower the angle of the projector. Figure 3-12. Foot Adjuster n Note Both adjusting feet must be raised or lowered the same amount to project a level image on the viewing screen. The elevation can be adjusted up to seven degrees. Rear Projection A semi-transparent screen (Figure 3-13) can be used to project an image and view it from the backside of the viewing screen.
Section 4: Operating the Projector 4-1. Turning On the Projector Read the Important Safeguards before operating the MP8650 projector. Refer to Section 3 to make all cable connections. When the input cables and power cords are connected, turn on the power, adjust the size and focus of the projected image and begin your presentation. Power On: Turn on the projector power, then turn on the power to your input sources.
4-2. Adjusting Image Size and Focus Zoom: Press the ZOOM button, then press the or arrow to adjust the image size. If you cannot make the image fill the screen, locate the projector further back from the screen. ! Caution To avoid damaging the internal projector components, DO NOT rotate the projection lens with your hand. Always use the remote control to adjust the focus. Focus: Press the FOCUS button to display the Focus pattern. Press the decrease the sharpness of the projected image.
Press the SELECT button or Figure 4-4). Press SELECT to display the first picture adjustment setting for Memory 1, 2 or 3. (See to adjust this line or press SELECT again to display the next picture to use the STANDARD default settings. adjustment setting or press RESET Note Using the standard default settings does not affect the Memory 1, Memory 2 or Memory 3 settings. 4-5.
4-9. Setting Apple Macintosh Monitor Mode (Windowed or Compressed) The MP8650 should be set to the desired Apple Macintosh monitor mode. Press the RGB button then RESET button on the remote control to switch between the ON compressed mode or OFF windowed mode. Press RESET again to switch the ON/OFF setting. ON ⇒ OFF ⇒ ON . Note In the compressed mode (ON), an 832 x 624 image is fully displayed by the 800 x 600 projector format.
Section 5: Remote Control 5-1. How to Operate the Remote Control The remote control keypad (Figure 5-1) controls basic projector functions. To use the remote control, aim the remote toward the projection screen and press the desired button. The remote signal (Figure 5-3) will bounce off of the projection screen and back to the mouse receiver and sensor on the front of the projector. n Note Pressing some buttons will cause the remote control LED to flash.
H/V Press once for horizontal (left/right) or press twice for vertical (up/down) position adjustment. The LED on the remote control will flash. Press or to adjust the setting or press the RESET button to return it to the factory default setting. Using the Mouse Buttons The PC serial cable or Apple Macintosh mouse receiver must be connected before the remote control buttons will operate the mouse functions. See RS232C Serial Cable/Mouse Receiver Connection in Section 3.
Section 6: Lamp Information 6-1. Metal Halide Projector Lamp If the projected image appears dark, the lamp may be getting old and in need of replacement. Under normal operating conditions, the lamp should last approximately 1000 hours. However, after time, the lamp brightness will slowly grow dimmer. Note The TEMPERATURE indicator will come on if the lamp becomes too hot. If this happens, wait for the fan motor to stop running, turn the power off and let the projector cool.
Section 7: Maintenance 7-1. Cleaning For best performance, keep your projector free of excess dust and surface dirt. Daily Cleaning Use a soft cloth to remove dust from the projector housing. Cleaning the Projection Lens Use 3M Overhead Cleaner 676 to remove surface dirt and smudges from the projection lens (Figure 7-1) . Cleaning the Air Filter Figure 7-1. Cleaning the Lens For best performance, clean the air filter every 50 hours of operations.
Section 8: Troubleshooting The MP8650 has been designed to be as simple and trouble-free to use as possible. If you should run into problems operating the projector, please review the troubleshooting information below. Problem Possible Solutions Power does not come on D Power cord must be plugged into an electric outlet. D Power switch must be turned on. No picture and sound D Set the projector to the correct input source. D Check all cable connections from input source to projector.
Section 9: Technical Specifications 9-1. Specifications Width Height Depth Weight Panel size Number of pixels per panel Dot defect Zoom lens Metal halide lamp 28.1 cm (10.95 inch) 35.6 cm (13.88 inch) 48.6 cm (18.95 inch) 14 kg (30.94 lbs) 8.1 cm (3.2 inches) 480,000 pixels (H800 X V600), 3 panels = 1.44 million total pixels < 0.011% of total pixel count 1.
9-3. Projector-to-Screen Distances DISTANCE TO SCREEN MINIMUM IMAGE MAXIMUM IMAGE 152 cm Diagonal 76 cm Width 61 cm Height 46 cm Diagonal 121 cm Width 97 cm Height 72 cm (5 ft) 229 cm (30 in.) 111 cm (24 in.) 89 cm (18 in.) 67 cm (47.5 in.) 176 cm (38 in.) 141 cm (28.5 in.) 106 cm (7.5 ft) 314 cm (43.8 in.) 152 cm (35 in.) 122 cm (26.3 in.) 91 cm (69.4 in.) 238 cm (55.5 in.) 191 cm (41.6 in.) 143 cm (10.3 ft) 381 cm (60.0 in.) 183 cm (48 in.) 146 cm (36 in.) 110 cm (93.8 in.
9-5. Computer Video (RGB) Input Terminal The following illustration (Figure 9-3) shows the terminal connections for the D-sub 15 pin HD connector. Refer to the table below for a description of the wire to pin connections. Pin # Description Pin # Description 1 Image Input (red) 9 Not connected 2 Image Input (green) 10 Ground 3 Image Input (blue) 11 Not connected 4 Not connected 12 Not connected 5 Ground (for sync.
Appendix: Technical Information A–1. MP8650 Lamp Replacement (110V machines only) To replace the lamp on the 3M MP8650 Multimedia Projector, you will need the following: D D 2.5 mm hex wrench (shipped with lamp module) Metal halide lamp 78-6969-8306-9 or 78-6969-8422-4 ! WARNING There are high voltage parts inside the cabinet that could cause an electric shock. Always unplug projector when changing the lamp.
A–2. Serial Command Codes All codes in this document are in ASCII Text. In order to get this to work you must send at the same communication setting as the projector. This should be 9600 8N1. For the rest of this document CR is a carriage return which is code 13. There are two types of commands that can be sent to the projector. They are Write commands and Read commands. Write Command Format User: Code CR Projector: O K CR G CR if it worked or: N if it did not work.
A–2. Serial Command Codes, continued Function Code Meaning Input Source Write Codes D02W01 D02W02 D02W11 D02W12 D03W00 RGB 1 RGB 2 Video 1 Video 2 Shows what input is selected on–screen Read Codes D02R Volume Control Focus Zoom Mute Write Codes D04W00 to D04W14 Sets volume level to a value between 00 and 14 hex. This corresponds to 20 possible settings.
A–2.
A–2. Serial Command Codes, continued Function Code Display Position Write Codes D36W00 to D36WFE D38W00 Change vertical display position (up/down) from reset position by 00 to FE. Change horizontal display position (left/right) from reset position by 00 to FE.
(Blank Page) A–6 3M Multimedia Projector MP8650 3M 1997