MP8660 Multimedia Projector Operator’s Guide MP8660 Appareil de projection multimédia Guide de l’opérateur MP8660 Multimedia-Projektor Bedienerhandbuch Portatil Multimedia MP8660 Manual del usuario MP8660 Projettore multimedia Manuale dell’operatore MP8660 Multimediaprojektor Brukerhåndbok MP8660 Multimedia Projector Gebruiksaanwÿzing
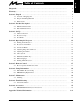
Safeguards . . . . . . . . . . . . . . . . . . . . . . . . . . . . . . . . . . . . . . . . . . . . . . . . . . . . . . . . . . . . . . . 1 Warranty . . . . . . . . . . . . . . . . . . . . . . . . . . . . . . . . . . . . . . . . . . . . . . . . . . . . . . . . . . . . . . . . . 2 Section 1: Unpack . . . . . . . . . . . . . . . . . . . . . . . . . . . . . . . . . . . . . . . . . . . . . . . . . . . . . . . . . 3 1-1. Contents of Shipping Box . . . . . . . . . . . . . . . . . . . . . . . . . . . . . . .
ENGLISH Safeguards INTENDED USE Before operating the machine, please read the entire manual thoroughly. The 3Mt Multimedia Projector MP8660 was designed, built and tested for use indoors, using 3Mt brand lamps and nominal local voltages. The use of other replacement lamps, outdoor operation or different voltages has not been tested and could damage the projector or peripheral equipment and/or create a potentially unsafe operating condition. IMPORTANT SAFEGUARDS 1.
ENGLISH Warranty THANK YOU FOR CHOOSING 3M Thank you for choosing 3M multimedia projection equipment. This product has been produced in accordance with 3M’s highest quality and safety standards to ensure smooth and troublefree use in the years to come. For optimum performance, please follow the operating instructions carefully. We hope you will enjoy using this high performance product in your meetings, presentations and training sessions.
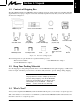
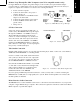
ENGLISH Section 1: Unpack 1-1. Contents of Shipping Box The 3M Multimedia Projector MP8660 is shipped with the necessary cables required for standard VCR, PC, Apple Macintosh or laptop computer connections. Carefully unpack and verify that you have all of the items shown below in Figure 1-1.
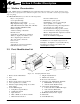
ENGLISH Section 2: Product Description 2-1. Machine Characteristics The 3M Multimedia Projector MP8660 integrates metal halide lamp and dichroic optics display technology into a single unit. It accepts input from two different computer sources and two video/audio sources and projects a bright super crisp image.
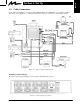
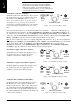
ENGLISH Section 3: Set Up 3-1. Cable Connections It only takes a few minutes to connect the 3M Multimedia Projector MP8660 to your computer, VCR or other video device (Figure 3-1). Always disconnect the projector power before connecting any cables. RS-232 Cable Figure 3-1. Typical Cable Configuration Terminal Connection Panel The input connection panel (Figure 3-2) is located on the back of the projector. Figure 3-2.
ENGLISH Power Connection ! Caution To prevent damage to equipment, all power to the MP8660 and input sources must be turned OFF during cable hook up. The power cord (Figure 3-3) is detachable from the projector and has different connection plugs on each end. Plug the female end into the power cord terminal on the projector and the male end into a properly grounded electrical outlet. Figure 3-3.
ENGLISH Monitor Loop-Through For MAC Computers (non VGA compatible monitor only) For Apple Macintosh computers, the gender changer (78-8118-3394-2) and optional SVGA adaptor (78-8118-3236-5) or VGA adapter (78-8118-3237-3) plus an additional VGA cable (78-8118-3235-7) is required to complete the connection. See Section 9 for ordering information. a b c d e f Power down the computer. Connect the VGA cable to the projector monitor output port. Connect the SVGA or VGA MAC monitor adaptor to the VGA cable.
ENGLISH Note Operating the mouse functions through the MP8660 remote control may disable the internal pointing device (IPD) on your computer. It is recommended that you review the operating instructions for your computer before connecting an external device of any kind. Serial Mouse Cable (PC Computer): Install the serial mouse cable (Figure 3-10) to connect the serial mouse port on your computer to the mouse I/F terminal on the MP8660 projector.
ENGLISH 3-2. Projector Set Up Ambient Light Whenever you have a choice, light the room from the rear, away from the projection screen. The MP8660 has a brightness adjustment to achieve the best image possible. Distance to Viewing Screen The MP8660 can be used in a small or large meeting room to project a quality image from 51 cm (20 inches) to 762 cm (300 inches) in size.
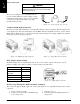
ENGLISH Adjusting the Projector Elevation The elevation can be adjusted by turning the foot adjuster (Figure 3-16) to raise or lower the angle of the projector. Figure 3-16. Foot Adjusters Note Both adjusting feet must be raised or lowered the same amount to project a level image on the viewing screen. The elevation can be adjusted from approximately 0.4 to 7.2 degrees.
ENGLISH Section 4: Operating the Projector 4-1. Turning On the Projector Read the Important Safeguards before operating the MP8660 projector. Refer to Section 3 to make all cable connections. When the input cables and power cords are connected, turn on the projector power then the power to the input sources. ! Caution Allow a projector that has been stored in a cold environment to warm up to operating temperature 0 C to 35 C (32 F to 95 F) before applying power. Step 1: Turn Projector Power On.
ENGLISH 4-2. Projector Control Panel Indicator Lamps The projector control panel (Figure 4-1) has several indicator lamps that illuminate to indicate normal operation and when alarm conditions have been detected. Refer to the chart below for details.
Use the projector control panel (Figure 4-1) or remote control keypad (Figure 5-2) to navigate the menus. MENU Press the MENU button on the projector control panel or remote control keypad to display the Main Menu. Press the up/down arrows or move the mini–joy stick up/down to move vertically within a menu, sub–menu or adjustment screen. Press the left/right select arrows t" on the projector control panel or move the mini–joy stick left/right to move horizontally within a sub–menu or adjustment screen.
ENGLISH SETUP SUB–MENUS (RGB, VIDEO), continued VIDEO – SETUP SUB–MENU Adjustment Screen Value/Position Default BRIGHTNESS ±00 |––––––|––––––| ±0 CONTRAST ±00 |––––––|––––––| ±0 COLOR ±00 |––––––|––––––| ±0 TINT ±00 |––––––|––––––| ±0 IMAGE SUB–MENU Press the MENU button to display the Main Menu. The SETUP Sub–Menu will be highlighted. Press the up/down arrow or move the mini–joy stick up/down to select the IMAGE Sub–Menu.
Press the MENU button to display the Main Menu. The SETUP Sub–Menu will be highlighted. Press the up/down arrow or move the mini–joy stick up/down to select the OPTION Sub–Menu. Press the right arrow on the control panel or move the mini–joy stick right to enter the sub–menu. SETUP IMAGE OPTION REMOTE PANEL LAMP TIMER SPECIAL BEEP AUTO OFF LANGUAGE LENS RETRACT LENS LANGUAGE AUTO OFF BEEP SPECIAL LAMP TIMER PANEL REMOTE AUTO MANUAL Figure 4-7.
ENGLISH 4-4. Adjusting Image Size and Focus Zoom: Press the ZOOM +/– buttons to adjust the image size. If you cannot make the image fill the screen, locate the projector further back from the screen. Focus: Press and hold the FOCUS +/– buttons to increase or decrease the sharpness of the projected image. ! Caution To avoid damaging the internal projector components, DO NOT rotate the projection lens with your hand. Always use the remote control or control panel buttons to adjust the focus. 4-5.
ENGLISH Section 5: Remote Control 5-1. How to Operate the Remote Control The remote control keypad (Figure 5-2) controls basic projector functions. To use the remote control: a. Aim the remote toward the projection screen or at the back of the projector (Figure 5-1). b. Press the desired button and the signal will bounce off of the screen to the front sensor or directly enter the back sensor. The function of each remote control button is explained below. Figure 5-1.
ENGLISH Using the Mouse Buttons Refer to Cable Connections in Section 3 for details on how to connect your type of mouse. There are three mouse buttons L-Left, R-Right and DRAG and a mini–joy stick for controlling mouse functions. See Figure 5-3. Mouse Mini–Joy Stick: The mini–joy stick controls the position of the on-screen cursor or pointer. L – Left Mouse Button: This button has two functions.
ENGLISH Section 6: Lamp Information 6-1. Metal Halide Projector Lamp Under normal operating conditions, the lamp should last approximately 1000 hours. However, after time, the lamp brightness will slowly decrease. The projection lamp contains mercury and should be disposed of according to local regulations. Note The TEMPERATURE indicator will come on if the lamp becomes too hot. If this happens, wait for the fan motor to stop running, turn the power off and let the projector cool.
ENGLISH 6-2. MP8660 Lamp Replacement To replace the lamp on the 3M MP8660 Multimedia Projector, you will need the following: 2.5 mm hex wrench (shipped with replacement lamp module) Metal halide lamp 78-6969-8460-4 ! Caution Lamp and adjacent metal parts become extremely hot and can cause burns to your fingers. Allow the projector to cool for at least 1 hour before replacing the lamp. ! Caution Do not touch the inside of the lamp glass with your fingers.
ENGLISH Section 7: Maintenance 7-1. Cleaning For best performance, keep your projector free of excess dust and surface dirt. Daily Cleaning Use a soft cloth to remove dust from the projector housing. Cleaning the Projection Lens Use 3Mt Overhead Cleaner 676 to remove surface dirt and smudges from the projection lens (Figure 7-1) . Figure 7-1. Cleaning the Lens Cleaning the Air Filters For best performance, clean the air filters every 50 hours of operation.
ENGLISH Cleaning Air Filters: Use a vacuum cleaner (Figure 7-4) to remove dust and dirt from the air filters and from the mesh screen inside the projector. Figure 7-4. Vacuum Air Filters Reinstall the bottom air filter (top side up) by sliding it back into place (Figure 7-4). Carefully insert the side air filter and lower the retaining frame to secure it. Replace the side panel and press down on the bottom edge until the tabs lock it into position (Figure 7-2).
ENGLISH Section 8: Troubleshooting The MP8660 has been designed to be as simple and trouble-free to use as possible. If you should run into problems operating the projector, please review the troubleshooting information below. Problem Probable Causes Solution Power does not come on Power not connected. Plug power cord into an electric outlet.Turn power switch to “ON.” Close cover door tightly. Rear cover is open. No picture and sound Input connections not properly installed.
ENGLISH Problem Probable Causes Solution Remote control does not operate Signal is not being received by front or back sensors. Point the remote control toward the projection screen so the signal will bounce back to the projector. The REMOTE LIGHT on the control panel should flash when receiving the signal. Make sure the remote control sensors on the front/back of the projector are not blocked from receiving the signal. Move remote closer to the projector.
ENGLISH Section 9: Accessories 9-1.
Appendix: Technical Information Table of Contents A–1. Specifications . . . . . . . . . . . . . . . . . . . . . . . . . . . . . . . . . . . . . . . . . . . . . . . . . . . . . A–1 A–2. S-Video Input Signal Terminal . . . . . . . . . . . . . . . . . . . . . . . . . . . . . . . . . . . . . . . A–2 A–3. Projector-to-Screen Distances . . . . . . . . . . . . . . . . . . . . . . . . . . . . . . . . . . . . . . . . A–2 A–4. Physical Dimensions . . . . . . . . . . . . . . . . . . . . . . . . . . . . . . .
A–2. S-Video Input Signal Terminal The following illustration (Figure 10-1) identifies the terminal connections for the Mini DIN4-pin. Chrominance Signal Luminance Signal Ground Ground Figure 10-1. S-Video Input (Mini DIN4-pin) Video input signal terminals are detected by the MP8660 in the following order of priority: D D S-video input terminal RCA jack input terminal A–3.
A–4. Physical Dimensions The MP8660 projector has the following physical dimensions: 49.1 cm (19.33 in.) 28.1 cm (11.06 in.) 35.8 cm (14.1 in.) 25.6 cm (10.08 in.) 4.95 cm (1.95 in.) 11 cm (4.33 in.) 13.2 cm (5.2 in.) 6.55 cm (2.58 in.) 5.45 cm (2.15 in.) Figure 10-3. Physical Dimensions A–5. Computer Video (RGB) Input Terminal The following illustration (Figure 10-4) shows the terminal connections for the D-sub 15 pin HD connector.
A–6. Computer (RGB) Signal Connection Modes The MP8660 projector automatically recognizes the following connection modes. Scan Frequency Mode H-Size Pixel Number Horizontal (kHz) Vertical (Hz) Dot Clock Frequency (MHz) Synchronization Signal Horizontal width/polarity Vertical width/polarity Computer 2 848 640 x 400 24.83 56.42 21.053 64/– 8/– TEXT 56 3 800 640 x 400 31.47 70.09 25.175 96/– 2/+ TEXT 70 3 800 640 x 350 31.47 70.09 25.
A–7.
A–8. Serial Interface Command Codes RS–232 Connection Cable Projector DIN 8–pin 6 7 3 1 1 1 2 2 3 3 4 4 5 5 8 4 5 Computer 6 6 7 7 8 8 Shield 9 2 D-SUB 9-pin 1 2 9 3 8 4 7 5 6 Shield Command Code Formats All codes in this document are in ASCII Text. In order to get this to work you must send at the same communication setting as the projector. This should be 9600 8N1. For the rest of this document CR is a carriage return which is code 13.
A–8.
A–8. Serial Interface Command Codes, continued Function Code Tint (Hue) Write Codes D14W00 to D14W14 Read Codes D14R Color (Saturation) Write Codes D15W00 to D15W14 Meaning Sets tint (hue) level to a value between 00 and 14 hex. This corresponds to 20 possible settings. Returns: 00 to 14 hex Sets color (saturation) level to a value between 00 and 14 hex. This corresponds to 20 possible settings.
A–8.
A–8.
We’re easy to reach http://www.mmm.com/presentations e-mail: presentations@mmm.com 3M Austin Center Building A145-5N-01 6801 River Place Blvd. Austin, TX 78726-9000 3M Canada P.O. Box 5757 London, Ontario, Canada N6A 4T1 3M Mexico, S.A. de C.V. Apartado Postal 14-139 Mexico, D.F. 07070 Mexico 3M Europe Boulevard de l’Oise 9500 Cerge Pontoife Cedex France Let us help you make the most of your next presentation. We offer everything from presentation supplies to tips for better meetings.