
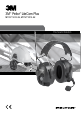
Technical data


2
3
GB
3.2 Recharging batteries
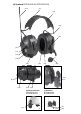
Insert a blunt tool under the edge of the clamp and pull outwards/upwards. Remove the battery and charge it separately, or
leave the battery in place and charge it in the hearing protector.
3.3 Switching the headset on and off
Press and hold the On/Off/Mode button (A:10) for two seconds to switch the headset on or off. A voice message will
conrm that the unit has been switched on or off. The button will start to ash when switched on. The last setting is always
saved when the headset is switched off.
Note! The automatic power-off time of 2 hours (factory default) can be adjusted in the set up menu.
Automatic power-off is indicated by a voice message: “automatic power off” followed by a series of short tones for 10
seconds, then the unit is switched off.
3.4 Scrolling through the menu
Press the On/Off/Mode button (A:10) briey to browse through the menu. A voice message conrms each step.
3.5 Surround volume (level dependent function for ambient sound)
Press the + button (A:11) or – button (A:12) to adjust the ambient sound volume. Each change is conrmed by a voice
message. You can choose between 6 volume levels, with level 6 allowing a maximum of 82dB.
To switch this function off, press the – button (A:12) for two seconds. When this function is switched off it is conrmed by
the voice message “surround volume off”. Press the + button (A:11) to switch this function back on.
Note! When this function is switched off you will not hear any ambient sound, which could be hazardous.
3.6 Radio volume (volume of built-in communication radio)
Press the + button (A:11) or – button (A:12) to adjust the sound level. Each change is conrmed by a voice message. You
can choose between 6 volume levels. To switch this function off, press the – button (A:12) for two seconds. When this func-
tion is switched off it is conrmed by the voice message “Radio volume off”.
Press the + button (A:11) to switch this function back on.
Note! No radio communication can be heard when the volume is switched off.
Note! When the volume is switched off all the applicable menus are hidden
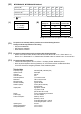
3.7 Channel (radio frequency)
Press the + button (A:11) or – button (A:12) to adjust the channel. Each change is conrmed by a voice message. The
number of radio channels that can be used depends on the product. MT7H7*4410-EU = 8 channels, see table F:1 Radio
channel frequencies (PMR). MT7H7*4310-EU = 69 channels, see table F:2 Radio channel frequencies (LPD).
3.8 VOX (Voice Operated Transmission)
VOX enables the LiteCom Plus to transmit automatically when sound above a certain level reaches the microphone. This
allows radio transmission without pressing the PTT button (A:15).
Press the + button (A:11) or – button (A:12) to adjust the sensitivity of voice operated transmission. Each change is
conrmed by a voice message. You can choose between ve levels or switch this function off. When the level is low it is
easier to transmit. To switch this function off, press the – button (A:12) for two seconds. This is conrmed by the message
“VOX off”. The PTT button (A:15) must now be used to transmit. Press the + button (A:11) to switch this function back on.
Alternatively switch voice-operated transmission on or off by briey press the PTT button twice. A voice message conrms
the current VOX setting.
The radio has a BCLO (Busy Channel Lock Out) function that prevents VOX operation if the channel is being used for
other transmission. An audible tone indicates that the channel is already being used.
Note! To activate the VOX function the speech microphone (A:9) must be very close to your mouth, 1–3 mm (gure G). The
user’s voice will be heard in the headset when the radio is transmitting.
3.9 Sub menu
This gives access to settings that are only adjusted occasionally. The sub menu is accessed by pressing the + button
(A:11) and – button (A:12) at the same time for 1 second. To return to the main menu, press and hold the + button (A:11)
and – button (A:12) at the same time again or wait 10 seconds without pressing any button to return automatically to the
main menu.