
User manual


Fabricating the Wax Pattern in the Dental Office
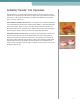
A wax injector enables the ability to fabricate the wax pattern in the dental office and modify
this custom occlusal rim and take all the patient records on the same appointment as the
impression. (Figure 14).
The optimum injecting temperature is 170–190°F. This temperature is typically reached by setting
the injector at the Medium/High position. It will take about 20 minutes to reach this temperature
from a "solid" state. Experiment with your injector to find the optimum position for injecting. Mark
this position on your machine for future reference.
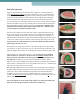
Spruing The Alginate Lower Container
Entrance Sprue Hole: Using a thin tapered bur, approximately 1/8" in diameter (determine the
size bur that works best for you), drill a hole through the anterior of the container entering the
void created by the denture. The sprue hole should be started approximately in the middle of the
container, not near the containers ledge, and enter the void above the ANTERIOR TEETH IN THE
ANTERIOR FLANGE (Figure 165, 165, 15C).
Do not have the sprue hole enter the midline of the anterior teeth as the anterior teeth need to be
accurately represented in the wax pattern. The hole can also be made using a cork boring tool or
small 3/16" thin straw, once a small hole is cut through the container (Figure 16).
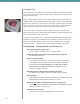
Exit Sprue Hole(s): The exit sprue for the maxillary arch can be made similarly as the entrance
sprue and should exit the distal end of the impression void. The exit hole should be directly opposite
the entrance hole for the maxillary arch. If you prefer, you can make 2 exit holes in the maxillary
arch — one at one at each distal end of the maxillary denture. Be sure to make these holes at the
“highest point” of the void when held vertically, as to allow the wax to fill the entire void before
exiting. In the mandibular arch there is one entrance sprue hole and two exit holes — one at each
distal end of the mandibular denture, exiting the distal retromolar area (Figure 17). Note: Be careful
not to make the exit holes in an area where the stone cast will cover the holes. These holes must be
made in the void itself.
12
Figure 16
Figure 17
Figure 14
Figure 15A
Figure 15B
Figure 15C