Handheld RFID Reader Model 702 and Model 802 Owners Manual 3M Security Systems Division 3M Center, Building 225-4N-14 St. Paul, Minnesota 55144-1000 Copyright © 2003-2004 3M IPC. All rights reserved.
Table of Contents Safety Information .......................................................................... 1 Intended Use................................................................................................................................... 1 Safety messages ............................................................................................................................ 2 Important Notes..............................................................................................
Safety Information Read, understand, and follow all safety information contained in these instructions prior to installation of the 3M™ Handheld RFID Reader Model 702 and Model 802. Retain these instructions for future reference. Intended Use The 3M Handheld RFID Reader Model 702 and Model 802 are designed and tested for use in processing 3M™ RFID Tags. These tags are used to identify items, such as books, videocassettes, files, etc., for various users. It has not been evaluated for other uses.
Safety messages WARNING To reduce the risk associated with fire and explosion: Do not attempt to use a damaged battery pack, charger, or power supply; Do not allow battery pack to come in contact with water; Do not disassemble, crush, or incinerate the battery pack — at the end of service life, dispose of the battery pack in accordance to federal, state and local requirements; Replace battery pack with Molicel MCR-1821 type battery pack only; Do not store the battery pack in areas that may exceed temperatur
Important Notes Important notes summarize best practices that can help you avoid damaging the 3M™ Handheld RFID Reader Model 702 and Model 802 (Handheld) and/or corrupting data. IMPORTANT NOTES! Be careful not to damage the handheld. DO NOT drop the Handheld. DO NOT leave the Handheld in locations where it might fall. DO NOT leave the Handheld in direct sunlight. DO NOT expose the Handheld to heat. Only use the point of the stylus to touch the various buttons and checkboxes on the screen.
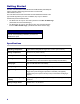
S/N: 702XXXX N1108 COM/STATUS Model 702 12 VDC FCC ID: DGF-LSD702 CANADA: ______ PWR PWR COM/STATUS Safety label locations Model 802 12 VDC FCC ID: DGF-LSD702 CANADA: ______ N1108 S/N: 802XXXX 702_001 4
EMC, USA, and Canada Compliance FCC Radio Frequency Rules and Regulations This equipment has been tested and found to comply with the limits for a Class A device, pursuant to Part 15 of the FCC Rules. These limits are designed to provide reasonable protection against harmful interference when the equipment is operated in a commercial environment.
Getting Started The 3M™ Handheld RFID Reader Model 702 and Model 802 (Handheld) are used to read 3M™ RFID Tags placed in items such as books, videocassettes, files, etc. The main difference between the Model 702 and Model 802 hardware is the type of RFID tag that they can read. In addition, they may run different software that performs different tasks. The Model 702 can only be used with systems that use 3M™ D1 RFID Tags. (The Model 702 cannot read D8 tags.
Handheld components IMPORTANT NOTE! Be careful not to damage the handheld. DO NOT drop the Handheld. DO NOT leave the Handheld in locations where it might fall. DO NOT leave the Handheld in direct sunlight. DO NOT expose the Handheld to heat. Only use the point of the stylus to touch the various buttons and checkboxes on the screen. Never use a pen, pencil, or other sharp object on the display screen.
Controls and indicators The handheld display includes menu selections and setup screens with various checkboxes. Most tasks are selected using the menu buttons. You can also use the stylus to select various handheld functions. Use the stylus to check and uncheck the various checkboxes that appear in the setup screens. Stylus Indicator Lights used in conjunction with audible cues to help locate items and shelf positions.
Using the Handheld Device for the first time Step 1 – Use your system software to export your data and 3M Handheld software onto a memory card. (See your Software User Manual.) 1 2 3 Install the Handheld software (located on the CDROM delivered with the handheld) on the same computer where you installed your system software. Export Handheld software onto a memory card. This occurs automatically whenever you export data to a memory card. Insert the memory card into the handheld.
Inserting the memory card The memory card contains the data and Handheld software required for operation. 1 - Install a pull tab on the memory card 2 – Insert the memory card 1 2 Grasp the memory card with the label side up. Push the pin-socket end of the memory card into the memory-card slot until it is completely inserted. Messages (such as loading the database, etc.) appear on the screen.
Removing the memory card IMPORTANT NOTE! Always return to the Home screen before removing the memory card. This helps avoid corrupting data that you collected with the handheld and saved to the memory card. Procedure 1 Press Home to return to the Home screen. This ensures that the handheld finishes any write activities before you attempt to remove the memory card. 2 Grasp the memory card and pull it straight out from the handheld.
Resetting the handheld If the handheld display locks up or stops working, perform the reset procedure described below. Symptoms may include: The power will not come on (screen remains blank). Lines appear on the display or the display is distorted. A blinking black square appears in the upper left corner of the display. The Palm startup screen appears on the display and will not go away. A blank screen may be caused by a fully discharged battery.
Formatting a memory card If the Handheld displays database error messages when you insert the memory card, try reformatting the memory card. If this procedure does not work, call 3M Service. (See Requesting service on page 18.) No Database Invalid Database No database found on Memory card. Invalid database found on memory card. Insert a memory card with a Export data to memory card again. Valid database.
Adjusting the antenna If necessary, use the antenna adjustment tool (shipped with the Handheld) to carefully adjust the swivel tightness of the handheld antenna. If the antenna is too loose Use the antenna adjustment tool to tighten (turn clockwise) the antenna adjustment screw slightly until the antenna swivels properly. Be careful to only turn the adjustment screw the minimum amount needed to tighten the handheld antenna swivel.
Battery Management The handheld is powered by a rechargeable lithium-ion battery that must be periodically charged. Battery charging guidelines Batteries may be charged overnight or for extended periods. Batteries do not have to be discharged before recharging them. Batteries may be plugged in for any amount of time to partially recharge the battery. 2 Power Supply Battery 1c 1a 1b Power Cord Charger Stand Always keep one of the two batteries fully charged in the battery charger.
Charging the battery Always keep one of the two batteries fully charged in the battery charger. The typical charge time is four hours. To charge a battery 1 2 Connect the battery charger. a Connect the power supply output to the charger stand. b Plug one end of the power cord into the power supply. c Plug the other end of the power cord into an AC power source: (100-240 Vac, 1.0A, 50-60 Hz). The status light is Green when no battery is inserted into the charger stand.
Replacing the battery Battery replacement Most software options are protected if all power is lost. If a battery is removed and replaced in approximately one minute, the handheld will continue to function without interruption.
Requesting service Before you call Before you call 3M Service, have the following information available: Have the Handheld near the phone. Write down the Handheld’s serial number (located on the bottom of the Handheld). Be ready to describe the problem and any error messages in detail. Write down the software version. (From the Handheld’s Home screen, select About to display the software version number.
Ordering replacement parts The following consumable parts may be ordered separately: Stock Number Description 78-8123-7939-0 Battery 78-8123-7940-8 Battery charger assembly 26-1014-9577-3 Antenna-adjustment tool 78-8123-7890-5 Memory-card removal tab 26-1017-1145-0 64-MB memory card 26-1014-9616-9 Replacement stylus three pack To order parts Call the following phone numbers to order the parts listed above.