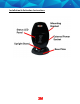
Beacon User Guide
Beacon User Guide April 15, 2016
Copyright © 2016 3M. All rights reserved. No part of this publication may be reproduced, stored in a retrieval system, or transmitted, in any form or by any means, electronic, mechanical, photocopying, recording, or otherwise, without the prior written permission of 3M. The information in this document is subject to change without notice. The software mentioned in this document is furnished under license and may only be used or copied in accordance with the terms of such license.
SAFETY INFORMATION Please read, understand, and follow all safety information contained in these instructions prior to the use of this 3M Electronic Monitoring device. Retain these instructions for future reference. Intended Use: This 3M Electronic Monitoring device is part of an electronic monitoring system, which performs data transfer using cellular network to a monitoring platform.
- Do not expose power adapter to rain, steam or wet conditions. Do not submerge the device, or hold the device under running water, while it is charging. Do not submerge the device, or hold the device under running water. CAUTION To reduce the risks associated with hot surfaces: - Do not touch thermal pads on device or charger if charging is interrupted. Safety information for Trained Customer only.
About This User Guide The Home Unit Installation and Operation Guide has been created for the installation expert and is meant as a guide through the installation and operational procedures. This manual assumes that you have at least some experience with electronic monitoring systems. This manual does not contain information regarding system settings, configuration or any other software produced by 3M, unless directly related to this product.
Installation & Activation Instructions
Locating the Home Unit Place the Home Unit as close to the center of the curfew location as possible, 3 ft (1 m) off the ground and at least 1 foot (30 cm) away from the wall. Figure 2 Locating the Home Unit Activating the Home Unit To activate the Home Unit: Connect the adapter end of the external power cable to the power outlet. The Charge/Power LED on the front panel is solid green when it is plugged in and/or the battery is charged. The Home Unit is now in monitoring mode.
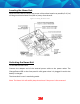
To deactivate the Home Unit: 1. Using a screwdriver, unscrew and remove the Unit holding screw located on the underside of the mounting bracket. 2. Disconnect the Home Unit from the mounting bracket by pulling the Unit upwards slightly. 3. Remove the Home Unit from the mounting bracket and turn the Unit over. The deactivation button is located on the backside of the Unit. 4. Using a pointed instrument (but not sharp), push down on the reset button. The Home Unit deactivates.
Maintaining & Packaging the Monitoring Equipment Regular cleaning of your Elmo-Tech equipment is recommended, using Elmo-Tech approved products. After cleaning, Elmo-Tech recommends that you perform a visual inspection of all Units to check for cracks or any other damage, before redeploying into the field. Cleaning the Home Unit To clean the Home Unit: 1. Remove the Unit from its carrying case. 2. Spray the surface of the Unit with an alcohol based cleaner (optional). 3.
FCC Information FEDERAL COMMUNICATIONS COMMISSION (FCC) Part 15 STATEMENT The equipment complies with Part 15 of the FCC Rules. Operation is subject to the following two conditions: (1) This device may not cause harmful interference, and (2) This device must accept any interference received, including interference that may cause undesired operation. This equipment has been tested and found to comply with the limits for a Class B digital device, pursuant to part 15 of the FCC Rules.