S50C/X50C Multimedia Projector Operator's Guide
CP-S317/327W/最終 03.5.27 2:22 PM ページ 1 S50C/X50C Multimedia Projector Operator's Guide Thank you for purchasing this projector. CAUTION Please read the "Product Safety Guide" and this "Operator's Guide" thoroughly to ensure correct usage through understanding. After reading, store this instruction manual in a safe place for future reference. NOTE • The information in this manual is subject to change without notice.
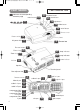
CP-S317/327W/最終 03.5.27 2:22 PM ページ 2 PROJECTOR FEATURES This liquid crystal projector is used to project various computer signals as well as NTSC / PAL / SECAM video signals onto a screen. Little space is required for installation and large images can easily be realized.
CP-S317/327W/最終 03.5.27 2:22 PM ページ 3 WARNING Precautions to observe in regards to the power cord: Please use extra caution when connecting the projector's power cord as incorrect or faulty connections may result in FIRE AND/OR ELECTRICAL SHOCK. Please adhere to the following safety guidelines to insure safe operation of the projector: • Only plug the power cord into outlets rated for use with the power cord's specified voltage range. • Only use the power cord that came with the projector.
CP-S317/327W/最終 03.5.
CP-S317/327W/最終 03.5.
CP-S317/327W/最終 03.5.27 2:22 PM ページ 6 SETTING UP THE PROJECTOR CAUTION • Install the projector in a suitable environment according to instructions of the "Product Safety Guide" and this "Operator's Guide". • If you press the elevator button without holding the projector, the projector might crash down, overturn, smash your fingers and possibly result in malfunction.
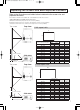
CP-S317/327W/最終 03.5.27 2:22 PM ページ 7 Adjusting the Screen Size and Projection Distance Refer to the illustrations and tables below to determine the screen size and projection distance. The values shown in the table are calculated for a full size screen (S50: 800x600 pixels/X50: 1024x768 pixels).
CP-S317/327W/最終 03.5.27 2:22 PM ページ 8 CONNECTING YOUR DEVICES Devices You Can Connect to the Projector (Refer to this section for planning your device configuration to use for your presentation.) CAUTION • Incorrect connecting could result in fire or electrical shock. Please read the "Product Safety Guide" and this "Operator's Guide".
CP-S317/327W/最終 03.5.27 2:22 PM ページ 9 Ports and Cables Refer to the table below to find out which projector port and cable to use for connecting a given device. Use this table for determining which cables to prepare.
CP-S317/327W/最終 03.5.27 2:22 PM ページ 10 CONNECTING YOUR DEVICES (continued) Connecting to a Computer ATTENTION Whenever attempting to connect a laptop computer to the projector, be sure to activate the laptop's RGB external image output (set the laptop to CRT display or to simultaneous LCD and CRT display). For details on how this is done, please refer to the instruction manual of the corresponding laptop computer.
CP-S317/327W/最終 03.5.
CP-S317/327W/最終 03.5.
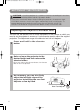
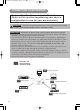
CP-S317/327W/最終 03.5.27 2:22 PM ページ 13 USING THE REMOTE CONTROL Putting batteries into the remote control unit CAUTION Precautions to observe in regards to the batteries Always handle the batteries with care and use them only as directed. Improper use may result in battery cracking or leakage, which could result in fire, injury and/or pollution of the surrounding environment. • Keep the battery away from children and pets. • Be sure to use only the batteries specified for use with the remote control.
CP-S317/327W/最終 03.5.27 2:22 PM ページ 14 TURNING ON THE POWER Precautions Connect all devices to be used to the projector prior to turning on the power. 8 ∼ 12 WARNING When the power is ON, a strong light is emitted. Do not look into the lens.
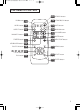
CP-S317/327W/最終 03.5.27 2:22 PM ページ 15 Selecting an Input Signal MAGNIFY SEARCH AUTO BLANK HOME PAGE UP VOLUME END PAGE DOWN MUTE ASPECT Selecting a RGB signal 5 STANDBY/ON RGB VIDEO Press the RGB button of the remote control or the rgb button of the control panel ON OFF FREEZE KEYSTONE Press this button to toggle between the devices connected to rgb in 1 and 2. As illustrated below, each time you press the RGB button or rgb button, the projector switches between rgb in 1 and 2.
CP-S317/327W/最終 03.5.27 2:22 PM ページ 16 TURNING OFF THE POWER 1 The message "Power off?" will appear on the screen for approximately 5 seconds. STANDBY/ON RGB VIDEO MAGNIFY SEARCH AUTO BLANK HOME PAGE UP VOLUME END PAGE DOWN MUTE ASPECT Press the STANDBY/ON button of the remote control or on/off button of the control panel ON OFF FREEZE KEYSTONE POSITION 2 Press the STANDBY/ON button or on/off button again while the "Power off?" message is visible.
CP-S317/327W/最終 03.5.27 2:22 PM ページ 17 ADJUSTING THE VOLUME 1 STANDBY/ON VIDEO RGB ASPECT SEARCH AUTO BLANK HOME PAGE UP VOLUME END PAGE DOWN MUTE Press the VOLUME button VOLUME As illustrated on the right, a dialog will appear on the screen to aid you in adjusting the volume. VOLUME MAGNIFY ON 16 OFF FREEZE KEYSTONE 2 POSITION MENU , buttons to adjust Press the VOLUME button again to close the dialog and complete this operation.
CP-S317/327W/最終 03.5.27 2:22 PM ページ 18 ADJUSTING THE POSITION 1 STANDBY/ON VIDEO RGB ASPECT MAGNIFY SEARCH AUTO BLANK HOME PAGE UP VOLUME END PAGE DOWN MUTE Press the POSITION button As illustrated on the right, a dialog will appear on the screen to aid you in adjusting the position.
CP-S317/327W/最終 03.5.27 2:22 PM ページ 19 USING THE AUTOMATIC ADJUSTMENT FEATURE 1 Press the AUTO button AUTO STANDBY/ON VIDEO RGB ASPECT MAGNIFY SEARCH AUTO BLANK HOME PAGE UP VOLUME END PAGE DOWN MUTE Automatic Adjustment for RGB Input ON OFF FREEZE KEYSTONE POSITION MENU ENTER ESC Horizontal position (H. POSIT), vertical position (V. POSIT), clock phase (H. PHASE) and horizontal size (H. SIZE) are automatically adjusted.
CP-S317/327W/最終 03.5.27 2:22 PM ページ 20 CORRECTING KEYSTONE DISTORTIONS 1 STANDBY/ON VIDEO RGB ASPECT SEARCH AUTO BLANK HOME PAGE UP VOLUME END PAGE DOWN Press the KEYSTONE button As illustrated on the right, a dialog will appear on the screen to aid you in correcting the distortion.
CP-S317/327W/最終 03.5.27 2:22 PM ページ 21 USING THE MAGNIFY FEATURE 1 Press the MAGNIFY (ON) button The projector enters MAGNIFY mode.
CP-S317/327W/最終 03.5.27 2:22 PM ページ 22 SIGNAL SEARCHING 1 STANDBY/ON VIDEO RGB ASPECT MAGNIFY SEARCH AUTO BLANK HOME PAGE UP VOLUME END PAGE DOWN MUTE ON Press the SEARCH button When you press the SEARCH button, the projector begins searching for input signals. If it detects an input signal, the search will cease and the projector will project the detected signal. If the projector is unable to find an input signal at any of its ports, it will return to the state it was in prior to the search.
CP-S317/327W/最終 03.5.27 2:22 PM ページ 23 USING THE MENU FUNCTIONS 1 Press the MENU button 2 / Select a menu using the buttons, then press the or ENTER button. STANDBY/ON VIDEO RGB ASPECT MAGNIFY SEARCH AUTO BLANK HOME PAGE UP VOLUME END PAGE DOWN ON MUTE MENU The menu display appears on the screen. The projector has the following menus: MAIN, PICTURE-1, PICTURE-2, INPUT, SCREEN, and OPTION. Select a menu using the / buttons.
CP-S317/327W/Vol2-E責了 03.5.27 2:30 PM ページ 2 MULTIFUNCTIONAL SETTINGS This device has 6 separate menus: MAIN, PICTURE 1, PICTURE 2, INPUT, SCREEN, OPTION. Each of these menus is operated using the same methods. The basic operations of these menus are as follows. Menu screen display : Press the "MENU" button. Menu selection : Choose a menu name using the / button, and press the button or the ENTER button. Item selection : Choose an item using the / button, and press the button or the ENTER button.
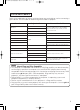
CP-S317/327W/Vol2-E責了 03.5.27 2:30 PM ページ 3 MENU MAIN PICTURE-1 PICTURE-2 INPUT SCREEN OPTION PICTURE 1 Menu With the PICTURE 1 menu, the five items shown in the Table below can be performed. Perform each operation in accordance with the instructions in the Table.
CP-S317/327W/Vol2-E責了 03.5.27 2:30 PM ページ 4 MULTIFUNCTIONAL SETTINGS (continued) INPUT Menu With the INPUT menu, the four items shown in the Table below can be performed. With inputting of rgb in 1 and rgb in 2 signals, the horizontal and vertical frequencies of the signals will be displayed on the initial screen of the INPUT menu. Perform each operation in accordance with the instructions in the Table.
CP-S317/327W/Vol2-E責了 03.5.27 2:31 PM ページ 5 SCREEN Menu With the SCREEN menu, the five items shown in the Table below can be performed. Please perform each operation in accordance with the instructions in the Table. MENU MAIN PICTURE-1 PICTURE-2 INPUT SCREEN OPTION BLANK START UP MyScreen MyScreen Size MyScreen Lock MyScreen ORIGNAL : SELECT Example : SCREEN Menu (BLANK) SCREEN Menu Item Description BLANK Selection of BLANK Screen: MyScreen ⇔ ORIGINAL ⇔ . . ⇔ . . ⇔ . .
CP-S317/327W/Vol2-E責了 03.5.27 2:31 PM ページ 6 MULTIFUNCTIONAL SETTINGS (continued) OPTION Menu With the OPTION menu, the five items shown in the Table below can be performed. Please perform each operation in accordance with the instructions in the Table. MENU MAIN PICTURE-1 PICTURE-2 INPUT SCREEN OPTION VOLUME AUTO OFF WHISPER LAMP TIME FILTER TIME 12 : SELECT Example : OPTION Menu (VOLUME) OPTION Menu Item VOLUME 28 Description Adjust Volume: High ⇔ Low AUTO OFF Adjust AUTO OFF Time: Long (MAX.
CP-S317/327W/最終 03.5.27 2:22 PM ページ 24 OPERATING THE PC SCREEN You can use the remote control as a simplified mouse or keyboard. CAUTION Caution: Mistaken use of the mouse/keyboard control could damage your equipment. • Only connect to a PC. • Before connecting, read the manuals of the device you will connect. • Do not unplug the connector cables while the computer is operating.
CP-S317/327W/最終 03.5.27 2:22 PM ページ 25 THE LAMP HIGH VOLTAGE HIGH TEMPERATURE HIGH PRESSURE Before replacing the lamp, check the serial number of the replacement lamp bulb (sold separately: 78-6969-9599-8), then contact your local dealer. Before replacing the lamp, turn off the power, and unplug the power cord, then WARNING wait at least 45 minutes, in order to ensure that the lamp is properly cooled. Removing the lamp bulb while it is still hot could cause burns, or cause the lamp bulb to burst.
CP-S317/327W/最終 03.5.27 2:22 PM ページ 26 THE LAMP (continued) Replacing the lamp All projector lamps will wear out eventually. If used for long periods of time, the image could become darkened, and the color contrast could be impacted as well. We recommend that you replace your lamps early. If the lamp indicator turns red, or a message prompts you to replace the lamp when you power up the projector, the lamp needs to be replaced.
CP-S317/327W/最終 03.5.27 2:22 PM ページ 27 THE AIR FILTER Caring for the air filter The air filter should be cleaned about every 100 hours. If the lamp indicator and temp indicator blink red simultaneously, or a message prompts you to clean the air filter when you turn on the unit, the filter needs to be cleaned. (See "Related Messages" ( 35 ) and "Regarding the Indicator Lamps" ( 36 ) for details.
CP-S317/327W/最終 03.5.27 2:22 PM ページ 28 THE AIR FILTER (continued) Replacing the air filter If the soiling will not come off the air filter, or it becomes damaged, then it needs to be replaced. Please contact your local dealer, after confirming the model of your separately sold replacement air filter. 1 Turn off the projector, and unplug the power cord.
CP-S317/327W/最終 03.5.27 2:22 PM ページ 29 OTHER CARE Caring for the inside of the projector : In order to ensure the safe use of your projector, please have it cleaned and inspected by your local dealer about once every 2 years. Never try to care for the inside of the unit yourself. Doing so is dangerous. Caring for the lens : Lightly wipe the lens with a commercially available lens-cleaning wipe. Do not touch the lens directly with your hand.
CP-S317/327W/Vol2-E責了 03.5.27 2:31 PM ページ 7 WHAT TO DO WHEN YOU THINK A MACHINE DEFECT HAS OCCURRED Related Messages When the unit's power is ON, messages such as those shown below may be displayed. When any such message is displayed on the screen, please respond as described below. Message CHANGE THE LAMP AFTER REPLACING LAMP, RESET THE LAMP TIMER. (Note 1) Description Lamp usage time is approaching 2,000 hours. (Note 2) Preparation of a new lamp, and an early lamp change, is recommended.
CP-S317/327W/Vol2-E責了 03.5.27 2:31 PM ページ 8 Regarding the Indicator Lamps Lighting and flashing of the power indicator, the lamp indicator, and the temp indicator have the meanings as described in the Table below. Please respond in accordance with the instructions within the Table.
CP-S317/327W/Vol2-E責了 03.5.27 2:31 PM ページ 9 WHAT TO DO WHEN YOU THINK A MACHINE DEFECT HAS OCCURRED (continued) Phenomena That May Easily Be Mistaken for Machine Defects Before requesting repair, check in accordance with the following chart. If the situation cannot be corrected, then contact your dealer.
CP-S317/327W/Vol2-E責了 03.5.27 2:31 PM ページ 10 SPECIFICATIONS NOTE • This specifications are subject to change without notice. Item Specification Product name Liquid crystal panel Liquid crystal projector Panel size 1.8 cm (0.7 type) Drive system TFT active matrix Pixels S50C:480,000 pixels (800 horizontal x600 vertical) X50C:786,432 pixels (1024 horizontal x 768 vertical) Lens Zoom lens F=1.7 ~ 2.1 f=36.8 ~ 47.8 mm Lamp 150 W UHB Speaker 1.0W Power supply AC100 ~ 120V, 2.
ACCESSORIES Accessories ................................................................ Part Number UHB Lamp, 150W .................................................................................... 78-6969-9599-8 Air Filter Assy ........................................................................................... 78-8118-9182-5 Power Cord (US) ...................................................................................... 78-8118-8102-4 Power Cord (UK) .......................................
Intended Use Before operating this machine, please read this entire manual thoroughly. The 3MTM Multimedia Projectors are designed, built, and tested for use indoors, using 3M lamps, 3M ceiling mount hardware, and nominal local voltages. The use of other replacement lamps, outdoor operation, or different voltages has not been tested and could damage the projector peripheral equipment and/or create a potentially unsafe operating condition.