Robert Bosch GmbH DM 2610039151 01-16_3D40 1/7/16 9:33 AM Page 1 Page / of DP CritP. SNR BDL-2610039151, Page: MUL (VAA), downloaded at: 2017.04.15_00:06:54, by PT-RT/ENG1_Chris.Heflin Term Ind. CRNo.
DP Page / of Robert Bosch GmbH BDL-2610039151, Page: MUL (VAA), downloaded at: 2017.04.15_00:06:56, by PT-RT/ENG1_Chris.Heflin Valid Release BWN DocType CritP. CAUTION, used with the safety alert symbol, indicates a hazardous situation which, if not avoided, will result in minor or moderate injury. CRNo. WARNING indicates a hazardous situation which, if not avoided, will result in death or serious injury. Ind.
General Safety Warnings Robert Bosch GmbH DM 2610039151 01-16_3D40 1/7/16 9:33 AM Page 3 Read all instructions in this manual and familiarize yourself with the ! WARNING Dremel 3D40 before setup and use. Failure to comply with the warnings and instructions may result in fire, equipment damage, property damage, or personal injury. READ ALL INSTRUCTIONS SAVE ALL WARNINGS AND INSTRUCTIONS FOR FUTURE REFERENCE Dress properly. Do not wear loose clothing or jewelry.
Use only DREMEL filament. Use of filament not authorized by Dremel may result in equipment and property damage. building will cancel the object and may damage the extruder. Robert Bosch GmbH DM 2610039151 01-16_3D40 1/7/16 9:33 AM Page 4 Do not pull the filament out. Doing so may damage the extruder. Ensure small objects created by Dremel 3D40 are not accessible to young children. Small objects are potential choking hazards for young children.
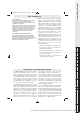
Additional Safety Warnings Robert Bosch GmbH DM 2610039151 01-16_3D40 1/7/16 9:33 AM Page 5 This product may contain or discharge chemicals known to the State of ! WARNING California to cause cancer and birth defects or other reproductive harm. SAVE THESE INSTRUCTIONS Symbols IMPORTANT: Some of the following symbols may be used on your 3D40. Please study them and learn their meaning. Proper interpretation of these symbols will allow you to operate the tool better and safer. Hot surface hazard symbol.
FCC Compliance FCC Statement: NOTE: This equipment has been tested and found to comply with the limits for a Class B digital device, pursuant to Part 15 of the FCC Rules. These limits are designed to provide reasonable protection against harmful interference in a residential installation. This equipment generates, uses, and can radiate radio frequency energy and, if not installed and used in accordance with the instructions, may cause harmful interference to radio communications.
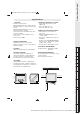
Robert Bosch GmbH DM 2610039151 01-16_3D40 1/7/16 9:33 AM Page 7 Specifications SUPPORTED OPERATING SYSTEMS • Apple® Mac® OS® X v10.9 or later (Mavericks) • Microsoft® Windows® 8.1 • Microsoft® Windows® 7 SP1 BUILDING Extruder: Single extrusion Extruder temperature: Up to 230°C (397°F) Operating Interface: 3.5” full color IPS touch screen Maximum Build Volume: 10” x 6” x 6.7” (255mm x 155mm x 170mm) Layer Thickness: 4 mil | 0.004 inches 100 microns | 0.10 mm Filament Colors: See Dremel3D.
Robert Bosch GmbH DM 2610039151 01-16_3D40 1/7/16 9:33 AM Page 8 Resources Installed from www.dremel3d.com Glossary of Terms Term Definition Build Platform The flat surface used by your Dremel 3D40 to build objects. The build platform is comprised of a tempered glass plate with a plastic holder. Build Platform Clip Clip located at the front of the build platform base that is used to secure the build platform in place.
Leveling Knobs Knobs located under the build platform base that are used to create proper spacing between the extruder tip and the build platform. Leveling Sensor A sensor that detects the height of the build platform and assists in proper leveling. Lid Your Dremel 3D40 has a pivoting lid on the top. This allows for more access to the build platform, extruder, filament, and objects when necessary.
Robert Bosch GmbH DM 2610039151 01-16_3D40 1/7/16 9:33 AM Page 10 Introduction You can create a user profile by either going to www.dremel3d.com or by downloading the Dremel3D mobile application on your compatible mobile device. Your profile gives you access to high-quality models, support and software downloads, and remote printing services powered by Spark. Once setup and registration is complete you are ready to start building. Welcome to the world of Dremel 3D.
Unpacking 1. Place box on table, cut tape, and open. Robert Bosch GmbH DM 2610039151 01-16_3D40 1/7/16 9:33 AM Page 11 6. Open door and remove middle insert. 2. Remove top insert. 3. Remove 3D40 and place on table. DP CritP. BDL-2610039151, Page: MUL (VAA), downloaded at: 2017.04.15_00:06:57, by PT-RT/ENG1_Chris.Heflin Term Ind. CRNo. Valid Release BWN DocType SNR MUL 11 / 108 11 -5. Raise build plate by lifting from both sides.
Robert Bosch GmbH DM 2610039151 01-16_3D40 1/7/16 9:33 AM Page 12 Getting To Know Your 3D40 2 1 3 12 BDL-2610039151, Page: MUL (VAA), downloaded at: 2017.04.15_00:06:57, by PT-RT/ENG1_Chris.Heflin Page / of DP Valid Release BWN DocType CritP. 12 Filament Guide Tube Extruder Lever Filament Guide Clip Extruder Intake Extruder Fan Ribbon Cable X-Axis Guide Rail Leveling Sensor Extruder Tip Power Switch USB B Port Ethernet Port Nameplate Power Input CRNo. 15. 16. 17. 18. 19. 20. 21. 22. 23. 24.
Robert Bosch GmbH DM 2610039151 01-16_3D40 1/7/16 9:33 AM Page 13 14 15 16 17 18 19 20 27 13 28 BDL-2610039151, Page: MUL (VAA), downloaded at: 2017.04.15_00:06:57, by PT-RT/ENG1_Chris.Heflin Page / of DP CRNo. Valid Release BWN DocType CritP. 26 Ind.
Touch Screen Robert Bosch GmbH DM 2610039151 01-16_3D40 1/7/16 9:33 AM Page 14 Using your Dremel 3D40 without a computer is easy with the onboard software and full color touch screen. Before building your model we want to familiarize you with the touch screen menu structure and options. Observe all provided warnings and safety instructions when using the ! WARNING Dremel 3D40. Failure to do so may result in fire, equipment damage, property damage or personal injury.
Robert Bosch GmbH DM 2610039151 01-16_3D40 1/7/16 9:33 AM Page 15 FILE DETAILS BUILD – Tap to begin build process. DELETE – Tap to remove model file from on-printer storage. COPY TO PRINTER – Tap to copy model file to onprinter storage. BUILD STATUS STOP – Tap to cancel the current build process. PAUSE/PLAY – Tap to pause or resume the current build process. Pause will allow you to access the filament button. BDL-2610039151, Page: MUL (VAA), downloaded at: 2017.04.15_00:06:57, by PT-RT/ENG1_Chris.
Robert Bosch GmbH DM 2610039151 01-16_3D40 1/7/16 9:33 AM Page 16 FILAMENT Page / of DP Ind. CRNo. Valid Release BWN DocType CritP. BDL-2610039151, Page: MUL (VAA), downloaded at: 2017.04.15_00:06:57, by PT-RT/ENG1_Chris.Heflin Term 16 SNR Tap to begin build platform leveling process.
Robert Bosch GmbH DM 2610039151 01-16_3D40 1/7/16 9:33 AM Page 17 TOOLS Tap to access the following individual printer functions and settings. BDL-2610039151, Page: MUL (VAA), downloaded at: 2017.04.15_00:06:57, by PT-RT/ENG1_Chris.Heflin Page / of DP Valid Release BWN DocType CritP. 17 CRNo. SET PROXY – Tap to set manual proxy. Ind. DISCONNECT WIFI – Tap to turn Wifi off. Term CONNECT WIFI – Tap to connect to WiFi. SNR Tap to enter Network menu to connect or disconnect WiFi and Set Proxy.
Robert Bosch GmbH DM 2610039151 01-16_3D40 1/7/16 9:33 AM Page 18 CALIBRATE Page / of CritP. SNR DP -- Tap to display options to move extruder and build platform along the X, Y, and Z-axis. BDL-2610039151, Page: MUL (VAA), downloaded at: 2017.04.15_00:06:57, by PT-RT/ENG1_Chris.Heflin BWN Release Valid CRNo. Ind. Term 18 DocType JOG MODE 2610039151 INSTRUCTION MANUAL AA 6035A0510A 2016-02-19 huq3hz 560 BDL MUL 18 / 108 Tap to move extruder and build platform to zero position.
SETTINGS Robert Bosch GmbH DM 2610039151 01-16_3D40 1/7/16 9:33 AM Page 19 LANGUAGE – Tap to pick alternate menu language. DISPLAY – Tap to customize cabinet LEDs or main menu hotkeys. Z-AXIS OFFSET – Used to calibrate build plate height during assembly. SOUNDS – Tap to turn 3D40 sounds On/Off. DEMO MODE – Tap to turn retail demo mode On/Off. FACTORY RESET – Tap to remove all information stored on 3D40 and return it to factory defaults.
Robert Bosch GmbH DM 2610039151 01-16_3D40 1/7/16 9:33 AM Page 20 ABOUT Indicates that the printer is connected to Spark 3D printing services and that it can receive remote commands. 20 BDL-2610039151, Page: MUL (VAA), downloaded at: 2017.04.15_00:06:57, by PT-RT/ENG1_Chris.Heflin Page / of DP Release BWN DocType CritP. Indicates that the extruder is hot. Valid Indicates that the extruder is warm. CRNo. Indicates that the extruder is cool. Ind.
Initial Setup Robert Bosch GmbH DM 2610039151 01-16_3D40 1/7/16 9:33 AM Page 21 networks. When your wireless network name is highlighted, tap “Accept”. The first time you power on your Dremel 3D40 you will be prompted to perform an initial setup of network, cloud services, and printer registration.
Getting Started with Your Dremel 3D App Robert Bosch GmbH DM 2610039151 01-16_3D40 1/7/16 9:33 AM Page 22 BDL-2610039151, Page: MUL (VAA), downloaded at: 2017.04.15_00:06:57, by PT-RT/ENG1_Chris.Heflin Page / of DP Valid Release BWN DocType CritP. 22 CRNo. 6. Your mobile device is now connected to your 3D40. Ind. 3. Register your 3D40 by filling in the required information and tapping “Register”.
Robert Bosch GmbH DM 2610039151 01-16_3D40 1/7/16 9:33 AM Page 23 Print Studio Software Overview Dremel 3D40 is compatible with Autodesk Print Studio which can be installed from www.dremel3d.com. Print Studio allows you to import, edit, and build 3D files. The overview below highlights the key controls, while additional support resources are available in the HELP menu.
Getting Ready to Build Robert Bosch GmbH DM 2610039151 01-16_3D40 1/7/16 9:33 AM Page 24 Observe all provided and safety instructions when using the Dremel 3D40. Failure to do so may result in fire, equipment damage, property damage or personal injury. ! WARNING warnings Do not touch the extruder ! WARNING tip during operation or until it has cooled down to at least 60°C (140°F). Contact with the extruder tip during or after operation before tip has cooled may result in personal injury. 2.
NOTE: Your Dremel 3D40 was tested by building objects before leaving the factory. These test objects may have Use extra care not to damage the extruder tip when clearing debris. Dremel 3D40 will not work properly with a damaged extruder tip and will require replacement. ! CAUTION 10. Close 3D40 lid and door. 25 DP Page / of Robert Bosch GmbH BDL-2610039151, Page: MUL (VAA), downloaded at: 2017.04.15_00:06:57, by PT-RT/ENG1_Chris.Heflin BWN DocType CritP. 8.
Robert Bosch GmbH DM 2610039151 01-16_3D40 1/7/16 9:33 AM Page 26 PREPARING BUILD PLATFORM FIG. 3 Do not drop the build ! WARNING platform. Tempered glass plate may break and result in personal injury. Do not remove tempered ! WARNING glass plate from plastic LIFT PRESS holder. Contacting with tempered glass plate edge may result in personal injury. Before every build make sure that the build platform is covered with Dremel specified build tape.
Robert Bosch GmbH DM 2610039151 01-16_3D40 1/7/16 9:33 AM Page 27 LEVELING BUILD PLATFORM Do not touch the extruder ! WARNING tip during Dremel 3D40 operation or until it has cooled down to 60°C (140°F). Contact with the extruder tip during or after operation before tip has cooled may result in personal injury. It is important you level the build platform every time you replace the build tape or reinstall the build platform to ensure that the build platform is evenly spaced from the extruder head.
Robert Bosch GmbH DM 2610039151 01-16_3D40 1/7/16 9:33 AM Page 28 CONNECTING USB CABLE FIG. 5 1. Ensure 3D40 power switch is in the off position. 2. Connect the included USB cable to your 3D40 and computer, figure 5. 3. Open software. 4. Turn your Dremel 3D40 on using the power switch to sync your computer to your Dremel 3D40. USB CONNECTING ETHERNET 1. Ensure 3D40 power switch is in the off position. FIG. 6 28 BDL-2610039151, Page: MUL (VAA), downloaded at: 2017.04.
4. In the model detail page tap “Build” to begin building process. BEFORE YOU BUILD 1. Ensure an adequate amount of filament is loaded (see page 24). Robert Bosch GmbH DM 2610039151 01-16_3D40 1/7/16 9:33 AM Page 29 TIP: You can determine whether you have enough filament to complete your object before building by comparing the length of filament needed as displayed by Print Studio to the length of filament on spool indicated by the length gauge.
Robert Bosch GmbH DM 2610039151 01-16_3D40 1/7/16 9:33 AM Page 31 Removing Your Object REMOVING YOUR OBJECT FROM THE BUILD PLATFORM FIG. 8 Do not touch the extruder ! WARNING tip during Dremel 3D40 operation or until it has cooled down to at least 60°C (140°F). Contact with the extruder tip during or after operation before tip has cooled may result in personal injury. Use personal protective ! WARNING equipment.
Robert Bosch GmbH DM 2610039151 01-16_3D40 1/7/16 9:33 AM Page 32 Best Practices 8. Use object removal tool gently to avoid damaging the build platform or object. 1. ALWAYS USE BUILD TAPE. 2. Ensure your build platform is level before every object. 9. Whenever possible, it is best to locate your object in the center of the build platform. Using the best orientation for your object is critical.
2. Add the 3D40 firmware file to an empty, FAT32 formatted, USB flashdrive. UPDATING FIRMWARE VIA NETWORK If your 3D40 is registered and added to your Dremel3D profile, you can update its firmware directly from the touchscreen. To update firmware: Robert Bosch GmbH DM 2610039151 01-16_3D40 1/7/16 9:33 AM Page 33 3. Turn off your 3D40 using the ON/OFF switch. 4. Insert the USB flashdrive into the USB-A port. 1. Tap “Tools”, “Settings”, “Check for Updates”. 5.
Robert Bosch GmbH DM 2610039151 01-16_3D40 1/7/16 9:33 AM Page 34 Troubleshooting Reorient the position of the 3D file in Print Studio to minimize the support material or place the support material on a non-critical surface. Spaghetti mess at end of build. A layer of your object did not stick properly, model was saved with minimal surface area contacting the build platform, or object was built floating above the build platform with no support selected.
Check 3D40 network settings and retry connection. Token invalid. Verify the current 3D40 token using "Tools/About" and retry. Use "Get new token" to generate a new token and retry connection. Note this will remove any users that are sharing your printer. Build did not start when sent over network. Filament ran out. Load additional filament and resume build. Doors open. Doors must be closed to start builds over your network, start build from print queue.