
User Manual
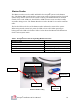
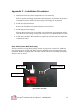
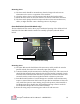
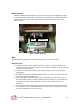
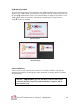
Table Of Contents

Octopus Installation & User Manual – APPENDIX C
C2
Mounting Notes:
a) The door switch should be mounted away from the hinge side and cause no
obstruction to the service or operation of the machine.
b) Clean the surface where it will be mounted with the alcohol pad provided
c) Mount the door switch ¾ inch back from the closed face of the door when shut.
d) The door switch plunger should not impact the door where an item that moves,
slides, or might otherwise cause a shearing action to the plunger.
Door-Bolt Switch (Door-Bolt Mode only)
The Door-Bolt Switch is used to detect proper authorized opening of the ATM safe lock
dead-bolt. The Door-Bolt Switch contacts are normally open (NO) when the bolt is
locked.
Mounting Notes:
a) The Door-Bolt switch should detect bolt movement, and if possible be wired in
parallel with the electronic lock’s Normally Open (NO) output.
b) Customer should provide instructions for attaching to their lock. The contact used
should be NO (normally open) when the bolt is locked and NC (normally closed)
when the bolt is unlocked. This mirrors the operation of our door-bolt switch and
ensures that either switch closure signals the MCU to disarm its protection.
c) Door-Bolt switch brackets of various designs are available. Some machines may
require a custom fabrication which cannot be provided at installation. If this is the
case, install the system as Auto-Arming, and provide pictures, make & model to
3SI Engineering. Re-schedule door-bolt installation giving at least 2 weeks for
3SI to fabricate and provide a new bracket assembly.
d) Route all wiring away from moving parts and secure with wire-ties.
Door-Bolt Switch Assembly
Mounting Frame
Door-Bolt Switch
Crimp Connectors
Mounting Hardware