
User Manual


2.3.2 Wipe Crank Arm
Open one of the cleaning wipes and wipe the installation
location of the crank arm.
Slide the installation tool under the band and x the pod in
place with the installation tool.
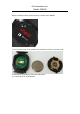
2.3.3 Remove Protective Tape
Remove the protective tape on the metal plate of the pod.
Only use supplied cleaning wipes for your instal-
lation – do not sand or use any other cleaning
agents on the pod.
!
2.3.4 Apply Adhesive
Using the adhesive applicator, spread the mixed epoxy adhe-
sive onto the metal plate of the pod. Ensure the entire metal
plate has a uniform layer of adhesive material.
Only apply epoxy adhesive directly to the metal
base of the pod – do not put adhesive on your
crank arm.
2.3.5 Fix Pod on Crank Arm
Place and hold the Precision
TM
pod on the install location as
marked on the crank arm in section 1.2.1 and secure the pod
on the crank arm using the provided installation tool and
installation band.
Pull the installation band around the crank arm and attach
them to the hooks on the pod.
!
Do not attempt to clean o the excess epoxy
with any solvents – doing so may damage
your power meter.
2.3.6 Curing Adhesive
Set the crank arm aside with the pod facing down for 8
hours in a warm location at room temperature and allow the
adhesive to cure.
!
Do not allow the pod to cure in tempera-
tures below 20°C or 68°F – doing so will not
allow the adhesive to cure properly and will
impact the accuracy of the power meter.
Do not expose the pod to temperatures
above 50°C or 122°F.
!
!
10
11
Figure 2.2
Figure 2.3
Figure 2.4
Figure 2.5
Figure 2.6