PRECISION 3 POWERMETER USER MANUAL
TABLE OF CONTENTS 1 2 Introduction 1.1 Your PRECISION 3 Powermeter [Component Diagram] 1 1.2 Installation 1 1.3 Get ready to ride [Quick Start] 1 Pair PRECISION 3 2.1 Compatible display units 2 2.2 Pair with a display unit over ANT+ 2 3 Perform a Zero Offset 4 Configure PRECISION 3 5 3 4.1 Pair with the 4iiii app 4 4.2 Zero offset using the 4iiii app 5 4.3 Link PRECISION 3 with a right-side power meter 6 4.4 Update firmware 7 4.5 Advanced features 7 Maintenance 5.
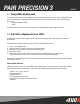
INTRODUCTION PAGE 1 1.1 Your PRECISION 3 Powermeter PRECISION 3 Crankset Your crankset, or your new Ride Ready Shimano crankset LED Indicator Light Battery Cap 1.2 Installation Install your 4iiii Powermeter and crankset following the crankset manufacturer’s instructions. The steps to install the crankset vary between models. Follow the manufacturer’s instructions, or consult your local bike mechanic for assistance.
PAIR PRECISION 3 PAGE 2 2.1 Compatible display units To view and record power and cadence data from your power meter, pair it with a compatible head unit or smart watch. Compatible devices pair with your power meter using one of the following protocols: •Bluetooth Smart (BLE) •ANT+ Consult the head unit or watch manufacturer for compatibility and pairing instructions. 2.2 Pair with a display unit over ANT+ Pairing steps vary between display units.
PERFORMING A ZERO OFFSET PAGE 3 Zero offset (calibrate) your power meter using your display unit before riding. For optimal performance, allow the power meter to adjust to the ambient riding temperature before performing a zero offset. This normally takes just a few minutes. 1. 2. 3. 4. Unclip and dismount from your bike for the zero offset. Spin the crank arms 3-4 times to wake your power meter. Connect your power meter with your display unit.
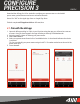
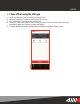
CONFIGURE PRECISION 3 PAGE 4 Download the 4iiii app for iOS or Android to configure your power meter as a dual-sided power meter, update firmware and access advanced features. Search for “4iiii” on the Apple App Store or Google Play Store. Find the complete 4iiii App User Guide at 4iiii.com/docs 4.1 Pair with the 4iiii app 1. Open the 4iiii app and log in. If this is your first time using the app, you will need to create an account.
PAGE 5 4.2 Zero offset using the 4iiii app 1. 2. 3. 4. Unclip and dismount from your bike for the zero offset. Spin the crank arms 3-4 times to wake your power meter. Pair PRECISION 3 Powermeter with the 4iiii app. Place your crank arms in the 12 and 6 o’clock positions, with the non-drive side crank arm downwards. Make sure the bike is stable and upright. 5. From the Devices tab, select the Zero Offset icon below your power meter’s name.
PAGE 6 4.3 Link PRECISION 3 with a right-side power meter The Left Side PRECISION 3 Powermeter can be used as a single-sided power meter, or linked with a right-side 4iiii PRECISION or 4iiii Podiiiium Powermeter for dual-sided power. PRECISION 3 ships configured as a single-sided power meter. If the right side power meter you are linking with has previously been linked with another left side power meter, make sure to unlink it first. Link as a dual power meter 1. Open the 4iiii app and log in. 2.
PAGE 7 4.4 Update firmware If a new firmware update is available, you will be prompted when you connect to PRECISION 3 Powermeter in the 4iiii app. We recommend updating your firmware if prompted. 1. Connect with PRECISION 3 Powermeter in the 4iiii app. 2. Select PRECISION 3 Powermeter from the Devices tab to view Device Settings. 3. Select Update Firmware (iOS) or UPDATE (Android). Do not close the app during a firmware update. 4.
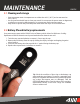
MAINTENANCE PAGE 8 5.1 Cleaning and storage • Store your power meter in temperatures no colder than -40°C (-40° F) and no warmer than 60°C (140° F). • Use only water and mild soap to clean your crank. Do not expose the power meter to degreasers, or abrasive or corrosive cleaning agents. Do not pressure wash your power meter. • Keep water or liquids away from the power meter when the cap is off for maintenance. 5.
SPECIFICATIONS 6 SPECIFICATIONS PARAMETER Accuracy (Power Error) Battery Type Battery Life Operating Temperature Range Storage Temperature Range Weather Sealing Rating Cadence Output Power Output, Maximum Communication ANT+ Range ANT+ Frequency ANT+ Features Bluetooth® Range Bluetooth® Frequency Bluetooth® Features Weight SPECIFICATION +/- 1.
TROUBLESHOOTING PAGE 10 For additional troubleshooting assistance, please go to 4iiii.com/support 7.1 What do the power meter lights mean? When you wake up the power meter, the light should turn red, green, and blue in sequence, then pause, then flash red 1 to 5 times to indicate the battery level.
WARRANTY PAGE 11 By purchasing this product you acknowledge and agree to the terms of this limited warranty. 4iiii Innovations Inc. (“4iiii”) warrants this product to be free from defects in material and workmanship, under normal use, for a period of three (3) years from the date of original purchase (the invoice date) to the original purchaser for Power meters.
REGULATORY COMPLIANCE PAGE 12 FCC ID: ZZNPM300 Model: PML300 FCC Statement: This device complies with Part 15 of the FCC Rules. Operation is subject to the following two conditions: (1) This device may not cause harmful interference, and (2) This device must accept any interference received, including interference that may cause undesired operation. The grantee is not responsible for any changes or modifications not expressly approved by the party responsible for compliance.
CONTACT PAGE 13 For technical support please contact your 4iiii authorized dealer. 4iiii Innovations Inc. 141 2 Ave E Cochrane, AB T4C 2B9 Canada Or visit www.4iiii.