
User's Manual


User
UserUser
User Guide
Guide Guide
Guide
Wireless Network Ticket Generator (SDS200W and POS Printer) ENGLISH
Copyright © 4IPNET, INC. All rights reserved.
- 6 -
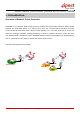
3. Including SDS200W into Your Network
The following diagram illustrates some deployment examples that show how to connect SDS200W to the
POS printer and 4ipnet Gateways/Controllers.
1. Put relevant devices in place.
2. Attach a SDS200W to a power adaptor provided in the package.
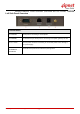
3. Attach a POS printer to a power adaptor provided in the package and turn on the power switch situated
on the left side of the device.
4. Connect a POS printer to the Console port of SDS200W by a RS-232 cable provided within the POS
printer package.
5. Connect SDS200W to your 4ipnet Gateway/Controller via Ethernet port or wirelessly. If you are to do it
wirelessly, conduct a site survey in the first place. The wireless coverage is subject to change.
Note:
You need to connect to the correct LAN port if your Gateway/Controller
is operating in Port-based mode.
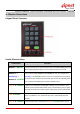
6. To verify if the deployment works fine. Press FUNC + ‘1’ + ENTER to see if SDS200W is attached to a
correct gateway and get an IP address from it. Additionally, press ‘Number’ + ENTER to see if an
account with a certain billing plan can be printed out. If it is not working properly, go to Appendix A for
trouble shooting.