C-pan arm USERS INSTRUCTIONS Designed 1 of 12 and made in Denmark
Thanks for purchasing a 9.Solutions product. With great passion, we design our products to be as versatile as possible. We hope that our products contribute to your creative vision. Sincerely, The 9.Solutions Team Please read and follow these instructions before use: Introduction: The C-pan Arm is a unique camera guide system that mechanically moves your camera in a variety of different paths: horizontally, vertically, or diagonally.
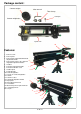
Package content: Counter weights Allen wrench Tube clamps Lock pin Counter weight tube C-pan arm 1 20 Features: 1. Camera screw 2. Camera plate 3. Camera plate forward/backwards tilt adjustment handle 4. Camera plate side to side slide and 5 angulation adjustment handle 5. Gearbox 6. Curvature adjustment handle 7 7. Curvature indication scale 6 8. Gearbox plate 9. Counterweight 10. Counterweight tube 11. Lock pin for counterweight tube 12. Fulcrum 13. Fulcrum rosettes 14.
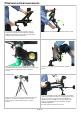
Setup: A heavy duty tripod is required to mount the C-pan arm. Insure that the max load capacity of the tripod is not exceeded. For best stability, spread the legs on the tripod as much as it is possible and make sure all the leg and lock knobs are securely tightened. During transportation or when not in use, lock the two arms together with the lock pin. Align arms and push pin down into the bottom arm. The pin can be used on either side to lock the arms.
Setup: Tilt fulcrum back until the lines on top of fulcrum and arm base line up. 1 Attach the counter weight tube to the front of the C-pan. 2. Insert the lock pin Attach camera to the camera plate. The camera screw has a 1/4” thread on one side and 3/8” on the other. Check the levelling bubble to insure that the C-pan is set level in all directions. Place counter weights on tube. Place the weights as needed (depending on camera weight) to reach a safe operating balance.
Straight and curved movements: Set adjustment handle to mid position for straight movement (indicated by a straight line) Straight movements Setting the adjustment handle at any position to the right of center position creates an outward curved movement. Any radius from 1,5m (59in) to straight can be achieved. Curved movements (outward). Setting the adjustment handle at any position to the left of center position creates an inward curved movement.
Set curved movements: Subject 1. Align the camera lens and the C-pan arms with the subject. Subject Subject 2. Move arm out to one side. To maintain the most accurate curve, do not move the arms all the way to the maximum position. 3. Loosen the adjustment handle and slide it to the right. Slide it until the camera lens lines up with the subject again. Tighten adjustment handle. The curvature of the movement becomes parabolic the further it gets to the maximum position.
Tilted and vertical movements: To easily tilt the C-pan arm into a vertical or sloped position, move the arm out to the right side and (while holding the arm firmly) loosen the green fulcrum handle and tilt the arm to the desired position. Set the arm at any desired angle from horizontal to vertical. Always insure that the rosette teeth intermesh correctly when tightening down the green handle. Do not let go of arm before having insured that the fulcrum connection is secured.
Tilted and vertical movements: Straight vertical movements. Vertical curved movement Sloped curved movement In and outs or Fly-over movements : To make in and out shots or fly-overs, simply loosen the camera screw and rotate the camera 90 degrees (or the desired angle) on the camera plate and then tighten screw again. In and out movement The camera plate can then be titled to any angle, depending on what kind of movement is desired.
Additional info: To replace or switch the camera screw around, remove plastic plug from slot end and slide camera screw to the large opening. The camera screw features a 1/4”-20 thread one one end and 3/8”-16 thread on the opposite end. At the top of the right rear shaft, there is a 1/4-20” attachment point to mount accessories such as external monitors. To ease directional positioning, an optional rotating plate can be placed between the C-pan and the tripod.
Safety cautions: ✘ ✘ Do not move a fully loaded C-pan by lifting or pulling in the arms. The C-pan should only be moved by its pedestal - and if so, it is recommended to move it without any counter weight or payload. Do not drag or jolt the C-pan around when fully loaded with counter weights. This could lead to damaged gears or joints. ✘ ✔ ✘ If C-pan has to be lifted to be moved, unload all weights and mounted equipment first. ✔ Always keep fingers clear from any of the mechanical moving parts.
For more info visit: www.9.solutions Contact (International): Email: info@9.solutions Phone: +886 2 25776608 Contact (US): Email: support@us-9.