
Installation Guide

Finished Flooring Installation
Using the provided trowel adapter, spread the adhesive over one half of the
up to the center line. Do not apply
excessive adhesive. Allow the adhesive to dry to tack before installing the plank (see adhesive pail label for
Allow the adhesive to dry completely to tack prior to installation.
Start installing the plank along the center line. Complete each row, including cut pieces at the wall, before proceeding to
the next row. end joints by at least six inches and position planks in a random fashion, working out of three -
four cartons for the best appearance. Position each plank lightly against the previous one by pressing it
into place
without sliding it. Remember to avoid small cuts of less than 6 inches at the ends of each row and place the cut ends
towards the wall.
If it is necessary to adjust or remove a plank, use a heat gun to
warm the plank. Complete the opposite side of the
room in the same fashion as the previous side.
Cutting a plank to
last row of planks will need to be cut to to walls and other vertical surfaces.
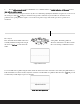
Straight Cuts: place a loose plank directly over the top of the last full installed plank, making sure to line up all edges.
Using a plank to measure the distance from the wall to the last installed plank, position the edge against the wall and
mark the loose plank with a pencil where it meets the installed plank at the opposite edge from the wall.
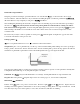
Next, place the marked plank on a cutting board. Using a carpenter square as a guide, score the pencil line carefully with
a sharp knife, then break/snap (or cut) the plank along the score mark.
CAUTION: Keep
away from the knife blade to avoid injury. Install plank with the cut edge toward the wall.
Irregular cuts: Scribe plank to irregular shapes such as door trims, pipes, etc., and cut with a utility knife.
Immediately
Installation
Roll the entire
with a 100 pound 3 section roller. Restrict to light for the 24 hours.
Replace the base
moldings and return appliances and furniture to the room by rolling or sliding them over strips of hardboard. Seal all
areas that may be exposed to surface spills (i.e. tubs, toilets, and showers) with silicone caulking.