INSTALLATION GUIDE GUIDE D’INSTALLATION GUÍA PARA INSTALACIÓN ROMAN BATHTUB FAUCET ROBINET POUR BAIGNOIRE ROMAINE GRIFO PARA TINA DE BAÑO ROMANA A&E Bath & Shower Bain et Douche
TO GET STARTED POUR COMMENCER PARA COMENZAR Before you begin, read all instructions carefully. Avant de débuter les travaux, lire attentivement les instructions d’installation. Leer todas las instrucciones cuidadosamente antes de empezar. Consult local building codes to ensure that installation complies with standards in your area. Inspect unit carefully to ensure there is no damage or defects. If such is the case, contact your distributor.
TOOLS NEEDED OUTILS REQUIS HERRAMIENTAS NECESARIAS (not included) (non inclus) (no incluidas) METRIC METRIQUE Hole saw | Emporte-pièce | Sierra perforadora Allen key | Clé allen | Llave allen Utility knife | Couteau à lame rétractable Navaja multiusos Adjustable wrench | Clé à molette | Llave inglesa flon te Measuring tape | Ruban à mesurer | Cinta para medir Teflon tape | Ruban téflon | Cinta de teflón Screwdriver | Tournevis | Desatornillador Drill | Perçeuse | Taladro Pencil | Crayon | Láp
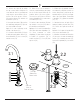
PARTS LIST LISTE DE PIÈCES LISTA DE PIEZAS 8 21 1A 9 1B 2 13 11B 3 22 10 23 4 11A 5 14 15 16 12 17 6 19 18 24 7 19 20 Item Description QT. Item Description QT.
PREPARATION PRÉPARATION PREPARACIÓN Drill 3 holes 1 1/2’’ (38 mm) in diameter for the installation of the mixer (1), the faucet (10) as well as the handheld shower (21). Percer 3 trous d’un diamètre de 1 1/2’’ (38 mm) pour l’installation du mitigeur (1), du robinet (10) ainsi que de la douchette à main (21). Taladrar 3 orificios de 1 1/2’’ (38 mm) de diámetro para la instalación del mezclador (1), el grifo (10) al igual que para la ducha manual (21). The distances shown below are for suggestion only.
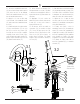
INSTALLATION 1 INSTALLATION 1 INSTALACIÓN 1.1 Insert the mixer (1) with the large flange and the gasket (11B) into the first hole on the bathtub. 1.1 Insérer le mitigeur (1) avec la bride et son joint (11B) dans le premier trou de la baignoire. 1.1 Introducir el mezclador (1) con la brida grande y la junta (11B) dentro del primer orificio en la tina de baño. 1.2 Underneath, insert the U rubber washer (3) and the U metal washer (4) before screwing the nut (5) on the threaded rod (2). 1.
2 2.1 Remove the spout (8) by taking the cap screw off and loosening the set screw with the allen key provided and verify that the spout washers (9) are in place. Pull on the spout to remove. Unscrew the diverter (12) and take off the washers (14 & 15). 2.1 Retirer le bec (8) en enlevant le cache vis et en dévissant la vis de réglage avec la clé allen fournie. Vérifier que les rondelles du bec (9) soient en place. Tirer sur le bec pour l’enlever.
2.4 Screw up the lock nut (16) to stabilize eveything. Screw on the screws (19) to secure in final position while leaving 1/4’’ (6mm) of space in between the lock nut (16) and the metal washer (15). 2.4 Remonter l’écrou (16) pour fixer le tout. Visser les vis (19) pour sécuriser en position finale en laissant 1/4’’ (6mm) d’espace entre la rondelle en métal (15) et l’écrou (16). 2.5 Insert the spout (8) in the faucet base (10).
11A 3 3.1 Insert the handheld shower base (23) as well as the flange and its gasket (11A) in the last hole on the bathtub. Slide in the handheld shower hose (22) into the handheld shower base. 3.1 Insérer la base de douchette (23) ainsi que la bride et son joint (11A) dans le dernier trou sur la baignoire. Glisser le tuyau de douchette (22) dans la base de douchette. 3.1 Introducir la base de la ducha manual (23) al igual que la brida y su junta (11A) en el último orificio en la bañera.
4 Apply 2 to 3 coats of teflon tape on all threads. Appliquer 2 à 3 couches de ruban téflon sur tous les filets. Aplicar de 2 a 3 capas de cinta de teflón en todas las roscas. 4.1 Connect the hoses (7, 20 & 22) like shown. 4.1 Raccorder les tuyaux (7, 20 et 22) comme indiqué. 4.1 Conectar las mangueras (7, 20 y 22) como se muestra. 4.2 Attach the weights (24) on the handheld shower hose (22) and on the hand shower (21) side using the screws (19). 4.
MAINTENANCE ENTRETIEN MANTENIMIENTO Daily care Entretien quotidien Cuidado diario Wipe with a soft towel after each use. Après chaque utilisation, essuyer avec un chiffon doux. Limpiar con una toalla suave después de cada uso. Les savons doux pour vaisselle sont suffisants pour garder la surface propre et brillante. Rincer à fond et sécher avec un chiffon propre. Utilizar detergente suave para lavar trastes para mantener las superficies limpias y brillantes.
WARRANTY GARANTIE GARANTÍA A&E Shower and Baths Inc. (hereafter “A&E”) offers the following limited warranty on each of its products. This warranty extends only to the original owner/end-user for personal household use. A&E warrants their products to be free from defects in workmanship and materials under normal use and service for a period of one (1) year from the original date of purchase by the owner/end-user.