Instruction Manual pH 300 pH 301 pH 302 Microprocessor GLP Bench-top pH/mV/ISE/°C Meters Rel mV ppm pH DATE TIME CFM MEM WRONG CAL LOG ON °C mV ppm pH INTV 1 m s BUF 2 3 OFF PAPER PRINT pH302 pH METER RANGE TIME http://www.hannainst.
Dear Customer, Thank you for choosing a Hanna Instruments Product. Please read this instruction manual carefully before using the instrument. This manual will provide you with all the necessary information for the correct use of the instrument, as well as a precise idea of its versatility in a wide range of applications. These instruments are in compliance with CSA, UL and (EN 50081-1 and EN 50082-1) directives. TABLE OF CONTENTS Preliminary Examination ...................................
FUNCTIONAL DESCRIPTION pH 300 THE FRONT PANEL Rel mV ppm pH DATE TIME CFM MEM WRONG ON °C mV ppm pH INTV 1 CAL LOG m s BUF 2 3 OFF COMM RANGE CAL DATA pH300 pH METER Rel mV ppm pH CAL °C MS CFM °C MR DATE TIME CFM MEM WRONG CAL LOG ON °C mV ppm pH INTV 1 m s BUF 2 3 OFF COMM RANGE CAL DATA pH300 pH METER CAL °C MS CFM °C MR Keyboard on the Left • COMM to display the current baud rate for RS232.
SPECIFICATIONS pH 300 FUNCTIONAL DESCRIPTION pH 301 THE FRONT PANEL Range pH ISE ORP °C 0.00 to 14.00 ±399.9 mV ±1999 mV -9.9 to 120.0 pH ISE ORP °C 0.01 0.1 mV 1 mV 0.1 Accuracy pH (@20°C/68°F) ISE ORP °C ±0.01 ±0.2 mV ±1mV ±0.5 Typical EMC pH Deviation ISE ORP °C ±0.01 ±0.6 mV ±1 mV ±0.
Keyboard on the Left • CAL to start the calibration mode for pH, mV and ION. To set or quit the date or time setting mode. Used also during logging (to start logging press pH, mV or ION plus LOG plus CAL key; to stop logging press LOG plus CAL key). • CFM to confirm calibration values. • COMM to display the current baud rate and command prefix for RS232. • DATE to display the date. • RANGE to display the calibration buffer or the temperature on the secondary LCD during calibration.
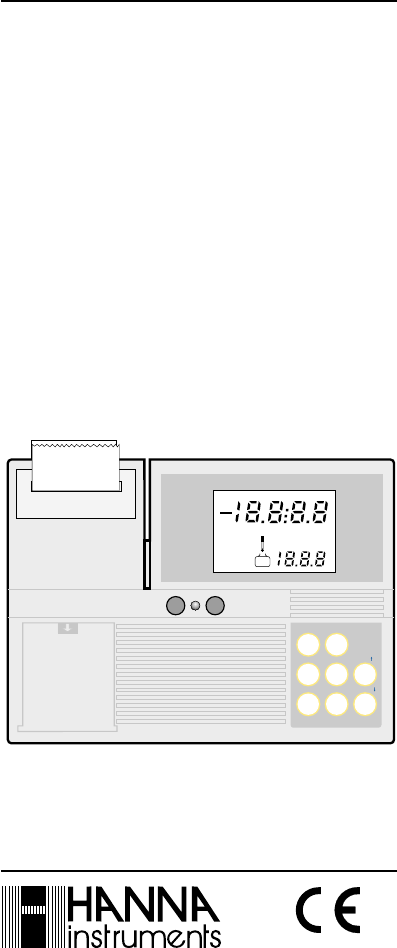
FUNCTIONAL DESCRIPTION pH 302 THE FRONT PANEL Rel mV ppm pH DATE TIME CFM MEM WRONG ON °C mV ppm pH INTV 1 CAL LOG m s BUF 2 3 OFF PAPER PRINT pH302 pH METER RANGE TIME Rel mV ppm pH CAL PGM CFM / ENTER / DATE TIME CFM MEM WRONG CAL LOG ON 7 8 9 4 5 6 1 2 3 °C mV ppm pH INTV 1 m s BUF 2 3 OFF PAPER PRINT pH302 pH METER RANGE TIME 0 . CAL PGM CFM / ENTER / CLEAR Keyboard on the Left • 0 to 9 for numeric and decimal data input.
SPECIFICATIONS pH 302 Range pH ISE ORP °C 0.00 to 14.00 ±399.9 mV ±1999 mV -9.9 to 120.0 pH ISE ORP °C 0.01 0.1 mV 1 mV 0.1 Accuracy pH (@20°C/68°F) ISE ORP °C ±0.01 ±0.2 mV ±1mV ±0.5 Typical EMC pH Deviation ISE ORP °C ±0.01 ±0.3 mV ±1 mV ±0.5 Resolution pH Calibration Automatic 1, or 2 points with 3 memorized buffers (4.01,7.01,10.
OPERATIONAL GUIDE ELECTRODE AND PROBE CONNECTIONS For combination pH or ISE or ORP electrodes (with internal reference) plug the electrode's BNC to the socket provided (see page 11). For electrode with separate reference, connect the measuring electrode's BNC to the BNC socket and the reference electrode's plug to the socket provided (see page 11). For temperature measurements and automatic temperature compensation connect the temperature probe to the °C socket (see page 11).
pH300, pH301 and pH302 use an EEPROM to retain the pH calibration, mV calibration, temperature calibration as well as the serial communication setting. The instrument will store the respective data after a calibration or serial communication setting, even when it is not plugged-in. Press CAL to enter the setting mode and the month will be flashing. For pH 302 only pH302 uses a rechargeable battery to retain the pH calibration data. It lasts approximately one month when fully charged.
CAL Press CAL to exit the date setting mode. Press RANGE and the logging interval on the secondary LCD will come up. RANGE Press TIME to display the time. The hour and the minutes will be displayed on the primary LCD, the logging interval on the secondary one. TIME TIME TIME INTV Use UP or DOWN to select the logging inter°C val. °C INTV Press CAL to enter the setting mode and the hour will flash. CAL TIME CAL Press CAL to exit the time setting mode.
SETTING THE DATE AND THE TIME AND THE LOGGING INTERVAL (for pH 302 only) See program No. 1 (page 60). VIEWING THE DATE AND THE TIME (for pH 302 only) Press TIME to display the time (HH/MM). TIME Press TIME again to display the date (MM/ DD). TIME pH Allow 1 or 2 minutes for the electrode to stabilize. °C pH is displayed on the primary display and temperature on the secondpH ary one. If readings are out of range "---" will appear on the LCD display. For pH 301 only: Press the .00/.
as close to the electrode as possible and wait for 1-2 minutes. If you know the temperature of the sample to be tested you can compensate for it manually. If manual temperature compensation is desired the temperature probe must be disconnected from the instrument. The display will then show the default temperature of 25°C or the °C last recorded temperature reading. "°C" is blinking. Note the temperature of the sample using a ChecktempC or a glass thermometer.
Press UP or DOWN to get this information in the following sequence: °C °C DATE a. Date of the last pH calibration (month, day and year) CAL b. Time when the last pH calibration was completed (hour and minutes). TIME TAKING REDOX MEASUREMENTS pH300, pH301 and pH302 have the capability to take ORP measurements. An optional ORP electrode must be used to perform these measurements (see page 105). RANGE CAL For pH 300 or pH 302: To get into the mV mode (ORP), press RANGE.
Note that the change in scale (from 0.1 mV to 1 mV as resolution) is automatic. For all models: Rel mV "---" appears if the value exceeds ±1999 mV (out of range). Oxidation-reduction potential (REDOX) measurements provide the quantification of the oxidizing or reducing power of the sample tested. To correctly perform a redox measurement, the surface of the ORP electrode must be clean and smooth.
DATE a. Date of the last ION calibration (month, day and year) b. Time when the last CAL ION calibration was TIME completed (hour and minutes) c. Offset calibration INTV value expressed in CAL mV and displayed on mV the primary LCD with the value used to calibrate the offppm set on the second1 CAL ary LCD. d. Slope calibration mV value expressed in mV/[log (0.0001xppm)] and displayed on the ppm primary LCD with CAL 2 the 2nd value used to calibrate the slope on the secondary LCD.
MR To recall the stored memory value, press MR and the memorized reading will be displayed with the MEM indicator lit. RESET BUTTON The RESET button (see page 11) is used when the instrument displays erroneous messages due to strong electrical interference or when the instrument's power supply was disconnected before the meter was switched off. It is necessary to press the reset button and restart the entire operation. Calibration points should remain memorized.
pH 4.01 if you are going to measure acid samples, or pH 7.01 and pH 10.01 for alkaline measurements or, for pH 301 only, perform a 3-point calibration for the entire range. PROCEDURE • Press RANGE (for pH 300 and pH 302) to select the pH measurement mode. Dip the electrode in the pH 7 solution; wait 30 sec and then press CFM RANGE • Select the buffer value by pressing UP or DOWN or just DOWN (for pH 302) until the secondary LCD displays the value of the first solution (e.g. “7.01”).
CFM/ (and adjusts the offset point). pH The buffer value is then displayed on the primary LCD and pH the secondary LCD CAL 2 will display the expected second buffer value. For pH 302 only: the printer will print further instructions for the calibration procedure. BUF Now dip the electrode in 2nd solution, wait 30 sec and then press CFM • Press CAL and the calibration process is ended with just the offset of the meter calibrated.
• Press UP or DOWN or just DOWN (for pH 302) until the secondary display changes the value of the second solution (e.g. “4.01”). °C °C For pH 300 only: The calibration process is complete and the display will ask for the date entry. DATE CAL °C °C Use UP or DOWN to select the month, the day and the year. ENTER/ pH CAL BUF 2 • Only when the reading is stable (less than ±0.
RANGE RANGE Note: during calibration, the secondary LCD displays the selected buffer value. By pressing RANGE the temperature value can be also displayed. This will allow you to check the buffer temperature during calibration. THREE-POINT CALIBRATION (for pH301 only) A three-point calibration (for the entire pH range) can be performed with pH 301. These are the selectable buffers: 1st buffer 2nd/3rd buffer 3rd/2nd buffer st (offset) (1 slope) (2nd slope): pH 6.86 pH 1.68 pH 9.18 or 7.01 or 4.01 or 10.
CALIBRATION WITH MANUAL TEMPERATURE COMPENSATION If for some reason the temperature probe is defective, or it is required to calibrate with manual temperature compensation, follow the procedure below: • Unplug the temperature probe from the meter. • Note the temperature of the buffer solutions with a ChecktempC or a glass thermometer with a resolution of 0.1°C. • For pH300 and pH301 only °C °C Use UP or DOWN to manually adjust the display reading to the value of the reference thermometer (e.g. 20°C).
ION CALIBRATION (for pH 301 only) INITIAL PREPARATION Pour small quantities of the chosen ION calibration solution into individual beakers. If possible, use plastic beakers to minimize any EMC interferences. For accurate calibration use two beakers for each solution, the first one for rinsing the electrode, the second one for calibration. By doing this, contamination between the buffers is minimized. PROCEDURE • Press ION to select the ION measurement mode.
• Press CAL and the calibration process is ended with only the offset of the meter calibrated. For best accuracy however, it is recommended that a two-point calibration is performed. Note: during calibration, the secondary LCD displays the selected buffer value. By pressing RANGE the temperature value can be also displayed. This will allow you to check the buffer temperature during calibration.
CFM mV CALIBRATION The meter has been factory calibrated for the mV and is ready for measurements. The calibration data are stored in the EEPROM. The ORP electrodes are interchangeable and no mV calibration is needed when the ORP electrode is replaced. If, for any reason, the mV measurements are out of accuracy, re-calibration should be carried out as follows. INITIAL PREPARATION Prepare a simulator with an accuracy of ±0.1 mV that can provide: • ±390.0mV and ±1000.0mV for pH300 • 0.0 mV, ±500.
PROCEDURE FOR pH 301 • Connect the meter to the simulator through the connection cable (connect it to the BNC electrode socket). • Turn the pH 301 on by pressing ON plus CAL simultaneously. ON CAL • The primary LCD will display "0.0 mV". • Set the simulator to "0.0 mV". mV CAL • As soon as the reading is stable (after about 10 seconds), the "CFM" indicator will start blinking. Press CFM to confirm the value. CFM CFM • The primary LCD will display "0 .0 mV". • Set the simulator to "0.0 mV".
mV • The primary LCD will display "0 .0 mV", • Set the simulator to CAL "0.0 mV". • As soon as the reading is stable (after about 10 seconds), the "CFM" indicator will start blinking. Press CFM to confirm the value. CFM/ • The primary mV LCD will display "1 5 0 0 . 0 mV". • Set the simulator CAL to "1500.0 mV". • As soon as the reading is stable (after about 10 seconds), the "CFM" indicator will start blinking. Press CFM to confirm the value. CFM/ CFM CFM mV • The primary LCD will display "500.0 mV".
• Wait for about 30 seconds. Press CFM. The secondary LCD section will show "50.0°C". TEMPERATURE CALIBRATION (for Technical Personnel only) The pH meter has been factory calibrated for the temperature and is ready for measurements. The temperature probes are interchangeable and no temperature calibration is needed when the temperature probe is replaced. If, for any reason, the temperature measurements are inaccurate, re-calibration should be carried out as follows.
• The secondary LCD will display "0.0 °C" with the "CAL" indicator. • As soon as the reading is stable the "CFM" indicator will start blinking. °C CAL ON °C CAL CFM • Immerse the temperature probe in the vessel with hot water and wait for a few minutes. • As soon as the reading is stable the "CFM" indicator will start blinking. °C 50 °C (122 °F) • Immerse the temperature probe in the vessel with the ice and water and wait for a few minutes.
CFM/ • Press CFM to confirm the calibration. • The temperature calibration is complete and the meter will return to the normal operating mode. LOGGING WITH pH 301 This function permits the automatic logging of pH or mV or ION measurements together with the temperature without needing an operator and for a long period of time. The lot number goes from 1 to 99 and then back to #1. The maximum capacity per lot is 8000 samples.
Press LOG and the primary LCD will show the current lot number and the secondary LCD will display the current page number. LOG LOG Press LOG again to display the current sample number (the number of values that have been taken in the current lot). LOG when this happens the LCD will show page "0", indicating the overwriting has happened. Each time a new logging period starts, it automatically starts a new page.
PROGRAMMING FUNCTIONS WITH pH302 There are 9 programs all together in the instrument. To select a particular program, press PGM followed by the program number on the numeric keyboard. E.g. To select program 1 PGM • press PGM 1 • press 1 By pressing PGM the secondary LCD will show "P" to confirm the programming mode. By pressing 1, the secondary LCD will show "P1" to confirm the selected program.
Program #7 To select a different printing language (6 languages are available) (see page 78). Program #8 To print the ion concentration in M for the measured pH value (see page 79). Program #9 To set the baud rate and the STRINGII code of Escape character for the RS232 (see page 79). To stop or exit any program: • press PGM • press 0 PGM 0 PROGRAM 1 1 set sample no. 2 set time 3 set date • To set the sample number (choice #1), press 1 followed by ENTER. "P1.
• "P1." will be displayed on the secondary LCD. • To set the time press 2 followed by ENTER. "P1.2" will be displayed on the secondary LCD with "0" on the primary one. ENTER/ 3 ENTER/ 2 The time value (choice #2) can be set for a 24 hour clock. Enter the desired number also using the decimal point followed by ENTER. E.g. 2 P.M. equals 14.00. Press "14.00" followed by ENTER. 1 • To set the date press 3 followed by ENTER. "P1.3" will be displayed on the secondary LCD with "0" on the primary one. .
PROGRAM #2 (pH 302) This program lets you calibrate with buffer values other than 4.01, 7.01 and 10.01 pH which are pre-programmed into memory. • To enter program #2, press PGM and then 2. PGM 2 • Check the appropriate value for the buffer at the measured buffer temperature (see page 39). • After about 30 seconds enter the 1st buffer value at the working temperature followed by ENTER. E.g. 6.92 (at 10°C). The printer will then define the two functions: 1 is the first buffer, 2 is the second buffer.
• After about 30 seconds enter the 2nd buffer value at the working temperature and then press ENTER. E.g. 9.33 (at 10°C). 9 . 3 ENTER/ 3 The printer will print the 2nd buffer value. PROGRAM 2 1 enter 1st buffer 2 enter 2nd buffer 1st buffer 6.92 2nd buffer 9.33 • Press PGM to quit this program. • The calibration is now complete. PGM PROGRAM #3 (pH 302) This program prints the date, time, the offset and slope characteristics of the pH electrode.
• "P4." will be displayed on the secondary LCD. PROGRAM 4 1 enter start time 2 enter time interval 3 enter end time • To set the time interval (choice #2), press 2 followed by ENTER. "P4.2" will be displayed on the secondary LCD with "0" on the primary one. • To set the start time (choice #1), press 1 followed by ENTER. "P4.1" will be displayed on the secondary LCD with "0" on the primary one. ENTER/ 2 ENTER/ 1 The minimum time interval is 1 minute. The interval is expressed in HH:MM. E.
• To set the finishing time (choice #3), press 3 followed by ENTER. "P4.3" will be displayed on the secondary LCD with "0" on the primary one. 2/04 10.20 202 20.3 6.38 DATE TIME SAMPLE °C pH 2/04 10.25 203 20.4 6.39 DATE TIME SAMPLE °C pH 2/04 10.30 204 20.3 6.38 ENTER/ 3 • Enter the desired number followed by ENTER. E.g. Finishing time 11:30. Hours and minutes must be separated by a decimal point. 1 DATE TIME SAMPLE °C pH 1 .
The printout defines functions 1, 2 and 3: 1 is a start time, 2 is the time interval, 3 is the interrupt value of pH/mV. PROGRAM 5 • "P5." will be displayed on the secondary LCD. • To set the time interval (choice #2), press 2 followed by ENTER. "P5.2" will be displayed on the secondary LCD with "0" on the primary one. 1 enter start time 2 enter time interval 3 enter end pH/mV value • To set the start time (choice #1), press 1 followed by ENTER. "P5.
• To set the end pH/mV value (choice #3), press 3 followed by ENTER. "P5.3" will be displayed on the secondary LCD with "0" on the primary one. 2/04 10.30 210 20.3 4.50 DATE TIME SAMPLE °C pH 2/04 12.00 211 20.4 4.01 DATE TIME SAMPLE °C pH 2/04 12.25 212 20.3 3.50 ENTER/ 3 • Enter the desired number followed by ENTER. E.g. pH 3.50 (supposed that the meter is in pH mode). Note: the value will automatically be pH or mV depending on the selected measurement range.
PROGRAM 6 1 set lower limit 2 set upper limit 3 clear alarm • To set the lower limit (choice #1), press 1 followed by ENTER. "P6.1" will be displayed on the secondary LCD with "0" on the primary one. • "P6." will be displayed on the secondary LCD. • To set the upper limit (choice #2), press 2 followed by ENTER. "P6.2" will be displayed on the secondary LCD with "0" on the primary one. ENTER/ 2 ENTER/ 1 • Enter the desired number followed by ENTER. E.g. upper limit pH 7.50.
PGM 0 To definitely exit the program press PGM plus 0. Press PRINT and the printout will be in French. DATE (M/J) 2/04 HEURE 10.20 ECHANTILLON 215 °C 20.0 pH 6.52 PRINT PROGRAM #7 (pH 302) This program allows the user to select a different working language. Press PGM and then 7. PGM PROGRAM #8 (pH 302) This program prints out the ion concentration in M for the pH value measured. To activate the program, press PGM and then 8. 7 PGM 8 The printer will print out a list of languages available.
The printout defines functions 1 and 2: 1 is the baud rate, 2 to set the STRINGII code of Escape character PROGRAM 9 • "P9." will be displayed on the secondary LCD. • To set the command prefix (choice #2), press 2 followed by ENTER. "P9.2" will be displayed on the secondary LCD with "0" on the primary one. ENTER/ 2 1 enter baud rate 2 enter STRINGII code of escape character • To set the baud rate (choice #1), press 1 followed by ENTER. "P9.
INTERFACE WITH PC Data transmission from the instrument to the PC is now much easier with the new HI 92000 Windows® compatible application software offered by Hanna Instruments. User friendly, HI 92000 offers a variety of features and has an on-line help feature to support you throughout all situations. HI 92000 allows you to use the powerful means of the most diffused spread sheet programs (e.g. Excel©, Lotus 1-2-3©). Simply run your favorite spread sheet and open the file downloaded by HI 92000.
ELECTRODE CONDITIONING AND MAINTENANCE Reference Filling Hole Reference Filling Hole Fill Hole Screw Sensitive Wire Reference Wire Reference Wire Sensitive Wire Reference Junction Reference Junction Glass Bulb Glass Bulb Plastic Body pH Electrode Reference Wire Reference Junction Platinum or Gold tip Glass Body pH Electrode Reference Wire Plastic Body ORP Electrode Reference Junction Platinum or Gold tip Glass Body ORP Electrode PREPARATION Remove the protective cap.
electrodes). Follow the Preparation Procedure above before taking measurements. Note: NEVER STORE THE ELECTRODE IN DISTILLED WATER OR DRY. PERIODIC MAINTENANCE Inspect the electrode and the cable. The cable used for the connection to the meter must be intact and there must be no points of broken insulation on the cable or cracks on the electrode stem or bulb. Connectors must be perfectly clean and dry. If any scratches or cracks are present, replace the electrode. Rinse off any salt deposits with water.
TEMPERATURE-RESISTANCE CORRELATION FOR HANNA pH SENSITIVE GLASS The resistance of glass electrodes partially depends on the temperature. The lower the temperature, the higher the resistance. It takes longer for the reading to stabilize if the resistance is higher.
ADDITIONAL INFORMATION ABOUT INTERFACE WITH PC (for technical personnel only) If you are not using Hanna Instruments HI92000 application software, please find here below some additional information to help your connection to the PC. SETTING THE BAUD RATE AND THE COMMAND PREFIX The transmission speed (baud rate) of your pH meter and of the external device must be the same. Procedure for pH 300: To set the baud rate of the meter press COMM, the primary LCD shows the current baud rate.
°C °C Select a different command prefix (between 0 to 47 in decimal) by pressing UP and DOWN. COMM Press COMM to confirm the setting. Procedure for pH 302: See program #9 (page 79). SENDING COMMANDS FROM PC With terminal programs such as, for example, Telix®, Windows Terminal®, it is possible to remotely control your pH meter. Use HI920010 cable to connect the meter to the PC, start the terminal program and set the communication options as follows: 8, N, 1, no flow control.
PRE Requests the meter to send the RS232 command prefix Commands setting parameters: /BR To set the RS232 baud rate. E.g. send "/BR0" to set the meter to baud rate of 150 send "/BR1" to set the meter to baud rate of 300 send "/BR2" to set the meter to baud rate of 600 send "/BR3" to set the meter to baud rate of 1200 send "/BR4" to set the meter to baud rate of 2400 /PF To set the RS232 command prefix. E.g. send "/PF05" to set the command prefix to 05.
TI? Requests the meter to send the time E.g. "233001" for 23:30 hr, 1 sec. as interval "233002" for 23:30 hr, 15 sec. as interval "233003" for 23:30 hr, 30 sec. as interval "233004" for 23:30 hr, 1 min. as interval "233005" for 23:30 hr, 5 min. as interval "233006" for 23:30 hr, 30 min. as interval "233007" for 23:30 hr, 60 min. as interval "233008" for 23:30 hr, 120 min. as interval "233009" for 23:30 hr, 180 min.
DA? Requests the meter to send the date status (MMDD) TI? Requests the meter to send the time status (HHMM) Commands setting parameters: /BR To set the RS232 baud rate. E.g.
HI 7061L HI7073M HI 7073L HI7074M HI 7074L HI7077M HI 7077L General Cleaning Sol., 460 mL Protein Cleaning Sol., 230 mL Protein Cleaning Sol., 460 mL Inorganic Cleaning Sol., 230 mL Inorganic Cleaning Sol., 460 mL Oil & Fat Cleaning Sol., 230 mL Oil & Fat Cleaning Sol.
HI 1330B / HI 1310S Glass-body, semimicro, single junction, refillable, combination pH electrode. Use: laboratory. 5mm DIA 0.2" 5mm 0.2" FC100B Plastic-body (Kynar®), double junction, refillable, combination pH electrode. Use: general purpose for food industry. 12 mm 0.5" HI 1330 FC 100 120 mm 4.7" "S" VERSION HI 1331B / HI 1311S Glass-body, semimicro, single junction, refillable, combination pH electrode. Use: flasks. 8 mm 0.3" 7.5mm DIA 0.29" 120 mm 4.
FC 911B Plastic-body (Kynar®), double junction, refillable with built-in amplifier, combination pH electrode. Use: very high humidity. 12 mm 0.5" HI 5412 Glass-body, single Calomel reference half-cell electrode, refillable with 4mm plug with 1m (3.3') cable. Use: general purpose with constant temperature range. 12 mm 0.5" FC 911 HI 5412 110 mm 4.3" HI 1413B / HI 1410S Glass-body, single junction, flat tip, Viscolene, combination pH electrode. Use: surface measurement. 12 mm 0.5" HI 1413 120 mm 4.
EXTENSION CABLES FOR SCREWTYPE ELECTRODES ONLY (SCREW TO BNC CONNECTOR) HI7855/1 Extension cable 1m (3.3') long HI7855/3 Extension cable 3m (9.9') long HI7855/5 Extension cable 5m (16.5') long HI7855/10 Extension cable 10m (33') long HI7855/15 Extension cable 15m (49.5') long HI 7855 SERIES CABLE CONNECTORS CONNECTOR AND 3.0 mm (0.
WARRANTY CE DECLARATION OF CONFORMITY All Hanna Instruments are warranted for two years against defects in workmanship and materials when used for their intended purpose and maintained according to the instructions. The probes and the electrodes are warranted for a period of six months. Damages due to accident, misuse, tampering or lack of prescribed maintenance are not covered. This warranty is limited to repair or replacement free of charge of the meter only, whenever due to defect of manufacturing.
112 h t t p : / / w w w . h a n n a i n s t .