
User Manual


60
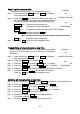
12-3. Data Memory for Calibration and Calibration Test
Calibration data (when and how it is performed) and calibration test
data can be stored in memory.
All the data in memory is available to be output at one time to a
printer or personal computer.
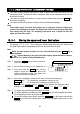
Up to 50 data sets of the latest calibration or calibration test can be
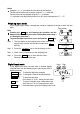
stored. When the memory capacity has been reached, "fUl"
illuminates in the upper left of the display as shown at the right.
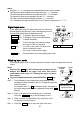
Storing the calibration and calibration test data
Note If "Clr" appears blinking in the upper left of the display, delete the data in memory.
Store the calibration and calibration test data as follows:
Step 1 Set the "Data memory (data)" parameter to "3".
Step 2 Set the "GLP output (info)" parameter to "1" or "2".
Step 3 With the settings above, each time calibration or calibration test is performed, the
data is stored automatically.
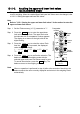
Transmitting the memory data
Note
Confirm that the "Serial interface (5if)" parameters are set properly.
Refer to "10. Function Table" and "16-2. Connection To Peripheral Equipment".
Confirm that the "Data memory (data)" parameter is set to "3".
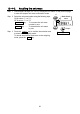
Step 1 Press and hold the PRINT key until out is displayed,
then release the key.
Step 2 Press the PRINT key to display out "n"o with "no" blinking.
Step 3 Press the
RE-ZERO key to display out "g"o with "go" blinking.
Step 4 Press the PRINT key to transmit all memory data using the RS-232C interface.
Step 5 The balance displays Clear when all memory data is output. Press the CAL
key to return to the weighing mode.
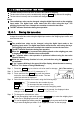
Deleting data stored in memory
Step 1 Press and hold the PRINT key until out is displayed,
then release the key.
Step 2 Press the SAMPLE key to display Clear .
Step 3 Press the
PRINT key to display Clr "n"o with "no" blinking.
Step 4 Press the
RE-ZERO key to display Clr "g"o with "go" blinking.
Step 5 Press the PRINT key to delete all data.
Step 6 The balance displays out when all the data has been deleted. Press the CAL
key to return to the weighing mode.
Indicato
r
In the upper left
of the display
In the upper left
of the display