
Manual


Replacing the Ink Ribbon
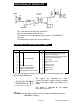
Front of Main Unit
Side of Main Unit
—TTT
À
__
Front of Printer
Printer Unit
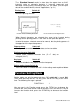
1. First, turn the power OFF.
2. Loosen the screws on the printer cover and draw out
the printer unit. Remove the printing paper. (Refer to
"Replacing the Printing Paper," p. 10.)
3. Remove the printer cover carefully: it can be
detached from the unit by lightly lifting up.
4. Remove the old ink ribbon by lifting it up when the
arrow position of the printer unit is pushed.
5. Set the new ink ribbon in place being careful not to
roll the ribbon. After the ribbon is in place, turn the
right knob of the ink ribbon in the direction of the
arrow shown in the figure to the left.
6. Reattach the printer cover by setting the bosses and
sliding the cover down.
7. Set the printing paper, see page 11.
8. Return the unit to its original position and tighten the
screws on the printer cover.
Note 1 : Do not apply excessive force to the printer unit. If normal, it can
be drawn out easily. If it is hard to take out return it once and
draw it out again. The guide may be damaged if excessive force
is applied vertically or horizontally.
Note 2: The printer is made of precision components and could be
damaged if metallic powder, water or other foreign substance get
inside the printer. Also be careful of static electricity when the
printer is drawn out.
If dust and other foreign substance get inside the unit, blow it out
with clean air. If the unit is used in a dusty environment consider
using a dust cover or air purge when not in use.
Page 12
owners-AO-8118A-v.3.a