SJ-3000WP SJ-6000WP SJ-15KWP SJ-30KWP 1WM PD4002705B
© 2013 A&D Company, Limited. All rights reserved. No part of this publication may be reproduced, transmitted, transcribed, or translated into any language in any form by any means without the written permission of A&D Company, Limited. The contents of this manual and the specifications of the instrument covered by this manual are subject to change for improvement without notice.
CONTENTS 1. SAFETY PRECAUTIONS ....................................................................................... 2 2. PARTS DESCRIPTION........................................................................................... 3 3. 3.1. 3.2. PREPARATION....................................................................................................... 4 Installing / Exchanging Batteries ......................................................................... 4 Setting Up The Scale ...........
1. SAFETY PRECAUTIONS All safety messages are identified by the following, "WARNING" or "CAUTION", of ANSI Z535.4 (American National Standard Institute: Product Safety Signs and Labels). The meanings are as follows: WARNING A potentially hazardous situation which, if not avoided, could result in death or serious injury. CAUTION A potentially hazardous situation which, if not avoided, may result in minor or moderate injury.
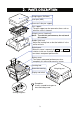
2. PARTS DESCRIPTION Weighing pan (SUS304) Inner pan (ABS) Screw to fix the pan support Pan support The pan support can be removed at times such as when the scale is cleaned. Weight sensor (Load cell) Note: To maintain performance, do not touch this sensor. Bubble Spirit level Adjust the leveling feet so that the bubble is in the center of circle. Switch cover When this cover is opened, the CAL and RESET switches inside are revealed. Keep the cover closed to maintain waterproof performance.
3. PREPARATION 3.1. Installing / Exchanging Batteries The batteries are not included with the product. Prepare 6 x "D" size (R20P or LR20) dry-cell batteries. When the mark is displayed, exchange the old batteries with new ones. 1. Loosen the screws for securing the battery cover using the provided screwdriver, and remove the battery cover. 2. Remove all the old batteries from the battery compartment. 3.
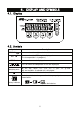
4. DISPLAY AND SYMBOLS 4.1. Display 4.2. Symbols Symbol STABLE NET ◄ ZERO ◄ Comparator LEDs Weighing units Description Turns on when the weight value is stable. Turns on when the NET weight is displayed. (The tare operation is in progress.) Turns on when zero is displayed. Turns on when the comparator results are displayed. "Ib", "oz", "ozt" , "Ib-oz" , "tI-s" , "tI-h" , "tI-t" , "t" , "pcs" , "N" , "g" and "kg" are available. A selected unit is displayed. Turns on while a switch is touched.
4.3. Operations And Functions Of Switches Switch Description When the scale is turned off: Touch the switch to turn ON the scale. The scale will be automatically set to zero (power-on zero). When the scale is turned on: Touch and hold the switch to trun OFF the scale. Tap the switch to ZERO the scale and display zero. During measurement: Touch and hold the switch to proceed to the calibration mode.
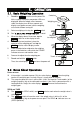
5. OPERATION 5.1. Basic Weighing Operation 1. Touch the switch to turn the power ON. All the symbols except the comparator LEDs are displayed. When the weight values becomes stable, the display turns off for a moment and displays zero (power-on zero) with the weighing unit used last before turning off. 2. Select a weighing unit using the UNITS switch. See "6. SELECTING A WEIGHING UNIT" in detail. 3. When the display doesn’t show zero, tap the switch to set the display to zero. 4.
The TARE switch will tare the scale and subtract the weight to zero as a tare weight when the weight is a plus value. In this case the ZERO◄ and NET◄ indicators turn on. (TARE operation) At the zero point, the net weight display shows the tare weight in negative, and the ZERO◄ and NET◄ indicators turn on. (Note: In some countries or areas, the ZERO ◄ indicator will not turn on while the scale is tared.
6. SELECTING A WEIGHING UNIT 6.1. Storing The Weighing Unit 1. 2. 3. 4. 5. 6. Touch the ON/OFF switch while touching and holding the TARE switch in order to display in the function setting mode. Tap twice the UNITS switch to display . Tap the SAMPLE switch to display a unit. Tap the TARE switch to activate or deactivate the unit. The indicator is displayed for each active unit. Repeat step 3 for other units. Tap the UNITS switch to move to the next function item when finishing the selection.
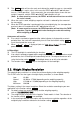
7. COUNTING MODE Determines a unit weight (the weight of one piece) from a known sample quantity, and calculates how many pieces are on the weighing pan using the unit weight. The unit weight is maintained even if the power is turned OFF. 1. Tap the UNITS switch to se lect "pcs".("pcs" = pieces) Tap 2. Tap the SAMPLE switch to enter the sample unit weight storing mode. The numerical value on the left indicates the number of samples. 3.
8. COMPARATOR The scale has three-, five- and seven-level comparators. Each comparator mode compares the weight value against the preset limit values and outputs the results using LEDs (yellow / green / red). Note: When the unit is "lb-oz" or "tl", this function can not be used. • • Red LOLO Five-level comparator mode: Uses four comparator values to compare the weight value and outputs results in five levels of LOLO, LO, OK, HI and HIHI.
8.1. The Formula To Compare Comparison is performed using the formula listed below and the results are output.
Seven-level comparator mode (portion weighing mode) Results None LED display Displayed value < Level 1 lower limit, or ( No LEDs on) Level 2 LOLO Level 1 (Level 1) lower limit ≤ Displayed value < lower limit ( Red LED on) Level 2 Level 3 LO (Level 2) lower limit ≤ Displayed value < lower limit ( Yellow LED on) Level 3 Level 3 OK (Level 3) lower limit ≤ Displayed value ≤ upper limit ( Green LED on) Level 3 Level 4 HI (Level 4) upper limit < Displayed value ≤ upper limit ( Yellow LED on) Level 5 H
8.2. Entering The Comparator Values 1. In the weighing mode, touch and hold the value setting mode. 2. Enter the comparator values using the following switches. UNITS To shift the blinking digit to the right. SAMPLE To increase the value of the blinking digit by one. TARE To store the setting value and to go to the next limit setting or UNITS switch to enter the comparator . The minus sign can be set at the next digit of the least significant digit.
9. AUTO-TARE The SJ-WP series has an auto-tare function to be used with the comparator mode enabled. If the weight values are in the OK range of comparator limits and stable for a preset period of time, the scale will automatic 1 ally tare the weight and show zero. In some countries or areas, the auto-tare function can not be used on the Legal for Trade models and the selection in the function settings , and is not available. To use the auto-tare function, set the function settings below.
10. CALIBRATION Adjusts the scale for accurate weighing. Calibrate the scale in the following cases. When the scale is first installed. When the scale has been moved. When the ambient environment has changed. For regular calibration. Note: The Legal for Trade models can not be re-calibrated if they have been sealed. 10.1. Calibration Mode The calibration mode has the following three functions.
Weighing mode Method 1 Touch & hold Method 2 Press Calibration mode Gravity acceleration Tap the UNITS switch to select an item correction Calibration using a weight and Tap the TARE switch to execute it. Restoring the factory set values or Power OFF To exit from the calibration mode, touch the switch or Press the CAL switch. The scale turns the power OFF. 10.2.
10.3. Calibration Using A Weight Prepare a weight, preferably a weight with the same value as the weighing capacity of the scale to be calibrated. Note that the calibration weight value can be changed. 1. Turn the power ON and warm up the scale for at least half an hour. Change the function setting or place something on the weighing pan to disable the auto power-off function. 2. Refer to "10.1. Calibration Mode" to enter the calibration mode. The gravity acceleration value is displayed. 3.
10.4. Restoring The Calibration Data To The Factory Set Values If the gravity acceleration value or calibration data is changed unintentionally, restore those values to the factory set values, as follows. 1. Refer to "10.1. Calibration Mode" to enter the calibration mode. The gravity acceleration value is displayed. Tap twice 2. Tap the 3. Tap the TARE blinking. 4. Tap the switch twice to display UNITS switch to display SAMPLE changes to . with " " switch. with " " blinking.
11. FUNCTION SETTINGS The scale has function settings to specify the scale performance. The parameters set in the function settings are maintained even if the power is turned OFF. Parameter Item 11.1. Setting The Parameters 1. Turn the power OFF. 2. Touch and hold the TARE switch and touch the switch to turn the power ON. The software version is displayed. "∗∗∗" indicates the software version number. 3. After about one second, the item is displayed. 4.
11.2. Restoring The Function Settings To The Factory Set Values 1. Turn the power OFF. 2. Touch and hold the TARE switch and touch the switch to turn the power ON and to display the software version. Release the switch but continue to touch the TARE switch until with " " blinking is displayed. 3. Tap the SAMPLE switch. changes to Tap with " " blinking. 4. When is displayed, tap the TARE switch. The factory set values are restored. After displaying , the scale goes to the weighing mode.
11.3. Function List Item Parameter Description All function is enable. Simplified operation Enable function: avilable. Key lock ON/OFF key, zero key, Tare key, CAL key enable. Comparator settings, counting settings Software version Enable function: "P-1.04" or later. ON/OFF key, zero key, Tare key Auto power-off function disabled Turns off after 5 minutes Auto power-off Turns off after 10 minutes Turns the power OFF function automatically.
Item Parameter Description Five-level (Result LED blinks.) Five-level (Result LED lights.) Three-level (Result LED blinks.) Comparator mode Sets comparator mode. Three-level (Result LED lights.) Seven-level (Result LED blinks.) Seven-level (Result LED lights.) Comparator disabled Compares all data Sets comparison Compares all stable data Comparison conditions. Compares all data of ≥ +5d or ≤ -5d conditions d = minimum Compares stable data of ≥ +5d or ≤ -5d display in kg.
12. MAINTENANCE 12.1. Notes On Maintenance Do not disassemble the scale. Contact your local A&D dealer if the scale needs service or repair. Use the original packaging for transportation. Do not use organic solvents to clean the scale. Use a warm lint free cloth dampened with a mild detergent. Calibrate the scale periodically to maintain the weighing accuracy. 12.2. Error Codes Overload error Indicates that an object beyond the weighing capacity has been placed on the weighing pan.
Specifications 13. SPECIFICATIONS Model Capacity SJ-3000WP SJ-6000WP SJ-15KWP SJ-30KWP 3 kg 6 kg 15 kg 30 kg 0.001 kg 0.002 kg 0.005 kg 0.01 kg 0.0005 kg* 0.001 kg* 0.002 kg* 0.005 kg* Minimum display "d" 0.0002 kg 0.0005 kg 0.001 kg 0.002 kg 0.0001 kg 0.0002 kg 0.0005 kg 0.001 kg Number of samples: 5, 10, 20, 50 or 100 pieces Counting Maximum count: 120,000 Repeatability (SD) 0.
Other weighing units Model Capacity g Minimum display Capacity lb Minimum display Capacity oz Minimum display Capacity ozt Minimum display Capacity Minimum display Capacity Catty-tl (HG)** Minimum display Capacity Catty-tl (HJ)** Minimum display Capacity Catty-tl (T)** Minimum display Capacity lb-oz Tola Minimum display SJ-3000WP SJ-6000WP 3000 g 6000 g 1g 2g 0.5 g* 1 g* 0.2 g 0.5 g 0.1 g 0.2 g 6.6 lb 13 lb 0.002 lb 0.005 lb 0.001 lb* 0.002 lb* 0.0005 lb 0.001 lb 0.0002 lb 0.
14. GRAVITY ACCELERATION Values of gravity at various locations Amsterdam Athens Auckland NZ Bangkok Birmingham Brussels Buenos Aires Calcutta Cape Town Chicago Copenhagen Cyprus Djakarta Frankfurt Glasgow Havana Helsinki Kuwait Lisbon London (Greenwich) Los Angeles Madrid 9.813 m/s2 9.807 m/s2 9.799 m/s2 9.783 m/s2 9.813 m/s2 9.811 m/s2 9.797 m/s2 9.788 m/s2 9.796 m/s2 9.803 m/s2 9.815 m/s2 9.797 m/s2 9.781 m/s2 9.810 m/s2 9.816 m/s2 9.788 m/s2 9.819 m/s2 9.793 m/s2 9.801 m/s2 9.812 m/s2 9.796 m/s2 9.
World map 28
3-23-14 Higashi-Ikebukuro, Toshima-ku, Tokyo 170-0013, JAPAN Telephone: [81] (3) 5391-6132 Fax: [81] (3) 5391-6148 A&D ENGINEERING, INC. 1756 Automation Parkway, San Jose, California 95131, U.S.A.