Digital Blood Pressure Monitor Model UA-767F Instruction Manual Original Manuel d’instructions Traduction Manual de Instrucciones Traducción Manuale di Istruzioni Traduzione 使用手冊 翻譯 1WMPD4002780E
Contents Dear Customers.................................................................... 2 Preliminary Remarks ............................................................. 2 Precautions........................................................................... 2 Parts Identification................................................................ 4 Symbols................................................................................ 5 Operation Mode......................................................
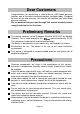
Dear Customers Congratulations on purchasing a state-of-the-art A&D blood pressure monitor, one of the most advanced monitors available today. Designed for ease of use and accuracy, this monitor will facilitate your daily blood pressure regimen. We recommend that you read through this manual carefully before using the device for the first time. Preliminary Remarks This device conforms to the European Directive 93/42 EEC for Medical mark of conformity. (0123: Products.
When reusing the device, confirm that the device is clean. Used equipment, parts and batteries are not treated as ordinary household waste, and must be disposed of according to the applicable local regulations. When the AC adapter is used, make sure that the AC adapter can be readily removed from the electrical outlet when necessary. Do not modify the device. It may cause accidents or damage to the device.
Parts Identification Button Button SET Button AC adapter plug DC Jack Air Connector Plug START Button Air Socket Display Air Hose Proper Fit Range Artery Position Mark Index Mark Arm Cuff Battery Compartment Battery Cover 1.5V Batteries (R6P, LR6 or AA) Display Average MEMORY I.H.B.
Symbols Symbols that are printed on the device case Symbols Function / Meaning Standby and Turn the device on. SYS. Systolic blood pressure in mmHg DIA. Diastolic blood pressure in mmHg PUL. Pulse per minute Battery installation guide Direct current Type BF: Device, cuff and tubing are designed to provide special protection against electrical shocks.
Symbols Symbols Function / Meaning Appears during measurement when the cuff is attached loosely Recommended Action The reading may yield an incorrect value. Apply the cuff correctly, and take another measurement. Detected rate of IHB in memory Number of detected IHBs in memory x 100 [%] %IHB = Total number User Previous measurements stored in memory. Average data Full Battery Low Battery The battery power indicator during measurement. The battery is low when it blinks.
Operation Mode 1. Normal Measurement Press the START button. Blood pressure is measured and the data is stored in memory. This device can store the last 60 measurements for each of the four users in memory. 2. Recalling the Data Press the or button to recall the data in memory. The average of all measurements is displayed, as indicated in the figure at the right. Then, each time the button is pressed, the memory data is displayed as follows. Most recent data (No.n, in the example, No.35) Last data (No.
Operation Mode 4. Deleting Data Stored in Memory In standby, press both the and buttons. The mark, battery indicator and user mark will appear. When you would like to delete the memory data of the currently displayed user, press and hold both the and buttons until the illuminated mark starts blinking. 5. Measurement with the Desired Systolic Pressure Refer to page 16 for measurement with the desired systolic pressure. 6.
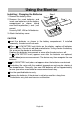
Using the Monitor Installing / Changing the Batteries 1. Remove the battery cover. 2. Remove the used batteries and insert new batteries into the battery compartment as shown, taking care that the polarities (+ and -) are correct. Use only R6P, LR6 or AA batteries. 3. Attach the battery cover. Step 1 Step 3 Step 1 Step 2 CAUTION Insert the batteries as shown in the battery compartment. If installed incorrectly, the device will not work.
Using the Monitor Air socket Connecting the Air Hose Insert the air connector plug into the air socket firmly. Air connector plug Connecting the AC Adapter Insert the AC adapter plug into the DC jack. Next, connect the AC adapter to an electrical outlet. DC jack AC adapter plug Use the specified AC adapter. (Refer to page 24.) When disconnecting the AC adapter from the electrical outlet, grasp and pull the AC adapter body out of the outlet.
Using the Monitor Adjusting the Built-in Clock Press and hold Adjust the clock prior to use. 1. Press and hold the SET button until the year starts blinking. or button. 2. Select the year using the Press the SET button to set the current year and move to month/day selection. The date can be set anywhere between the years 2013 and 2059. 3. Select the month using the or button. Press the SET button to set the current month and move to day selection. 4. Select the day using the or button.
Using the Monitor Selecting the Correct Cuff Size Using the correct cuff size is important for an accurate reading. If the cuff is not the proper size, the reading may yield an incorrect blood pressure value. The arm size is printed on each cuff. The index and proper fit range, on the cuff, tell you if you are applying the correct cuff. (Refer to "Symbols that are printed on the cuff" on the next page) If the index points outside of the range, contact your local dealer to purchase a replacement cuff.
Using the Monitor Symbols that are printed on the cuff Symbols Function / Meaning Recommended Action Set the mark on the artery of the upper arm or in line with the ring finger on the inside of the arm. Artery position mark ▲ REF Index Catalog number Proper fit range for the adult cuff. It's printed on the adult cuff. Range to use the large adult cuff. Over range printed on the adult cuff and wide range cuff. Proper fit range for the wide range cuff. It's printed on the wide range cuff.
Using the Monitor How to Take Accurate Measurements For the most accurate blood pressure measurement: Sit comfortably on a chair. Rest your arm on the table. Do not cross your legs. Keep your feet on the floor and straighten your back. Relax for about five to ten minutes before measurement. Place the center of the cuff at the same height as your heart. Remain still and keep quiet during measurement. Do not measure right after physical exercise or a bath.
Measurements Before measurement, read “Notes for Accurate Measurement” on the next page. Normal Measurement 1. Press the SET button to select a user from 1 to 4. At heart level Press 2. START Place the cuff on the arm (preferably the left arm). Sit quietly during measurement. All of the display 3. Press the START button. segments displayed All of the display segments are displayed. Zero (0) is displayed blinking briefly.
Measurements Measurement with the Desired Systolic Pressure Model UA-767F is designed to detect the pulse and to inflate the cuff to a systolic pressure level automatically. Use this method when re-inflation occurs repeatedly or when the results are not displayed even if the pressure decreases to 20 mmHg or less. 1. 2. 3. Place the cuff on the arm at heart level (preferably the left arm).
Recalling the Memory Data Note: This device stores the last 60 measurements for each of the four users in memory. 1. Press the or button. Press or The average of all measurements and Average systolic the number of data are displayed. (If no data, “0” is displayed. Press the Average diastolic , or START button to turn the Average pulse device off.) Average of all the data button (or the 2.
4. Press the SET button to display the memory display after changing the user number. 5. Press the START button to turn the device off. After one minute of non-operation, the device will turn off automatically.
What is an Irregular Heartbeat The UA-767F blood pressure monitor provides a blood pressure and pulse rate measurement even when an irregular heartbeat occurs. An irregular heartbeat is defined as a heartbeat that varies by 25% from the average of all heartbeats during the blood pressure measurement. It is important that you are relaxed, remain still and do not talk during measurements. Note: We recommend contacting your physician if you see this indicator frequently.
Pressure Bar Indicator The indicator monitors the progress of pressure during measurement. Pressurizing Releasing air Inflation in progress Measurement in progress Inflation complete WHO Classification Indicator Each segment of the bar indicator corresponds to the WHO blood pressure classification described on the next page.
About Blood Pressure What is Blood Pressure? Blood pressure is the force exerted by blood against the walls of the arteries. Systolic pressure occurs when the heart contracts. Diastolic pressure occurs when the heart expands. Blood pressure is measured in millimeters of mercury (mmHg). One's natural blood pressure is represented by the fundamental pressure, which is measured first thing in the morning while one is still at rest and before eating.
described in this manual to get to know your normal blood pressure. Regular readings give a more comprehensive blood pressure history. Be sure to note the date and time when recording your blood pressure. Consult your doctor to interpret your blood pressure data. Troubleshooting Problem Nothing appears on the display, even when the power is turned on. The cuff does not inflate. Possible Reason Batteries are drained. Battery terminals are not in the correct position. Battery voltage is too low.
Maintenance Do not open the device. It uses delicate electrical components and an intricate air unit that could be damaged. If you cannot fix the problem using the troubleshooting instructions, contact the authorized dealer in your area or our customer service department. The A&D customer service will provide technical information, spare parts and units to authorized dealers. The device was designed and manufactured for a long service life.
Applied part Cuff Type BF Useful life Device: Cuff: 5 years (when used six times a day) 2 years (when used six times a day) Accessory AC adapter The adapter is to connect the device to a power source at home. Please contact your local A&D dealer for purchasing. The AC adapter is required to be inspected or replaced periodically.
1-243 Asahi , Kitamoto-shi, Saitama 364-8585, JAPAN Telephone: [81] (48) 593-1111 Fax: [81] (48) 593-1119 A&D INSTRUMENTS LIMITED Unit 24/26 Blacklands Way, Abingdon Business Park, Abingdon, Oxfordshire OX14 1DY United Kingdom Telephone: [44] (1235) 550420 Fax: [44] (1235) 550485 A&D ENGINEERING, INC. 1756 Automation Parkway, San Jose, California 95131, U.S.A.