Roman Bathtub Faucet Robinet pour baignoire romaine Owner Manual and Installation Guide Manuel du propriétaire et guide d’installation 25JA2013
INFORMATION / INFORMATION Avant de débuter les travaux, lire attentivement les instructions de montage. Before you begin carefully read all instructions. Consult local building codes to ensure that installation complie with standards in your area. Inspect unit carefully to ensure there is no damage or defects. If you find a defect, contact your distributor. If damage has occured during transport, contact your carrier. Make sure you have received all the parts required to install the unit.
TOOLS AND MATERIAL REQUIRED / OUTILS ET MATÉRIAUX REQUIS METRIC METRIQUE METRIC METRIQUE Drillbits / Forets Wrenches / Clés Allen Key Set / Clés Allen Utility Knife / Couteau à lame rétractable Screwdriver / Tournevis Lead Pencil / Crayon à mine de plomb Basin Wrench / Clé pour lavabo Mutligrip Pliers / Pince multiprise Adjustable Wrench / Clé à molette eflon t Teflon Tape / Ruban Téflon Measuring Tape / Ruban à mesurer Drill / Perceuse Hole Saws / Scies emporte-pièce Page 3
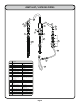
PARTS LIST / LISTE DES PIÈCES 1 Aerator 2 Handle Allen screw 9 3 Color index 4 Cartridge 12 8 Spout flange 13 14 6 Flange allen screw 7 Spout allen screw 5 Lift rod 11 Diverter rubber washer kit 10 O-ring 15 19 Hand shower Elbow for hand shower Check valve Support kit for hand shower 16 n Hand shower hose Check valve Flexible braided connector Anchor kit 17 No Description 1 Aérateur Aerator 2 Poignée Handle 3 Vis allen Allen screw 4 Index couleur Color index 5 Cartouche
DRILLING DIAGRAM / SCHÉMA DE PERÇAGE Avant de commencer Before you begin AVERTISSEMENTS WARNING Fermer la valve d’alimentation d’eau. Si nécessaire, enlever le vieux robinet et nettoyer la surface sur laquelle le robinet sera installé. 1 Shut off the water supply valves. If required, remove the old faucet and properly clean surface on which faucet is to be installed. Your roman bathtub should have 3 2 holes with a diameter of 1 1/8” for the installation of the body, the handle and the hand shower.
Étape 1 Step 1 Handle installation Installation de la poignée Place the base of the handle flange kit on the left hole. Insert the braided flex connectors through the hole. 1 2 Par dessous la surface, placer la rondelle From underneath, place metal washer and locknut on each threaded stud and tighten gently by hand. 2 3 3 Aligner ensuite la poignée sur le dessus Now, position and properly align the handle on top. Tighten the locknuts with a flat head screwdriver or appropriate tool.
Étape 4 Step 4 Raccordements des valves et de l’alimentation d’eau Valve and water supply connection Using the flexible connectors included (5), connect the valve to the spout connector. Use the extra flexible connector (14) to join the spout to the hand shower hose.Tighten using appropriate tool. (ill. A) Connect hot and cold valves to the corresponding water supply lines using flexible connectors and tighten. (ill.
WARRANTY / GARANTIE A&E Shower and Baths inc. (hereafter ‘‘ A&E ‘‘) offers the following express limited warranty on each of its products. This warranty extends only to the original owner/ end-user for personnal household use. A&E warrants his products to be free from defects in workmanship and materials under normal use and service for a period of one (1) year from the original date of purchase by the owner/ end-user.