INSTALLATION GUIDE GUIDE D’INSTALLATION GUÍA PARA INSTALACIÓN SHOWER COLUMN 6 COLONNE DE DOUCHE 6 COLUMNA PARA DUCHA 6 A&E Bath & Shower Bain et Douche
TO GET STARTED POUR COMMENCER PARA COMENZAR Before you begin, read all instructions carefully. Avant de débuter les travaux, lire attentivement les instructions d’installation. Leer todas las instrucciones cuidadosamente antes de empezar. This manual is a graphic reference for installation purposes. Some graphic elements and components may differ. Consult local building codes to ensure that installation complies with standards in your area.
TOOLS NEEDED OUTILS REQUIS HERRAMIENTAS NECESARIAS (not included) (non inclus) (no incluidas) Masonry drill bit | Mèche de maçonnerie Broca para mampostería Drill bits | Forets | Brocas Pencil | Crayon | Lápiz Utility knife | Couteau à lame rétractable Navaja multiusos Adjustable wrench | Clé à molette | Llave inglesa Silicone | Silicone | Silicona Caulking gun | Pistolet de calfeutrage Pistola de calafateo (mildew resistant) | (résistant à la moisissure) | (resistente al moho) Measuring tape
PARTS LIST LISTE DE PIÈCES LISTA DE PIEZAS 6 1 2 3 4 5 Item 1 2 3 4 5 6 A B C D E Description Shower column / Colonne de douche / Columna para ducha Mounting bracket / Plaque de fixation / Soporte de montaje Flexible hose / Tuyau flexible / Manguera flexible Shower head / Tête de douche / Cabeza de la ducha Handheld shower / Douchette à main / Ducha manual Shower arm / Bras de douche / Brazo de la ducha Rubber filter washer / Rondelle de filtrage en caoutchouc / Arandela de caucho del filtro Rubber
PREPARATION PRÉPARATION PREPARACIÓN Adjust the plumbing to ensure that there is adequate space for the shower to be installed. (fig.1) Vérifier et ajuster la plomberie pour qu’elle soit disposée adéquatement. (fig.1) Ajustar al tubería para asegurar que existe suficiente espacio para la ducha al instalar (fig. 1). Establish the precise height and position of the unit on the wall.
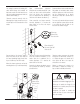
INSTALLATION INSTALLATION INSTALACIÓN 1 1.1 Measure the total height A from the floor to the top of the shower column. Measure the distance B between the top of the shower column and the first bracket. Measure the distance C between the brackets at the back of the shower column body (1). 1.2 Project this measurement onto the wall in order to install the mounting brackets (2). 1.3 Mark the position of each screw holes of both mounting brackets (2) on the wall using a pencil. 1.1 1.
2.1 Drill holes smaller than the diameter of the plastic screw anchors (D) using the masonry drill bit (for ceramic). 2 2.1 Percer les trous, à l’aide d’un foret à maçonnerie (pour la céramique) plus petit que le diamètre des chevilles d’ancrage de plastique (D). 2.1 Taladrar orificios más pequeños que el diámetro de los tornillos de plástico de anclaje (D) utilizando la broca para mampostería (para cerámica). 2.3 Insert the plastic screw anchors (D). 2.
Apply 2 to 3 layers of teflon tape on the threads of the shower arm (6). Install the shower arm (6) to the shower column (1) by attaching it with the hexagonal plastic nut and the rubber washer. Then install the shower head (4) to the shower arm (6) using the rubber washer (B) in between to seal the joint. 3 Appliquer 2 à 3 couches de ruban de téflon sur les filets du bras de douche (6). Aplicar de dos a tres capas de cinta de teflón en las roscas de el brazo de la ducha (6).
We strongly recommend installing 90° short elbow fittings (not included) on both water outlets to avoid interferences with the plumbing components inside the shower column body (1). Otherwise, proceed normally with the following steps. Apply two to three layers of teflon tape on the threads of the water outlets.
5 Apply two to three layers of teflon tape on all threads of the handheld shower (5) and the flexible hose connector on the shower column (1). Appliquer 2 à 3 couches de ruban au téflon sur tous les filets de la douchette à main (5) et sur le connecteur du tuyau flexible sur la colonne de douche (1). Aplicar de dos a tres capas de cinta de teflón en las roscas de la ducha manual (5) y el conector de la manguera flexible (1). Install the flexible hose (3) on the shower column (1).
Adjustment and usage of the thermostatic valve of the shower panel 4 & 5 Ajustement et utilisation de la valve thermostatique des colonnes de douche 4 et 5 Ajustes y uso de la válvula de termostato del panel para ducha 4 y 5 Temperature Température Temperatura 30°C - 49°C Locate the thermal adjustment handle. Localiser la poignée d’ajustement thermique. Localizar el asa de ajuste térmico. Remove the thermal adjustment handle. Retirer la poignée d’ajustement thermique. Quitar el asa de ajuste térmico.
MAINTENANCE ENTRETIEN Daily care Entretien quotidien Cuidado diario Wipe with a soft towel after each use. Use mild dishwashing detergent to keep surfaces bright and clean. Rinse well and dry with a clean cloth. Après chaque utilisation, essuyer avec un chiffon doux. Limpiar con una toalla suave después de cada uso. Utilizar detergente suave para lavar trastes para mantener las superficies limpias y brillantes. Enjuagar bien y secar con un paño limpio.
WARRANTY A&E Shower and Baths Inc. (hereafter “A&E”) offers the following limited warranty on each of its products. This warranty extends only to the original owner/end-user for personal household use. A&E warrants their products to be free from defects in workmanship and materials under normal use and service for a period of one (1) year from the original date of purchase by the owner/end-user.
NOTES 14 NOTES NOTAS
NOTES NOTES NOTAS 15
A&E Bath & Shower Bain et Douche 9181 Boivin LaSalle, Québec Canada H8R 2E8 Tel.: (514) 367-1741 1-800-667-9506 #373 (Toll Free/Sans frais) Fax: (514) 363-4753 @: service@aebath.com www.aebath.