
Installation manual


14
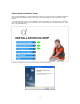
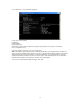
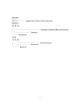
utility should automatically find your camera if is correctly connected (See image below).
[Refresh] Click Refresh to search for cameras on the local network.
[Setup] Select the required camera and click Setup to configure the network settings for the camera.
[Open] Select the required camera and click Open to access the camera via a web browser.
[Exit] Click Exit to exit the Camera Setup window.
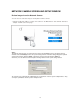
Note: Select and double click one of the cameras from the Device list, to open the camera view via the web
browser.
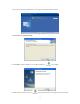
Assigning an IP address to the Camera with Camera Setup
1. Launch Camera Setup program to detect cameras on the local network.
2. Click on “Setup” button and the following setup interface will pop up.
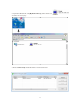
3. Enter a unique name for the camera, the location (optional) and leave the default port number as
80.“Obtain an IP address automatically” and “Obtain DNS server address automatically” are selected by
default, if you are confident enough to enter your own settings, you can do so by selecting “Use the following
IP address” and follow the guidelines on the next page. If however you wish to leave the default settings
please skip to NETWORK CAMERA SCREEN AND SETUP WINDOW.
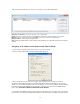
4. To obtain the IP addresses specific to your network, click “Start” then “Run” and type “cmd” in the text box
and click “Ok”. The will bring up the MS-DOS prompt and in this window type “ipconfig/all” and press enter. A