
User manual


Rebuilding the Software Applications
XAPP794 (v1.3) December 20, 2013 www.xilinx.com 49
4. Optionally, to permanently prevent the application from auto-starting on boot, edit the
init.sh script on the SD card and comment out the statement shown using the “#”
character:
zynq> vi /mnt/launch_my_app.sh
# /mnt/zvik_camera_linux_app.elf
A remote connection can be established between the SDK tool and the ZVIK using Secure
Shell (SSH) by following these steps:
1. In the SDK tool, select Window > Open Perspective > Other ….
2. Select Remote System Explorer, then click OK.
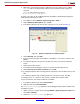
3. In the Remote Systems tab, click the new connection icon as shown in Figure 55.
4. Select SSH Only, then click Next.
5. In the Host name field, type the IP address of the ZVIK (i.e., 192.168.1.10) then click
Finish.
6. In the Remote Systems tab, open the 192.168.1.10 section, then open the Sftp Files
section.
7. Double-click the Root section.
8. In the Enter Password dialog box, enter root for both user ID and password.
9. Select Save User ID and Save password, then click OK.
10. If a dialog box appears with a warning about the authenticity of the 192.168.1.10 host, click
Yes.
11. If a dialog box appears with a warning that known_hosts does not exist, click Yes.
12. Navigate to the /mnt directory. The contents of the SD card should be visible.
To open a terminal to enter Linux commands on the ZVIK:
1. In the Remote Systems tab, Select Ssh Terminals.
2. Right-click and select Launch Terminal.
The zvik_camera_linux_app application can be debugged remotely with the SDK tool by
following these steps:
1. Switch to the C/C++ perspective by selecting Window > Open Perspective > Other, then
select C/C++ (Default).
2. Select the zvik_camera_linux_app application.
X-Ref Target - Figure 55
Figure 55: Define a Connection to a Remote System
X794_55_102612