
User manual

Running the Demonstration
XAPP794 (v1.3) December 20, 2013 www.xilinx.com 5
Preparing the SD Card
Pre-built binaries for the camera design are provided in this directory:
..\zc702-zvik-camera\binaries\sd_content
Create a backup copy of the files on the SD card provided with the kit to enable them to be
restored if desired. These files are also available on the ZVIK product page. Copy the contents
of the sd_content directory to the root directory of the SD card.
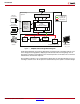
By default, the design configures the ZVIK for IP address 192.168.1.10. This requires
configuring the host computer to a compatible IP address, such as 192.168.1.20. If this is not
possible, the IP address of the ZVIK in the configuration script should be changed:
..\zc702-zvik-camera\binaries\sd_content\config_my_ip.sh
On a Windows host, use a text editor that does not alter the end of line characters, such as
Notepad.
With a subnet mask of 255.255.255.0, the first three number groups of the IP address must be
identical in both the host computer IP address and the ZVIK IP address. For example, if the
ZVIK is configured with the IP address 192.168.1.10 (and subnet mask 255.255.255.0), the
host must be configured with an IP address containing identical numbers in the first three
positions and a differing number in the fourth group, such as 192.168.1.20.
Configuring the Host IP Address
Configure the IP address of the host computer to one that is compatible with the ZVIK IP
address discussed in Preparing the SD Card. Record the host PC's original network settings so
they can be restored after running the demonstration. Configure the computer’s IP address to
192.168.1.20 (or similar). The subnet mask can be 255.255.255.0. The screen captures and
icon names shown in this section might be slightly different depending on the computer’s
operating system version.
For Windows 7:
1. Click the Start button and select Control Panel.
2. Select Network and Sharing Center.
3. Select Change Adapter Settings from the options on the left panel.
4. Right-click the adapter corresponding to the wired Ethernet port identified as a local area
connection and select Properties.
5. Accept the User Account Control dialog box by selecting Yes.
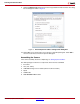
6. Click the Internet Protocol Version 4 (TCP/IPv4) entry and select Properties.
7. On the General tab, select Use the following IP address radio button.
8. In the IP address: field, enter 192.168.1.20 or a value that is compatible with the ZVIK IP
address configured in the previous section.
X-Ref Target - Figure 2
Figure 2: Modifying the ZVIK IP Address
X794_02_111512