
Instruction manual

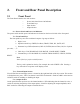


2. Front and Rear Panel Description
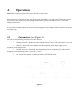
2.1 Front Panel
The Front Panel contains four main sections:
− Power Switch and Power On Indicator
− Front Panel keys
− Input Section
− Output Section
One. Power Switch and Power On Indicator:
The power switch and the power ON indicator are located on the lower left side of the front panel.
Two. Front Panel Keys
The front panel keys are color-coded and comprise 5 groups as follows:
1. Digits: 0 to 9.
2. Operation mode keys: FREE (Free Run), TRAIN, TRIG, DC, GATE, OFF.
3. Parameter keys: DURA (Duration), DELAY, INTER (Interval Time), M (No. of pulses
per train), ‘’, ‘↓’.
4. Clock keys: CLOCK-DISPLAY, STOP WATCH, CLOCK-RESET, TIMER.
5. Command keys: CLEAR-DISPLAY, CONNECT/DISCONNECT, CHECK, ENTER,
RESET.
Note:
Some of the keys perform a dual function
The key code is painted on the key. For example, the code of FREE is FR. Pressing a
key will result in a response on the display screen.
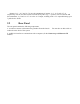
Three. External Input Section
You will find the external input section is located on the right hand side of the key section. This section
is divided into two, parts - EXT1 for channel 1 and EXT2 for channel 2. Each has a BNC socket and an
ON/OFF switch for enabling or disabling the input.
Four. Output Section
On the panel from the top down are: the channel number, a LED indicating that the channel is active, a
switch for selecting the polarity of the output pulses, a knob for adjusting the output amplitude, and a
BNC socket for connecting the output to external devices.