
Troubleshooting guide


Installing System Board Options 6-9
3HUIRUPLQJD0HPRU\8SJUDGH
Follow this procedure to perform a memory upgrade:
&$87,216HH´3UR WHFWLQJ$JDLQVW(OHFWURVWDWLF'LVFKDUJHµLQWKHVDIHW\
LQVW UXFWLR QVDW W KHIUR QW R IWKLVJX LGH
5HPRYHWKHFRPSXWHUFRYHUDFFRUGLQJWRWKHLQVWUXFWLRQVLQ´5HPRYLQJ
W KH&RPSX WHU&RYHUµ LQ&KDSWHU
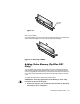
5RWDWHWKHSR ZHUVXSSO\R XWRIWKHZD\DFFRUGLQJW RWKHLQVWUXFWLR QVLQ
´ 5RWDWLQJW KH3RZHU6XSSO\ $ZD\)URPWKH6\VWHP%RDUGµLQ
& KDSWHU
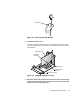
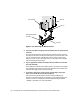
'HWHUPLQHWKH',0 0VRFNHWVLQW RZKLFK\RXZLOOLQVWDOO', 00VRU
UHSODFHH[ LVWLQJ' ,0 0 V
See Figure 6-1 and Table 6-1.
, QVW DOORUUHSODFH',00VDVQHFHVVDU\WRUHDFKWKHGHVLUHGPHPRU\
WRWDO
Follow the instructions in “Installing a DIMM” or Removing a DIMM,” as appro-
priate, found later in this section.
5RWDWHWKHSR ZHUVXSSO\ EDFNLQWRWKHFRPSXW HUFKDVVLV
5HSODFHWKHF RPSXWHUFR YHUUHFRQQHFW\R XUFRPSXW HUDQ GSHULSKHUDO V
WRWKHLUSRZHUVRXUFHVDQGWXUQWKHPR Q
NOTE: After you remove and replace the cover, the chassis intrusion detector will
cause the following message to be displayed at the next system start-up:
ALERT! Cover was previously removed.
After the system completes the power-on self-test (POST) routine, the system
runs a memory test that displays the total memory of all installed DIMMs, includ-
ing those you just installed.
NOTE: If the memory total is incorrect, turn off your computer and peripherals
and disconnect them from their power sources, remove the computer cover, and
make sure that the installed DIMMs are seated properly in their sockets. Then
repeat this step.
The system detects that the new memory does not match the existing system
configuration information, which is stored in nonvolatile random-access memory
(NVRAM), and generates the following message:
The amount of system memory has changed.
Strike the F1 key to continue, F2 to run the setup utility