
Troubleshooting guide


7-12 Dell OptiPlex GX1 and GX1p Midsize Managed PC Systems Reference and Installation Guide
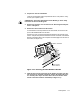
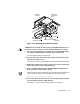
)LJXUH,QVHUWLQJWKH+ DUG 'LVN'ULYHLQWKH%UDFNHW
$OLJQWKHIRXUVFUHZKROHVRIWKHGULYHDQGEUDFNHW,QVHUWDQGWLJKWHQ
WKHVFUHZVWKDWFDPHZLWK\RXUXSJUDGHNLWVHH)LJXUH
If you are replacing a drive in the 1.6-inch slot, use the four screw holes in the
side of the bracket. If you are replacing a drive in the 1-inch slot, use the four
screw holes in the bottom of the bracket.
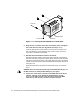
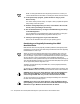
5HLQVWDOOWKHKDUGGLVNGULYHEUDFNHWLQWKHF KDVVLV
Hold the bracket by its handle, so that it stays at the proper tilt. Let it brush the
side of the drive cage as you lower it into the chassis until the two tabs at the bot-
tom back of the bracket (see Figure 7-11) fit flush against the
front
of the rail that
extends across the chassis floor and the horizontal lip at the back fits
over
the rail
(see Figure 7-12).
Rotate the bracket down into position, and reinstall the screw you removed in
step 4.
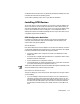
&$87,21<RXPXVWPDWFKWKHFRORUHGVWULSRQWKH(,'(FDEOHZLWKSLQRQ
WKH,'(F RQQHFWRUWRDYRLGSRVVLEOHGDPDJHWR\RXUV \ VWHP
& RQQHFWRQHRI W KHGHYLFHF RQQHFWRUVRQWKH(,'(FDEOHW RWKHSLQ
LQWHUIDFHFRQQHFW RURQWKHEDFNRIWKHKDUGGLVN GULYHVHH)LJ
XUH7KHFDEOH LVNH\HGVRWKDWWKHFRORUHGHGJH RIWKH(,'(
FDEOH OLQHVXSZLWKW KHSLQ HQGRIWKHLQWHUIDFHFRQQHFWRU
1.6-inch drive
screws (4)
drive bracke
t
tabs (2)