S T Use this owner’s manual to reference installation, troubleshooting and filter replacement information. If you need help or have a question, we've got you covered. (el 0T TiE -1 877.333.
Xe Smith. A. O. Smith has obsessively engineered this filtration system for you. It features an effective filtration method to reduce rust, soil and silt for improved water throughout your entire home. Keep this owner's manual to reference installation, troubleshooting and filter replacement information. If you need help or have a question, weave got you covered. Give us a call at 877.333.7108.
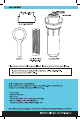
'WRENCH SEDIMENT FILTER CLEAR HOUSING AO-WH-PREV-R2 Please read entire manual to ensure all parts listed are present before Installation. If any part is missing or damaged let us know by calling 877.333.7108. Do not attempt to install the filter. Tools recommended for installation: Gather the required tools before starting Installation Head and flow the instructions provided with any tools sited here.
PRECAUTIONS READ ALL PRECAUTIONS AND INSTALLATION INSTRUCTIONS CAREFULLY. Before installing: * Do not install this filtration system where the line pressure may exceed 100 psi. The operating pressure range for this filtration system is between 25 psi 100 psi. Install on cold water lines only {40" 100°F). Do not install the unit on its side. It must be installed upright to maximize contact with media bed. It is recommended your system be installed indoors and out of direct sunlight.
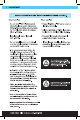
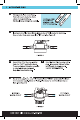
INSTALLATION GUIDE 3 n Turn off main water supply. fl Remove clear housing from filter Drain water from water lines. head and set aside. B Wrap Teflon® tape (2-12 wraps) n Calculate proper spacing of around the 3/4" MNFPT x 3/4" ing components {approximately 3/4" of for copper pipe to the left and firmly existing pipe inserts into each fitting). assemble into filter head.
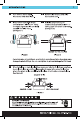
4 INSTALLATION GUIDE fl Cut pipe and clean ends of pipe. Ensure there are no burrs, sharp & edges or deep scratches. Gt tubing a5 straight éf Cut should be as straight bile. i possible with soul as straight as possible. e b uteri for copper piing. fl Insert pipe into filter head fitting. Ensure pipe is firmly seated to backstop. Connect pipe from water supply to *IN” port. {See Figure 4) FIGURE 4 EX Repeat step for the pipe leading IEN Hand-tighten fighter housing until from the “OUT" port to the house. snug.
CARE AND MAINTENANCE Rated service flow 6.0 gpm Water pressure 25-100 PSI TROUBLESHOOTING Water leaks at fittings: Slowly tighten until leak stops. Water peaks at connections: Push pipe in as far as it will go. If leaking continues, shut off water and remove water line by pushing in on connector collar while pulling the pipe away. Inspect pipe. If pipe is cracked or scratched, cut off the end as straight as possible and reinsert new pipe end into fitting.
LIMITED WARRANTY What Is covered: This Warranty covers defects In materials ‘or workmanship in manufacturing of your A. O. Smith Whole House Sediment Filter, except as provided below. For how long: This warranty runs for 12 months from the date of purchase by a consumer (*Warranty Period”).
Xe Mitos. A. O. imite diseñé este sistema de filtración minuciosamente para usted. Cuenta con un método de filtración eficaz para reducir el oxido, |a tierra y el sedimento y mejorar el agua en toda su casa. Conserve este manual del propietario como referencia para la instalación, resolución de problemas e información de cambio del filtro. AO-WH-PREV FILTRO DE AGUA PARA TODA LA CASA Sistema de válvula en el cabezal TABLA DE CONTENIDO Contenido de |a caja Quia de instalación. Cuidado y mantenimiento.
CONTENIDO DE LA CAÍA 3 CABEZAL DEL FILTRO LLAVE FILTRO DE SEDIMENTOS CARCASA AQ-WH-PREV-R2 TRANSPARENTE Lea todo el manual antes de la instalad para asegurarse de que todas las piezas indicadas estén presentes. Herramientas recomendadas para [a instalación: Retina a5 herramientas necesarias antes de comenzar | instalad Lea y siga las instrucciones que se proporcionan con las herramientas indicadas aguo.
10 PRECAUCIONES LEA DETENIDAMENTE TODAS LAS PRECAUCIONES Y LAS INSTRUCCIONES DE INSTALACIÓN. * No instale este sistema de filtración donde la presión de a tubería pueda superar los 689 kPa (100 psi). El rango de presión de funcionamiento para este cisterna de filtración es entre 172 kPa y 689 kPa (25 psi y 100 psi). * Instale solo en tuberías de agua fría {4.4.a37.8 *C[40 a * No instale la unidad de costado. Se debe instalar de manera vertical para maximizar el contacto con la cama de material.
1 * La instalación del sistema de filtración debe cumplir con los códigos de plome ria estatales y locales. A O. Mitos y su fabricante no se hace responsable por dacios indirectos o emergentes a causa de una instalación incorrecta. Algunos códigos locales pueden exigir el usc de un plomero con licencia o un instalador certificado cuando afecte una tubería de agua potable. Debido a los distintos dioses de las casas, no todas las configuraciones de instalación se pueden mencionar en este guía.
12 GUÍA DE INSTALARON n Cierre el suministro principal de agua. n Retire la carcasa transparente el Drene el agua de las tuberías de agua. cabezal del filtro y déjela a un lado. B Envuelva cinta Teflon® (2 12 vueltas) u Calcule la separación adecuada de hacia la izquierda alrededor del los componentes (aproximadamente conector de 3/4" OPTEN x 3/4" para la 19 mm de la tubería existente tubería de cobre e instale firmemente se inserta en cada conector). en el cabezal del filtro.
13 A corte s tubería lime los extremos. Asegúrese de que no ‘Corte el tubo lo més haya rebabas, bordes afilados o rectan postile con un rayas profundas. El corte deberla cuchillo muid usa o un. ser lo més recto posible. contador de tuberías en: l:awduizerhsdl obre n Inserte |a tubería en el conector del cabezal del filtro. Asegúrese de que la tubería esté firmemente asentada en el tope de detención. Conecte la tubería desde el suministro de agua al puerto “IN” {Entrada).
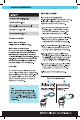
14 CUIDADO Y MANTENIMIENTO Flujo nominal del servicio 22.7 Lim (6.0 gpm) Presión de agua 172 a 689 kPa {25 a 100 PSI) CONSEJOS Antes de cambar & fit, corte el ensimismare de agua. Coligue na cubata bajo ) narcisista de citación ‘proa meco lactar (2 penitencia cantidad de agua que saldrá despulsa de retirar 'a caresa, 5 xe risa un falles que 1o sea de A O Mitos, el instalador debe garantizar que el filtro de reemplazar sea decuriato.
REEMPLAZO DEL FILTRO Recomendamos cambiar el filtro A AD-WH-PREV-R2 cada seis (6) meses. Se debe reemplazar antes si hay una reducción significativa de la presión del agua. 1.Cierre el suministro de agua con la llave que se proporciona. Gire la válvula del cabezal del filtro a la posición “OFITA {Cerrada} o “PASABLES” (Derivativo. {Consulte Operación de llave y mango a continuación. 2. Destornille la carcasa y retire el filtro antiguo.
GARANTÍA LIMITADA Lo que ésta cubierto: Esta garantía cubre defectos en materiales ©&n la mano de obra de la fabricado de su filtro de sedimentos para toda la casa de A. O. Mitos, salvo seg din se estipula a continuación. Duración: Esta garantía dura 12 meses a partir de a fecha de compra por parte del consumidor (“Perforo de garantieran.