
Installation Guide


SERVICE
Electric Tankless Water Heater • 23
5
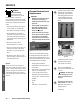
Remove the heater’s front
cover, then place a bucket
under the water heater to
catch any water that spills.
NOTICE: If you have a two- or
four-chamber model, you must
unplug the cover’s ribbon
cable from the control board.
When you plug it back in later,
it must be oriented correctly.
(See Figure 5, page 14.)
We recommend marking the
connector and board with a
marker. You will then be able
to align the marks.
• If you have a point-of-use water
heater, go to step 6.
• If you have a two- or four-chamber
water heater, go to step 7 on page
24.
6
Point-of-use water heaters
only:
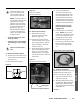
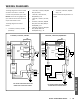
6.1 Remove the heater’s top plate:
A.) Remove both screws which secure
the top plate to the water heater.
(See Figure 12.)
B.) Lift and remove the top plate.
Figure 12.
Top View of Point-of-Use Model
Top Plate
Screws
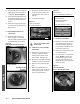
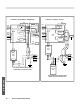
Figure 13.
Point-of-use models:
Grommet Orienta on
Grommets
Outlet Inlet
6.3. Remove the old element:
A.) Slide the inlet and outlet
grommets upward to provide
clearance. (Figure 13).
B.) Remove the screws that secure
the red and black wires to the top
of the heating element. (Use the
Phillips screwdriver. Save both
screws for later use.)
C.) Disconnect the green ground wire
from the heating element. (See
Figure 14.) It is secured with a
spade connector. Pull it straight
up from the element to slide it off
the terminal.
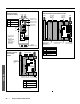
Figure 1 4.
Element in point-of-use heater
Retaining Nut
Ground wire (spade connector)
D.) Unscrew and remove the
retaining nut that secures the
heating element (See Figure 14).
Use an adjustable wrench. You
may also purchase an element
replacement kit which includes a
thin-walled socket. Call Technical
Support for ordering information.
NOTICE: During the next step,
protect the circuit board from
dripping water!
E.) Lift the element out of the water
heater. NOTICE: As you lift the
element out of the opening, wrap
it with a rag to keep water from
dripping onto the circuit board.
F.) Remove the brass ground ring
from the top of the element. (See
Figure 15: Brass ring and flag
terminal.) Set it aside for later
use.
Figure 15: Brass ring and flag terminal
Flag terminal
Brass ground ring
(point-of-use models)
6.4 Install the new element:
NOTICE: Ensure that there is an O-ring
installed above the threads of the
element. (See Figure 20, page 25.)
A.) Insert the new element into its
water heater opening.
B.) Place the brass ground ring on top
of the element. Make sure that the
flag terminal is positioned so that
the ground wire can be reconnected
easily (Figure 16.)
ConƟ nued...