SQ-100 User Manual Version 3.0 This version is usage for Firmware Version 2.
SQ-100 Table of Content 1. INTRODUCTION AND FEATURES................................................................................ 4 1.1 INTRODUCTION............................................................................................................... 4 1.2 FEATURES ....................................................................................................................... 4 2. SPECIFICATION .............................................................................................
SQ-100 7.1.1 DIST / TIME ..................................................................................................................... 26 7.1.2 DIST / SPEED .................................................................................................................. 27 7.1.3 SPEED / TIME .................................................................................................................. 27 7.1.4 PACE / DIST ..........................................................................
SQ-100 Thank you for purchasing GPS TRAINING DEVICE SQ-100. We sincerely hope you to enjoy using this high technology GPS device. For fully understand the functions and features of SQ-100, please read the user manual before you get started. 1. INTRODUCTION AND FEATURES 1.1 INTRODUCTION GPS TRAINING DEVICE SQ-100 is a stylish, fully-sealed, wrist type GPS device.
SQ-100 2. SPECIFICATION Electrical and Mechanical Parameters General Item SQ-100 Number of Trackpoints 120,000 LAP 6,000 Number of Waypoints 100 Display Size 24.9 x 39.88 (H x W in mm.) Display type 4 gray color LCD Pixels (H x W) 128x96 Unit Weight 83 g Water resistance Standard IPX7 Unit Size 76.5 x 61.5 x 17.5 (L x D (Φ)x H in mm.) Backlight Display Single level Operating temperature -10℃ – 60 ℃ Humidity 5% to 95% Non-condensing Voltage 3.
SQ-100 Hot start 1 sec., average Warm start 38 sec., average Cold start 42 sec., average Altitude 18,000 meters (60,000 feet) max. Velocity 515 meters/ second (1000 knots) max. Acceleration Less than 4g Jerk 20 m/sec3 3. HARDWARE OVERVIEW 3.1 PACKAGE CONTENTS Check the contents of your SQ-100 package. If you find any accessories are missing or appear damaged, please contact your dealer immediately.
SQ-100 Heart Rate Monitor Quick Guide Bike Holder (optional) 3.
SQ-100 Button Description In Menu mode, press ESC button to escape from the current page and go back ESC/LAP to the previous page. Press ESC button to split a lap when timer is running. Press 2 seconds to turn on/off SQ-100. When SQ-100 is turn on, quickly press this button will turn on/off the Power/Backlight backlight. Press and hold this button for 14 seconds to do hardware reset if the system is halted.
SQ-100 3.4 BATTERY CHARGER DESCRIPTION SQ-100 operates by a built-in Li-ion rechargeable battery. A battery icon shown on the left bottom corner of screen indicates the remaining battery power. Inside the USB socket, there is a small "bar" on the right side. There is a "groove" on the side of the column of USB connector. Aim the "groove" at the "bar" for plugging in the USB connector. To charge the battery: 1.
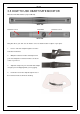
SQ-100 3.5 HOW TO USE HEART RATE MONITOR Wear the Heart Rate Monitor (only for SQ-100) Outer side Heart rate sensor Transmitter Heart rate sensor Inner side. Cling this side to your skin. You can wet the sensor to obtain a better reception of your pulse. 1. Put one end of the strap through the slot of the heart rate monitor first. 2. Wrap the heart rate monitor and strap around your chest. Adjust the heart rate monitor to be at the center of your chest. 3.
SQ-100 3.6 MOUNT THE BIKE HOLDER 1. Buckle up the bike holder on the bike. 2. Bind up the SQ-100 strap. Test the stability by twisting the watch set. 3.7 TIME OF DATE MODE SETTING 1. SQ-100 supports TOD mode after a while for non usage in order to save more power. 2. You may go to CONFIGURATION>SET SYSTEM>TOD MODE to enable this function. 3. System will upon the TIME for non usage to enter the TOD MODE. 4.
SQ-100 3.8 SYMBOL EXPLANATION Icon picture Description Indication Battery capacity The remaining battery power indication When you stop the timer, the icon will be flashing.
SQ-100 4. GETTING START 4.1 STARTING UP YOUR SQ-100 Press the Power button for 2 seconds to turn on the device. You will see the welcome screen displayed. Allow the SQ-100 a short time to track satellites for the first time you use it. Take your SQ-100 to the outdoor open space with a clear view to the sky and it will be easy to acquire satellite signal with a few seconds. If the device can't get 3D fixed, you can still press PG button to exit the Locating screen.
SQ-100 4.3 GETTING START A TRAINING AND SAVING To start training by “OK” key and you also can split laps by press “LAP” key while in training In speedometer page or custom Select YES and pressing pages, pressing “ENTER” to start “ENTER” timer To save data Pressing “LAP” button to Pressing “ENTER” to pause Pressing “ESC” to save data split a Lap. your training when in PAUSE 4.
SQ-100 Dist / Time 1. To set up your target trainer parameters through setting for distance, time, speed, pace or specified training file accordingly. The trainer will according to the setting to race with you. Dist / Speed 2. Finished setting, press ‘’Up or Down button’’ to select ‘’Start’’ and then press ‘’Enter button’’ to start. Speed / Time Pace / Dist Yourself 3. When you decided to START the race, the competition window will pop up.
SQ-100 [REST DIST] The rest of distance [BEHIND /AHEAD] The status of competition [YOURSELF] The finished percentage of yourself [TRAINER] The finished percentage of trainer MULTISPORT Multisport could be used on composite activities competition; you could set running, biking, or others for your personal training. Trainer can make a Transition or switch to next sport by pressing “UP” key 3 seconds. INTERVAL TRAINING Several activities likes hockey or soccer need this kind particular training.
SQ-100 4.5 HOW TO USE SMART TRACK BACK To use track can guide you go back along your training record and make you never get lost. [MAIN MENU] > [ACTIVITY] > [ACTIVITY INFO] 1. You will see all data you saved, press ‘’ Enter button’’ to enter. 2. Click ‘’ TRACK BACK?’’ and then press ‘’Enter button’’. 3. Chose ‘’ Backward’’ or ‘’ Forward’’ to start your track back. It will take some times to compress the record in order to optimize the memory usage. 4. The screen will show map.
SQ-100 4.
SQ-100 5. Menu Structure - Main Menu This diagram presents all the available menu options for your quick look up.
SQ-100 SET PAGE 4 SET LAP PAGE BEPPER TPD MODE SET SYSTEM DISPLAY TIME SETTINGS ALARM UNITS UNIT COORDINATION CARDIO SET WAAS / EGNOS GPS SETTINGS GPS GPS INFO MAP MODE SET FACTORY RESET SYSTEM UPGRADE ABOUT PRODUCT 6. ACTIVITY 6.1 ACTIVITY INFO 6.1.1 TRAINING INFO Personal training records will be located into this session. [MAIN MENU] > [ACTIVITY] > [ACTIVITY INFO] > [TRAINING INFO] 1. Use Up and Down button to scroll to the item you wish to display and press ‘’Enter button’’ .
SQ-100 Information items are displayed: * Date and Time. * Total distance of this training. * Total calories you have burned. * Total time of this training. * Average speed of this training. * Fastest speed of this training. * VIEW? Display this training data on the screen. * TRACK BACK? You can track back to the BEGIN point or END point of this training route. When the Track Back is active, you may press OK or ESC to go to next or previous waypoint.
SQ-100 6.2 SETTING 6.2.1 AUTO HOLD [MAIN MENU] > [ACTIVITY] > [SETTING] > [AUTO HOLD] 1. The Auto Hold function allows you to pause the timer automatically when you stop moving or your speed falls below a certain value. 2. When the timer is paused, the data is not recorded. Thus the average speed and calories calculation could be more accurate. 6.2.2 ALERTS A 6.2.2-1 TIME / DIST ALERT [MAIN MENU] > [ACTIVITY] > [SETTING] > [ALERTS] > [TIME/DIST ALERT] 1.
SQ-100 1. Use Up and Down button to select the item and press OK to modify it. 2. You can set the alarm to sound when your HR ZONE / CUSTOM setting is above or below a specified value or OFF alarm. 3. Heart Rate Alert supports 3 regions setting, when training is start, the Heart Rate Alarm region indicator will appear in Speedometer page. 4. Trainer may press “UP” 3 key seconds to switch Heart Rate Alarm region. A 6.2.
SQ-100 TRAINING LEVEL Select training level depend on your sport type, the default setting is Middle. EXTRA WEIGHT 1. Confirm the extra weight you carry and then input to EXTRA WEIGHT item. 2. System will calculate the calories consumption depending on the specified sport type. 6.2.4 LAP SETTING [MAIN MENU] > [ACTIVITY] > [SETTING] > [LAP SETTING] There are five selections for setting. X OFF Disable LAP function. X DISTANCE LAP trigger by specify distance. X BY TIME LAP trigger by specify time.
SQ-100 2. Set the longer interval means less data in a fixed period of time. But you can use the device for a longer time. 3. Indoor Training means to record training data with Heart Rate without GPS fix. 6.3 DELETE ALL [MAIN MENU] > [ACTIVITY] > [DELETE ALL] You can delete all the training data stored in the device. 6.4 MEMORY STATUS [MAIN MENU] > [ACTIVITY] > [MEMORY STATUS] You will see how many points left and the remaining time you can use.
SQ-100 7. GYM In order to improve and enhance your training performance. SQ-100 provides GYM to pretend your coach to improve your performance through mutual training and reaction. 7.1 TRAINER 7.1.1 DIST / TIME [MAIN MENU] > [GYM] > [TRAINER] > [DIST / TIME] The distance for 10 km and time for 5 minutes which means the virtual trainer will finish 3km within 15 minutes to compete with you. 1. You could change DIST / TIME to set up your goal. 2.
SQ-100 7.1.2 DIST / SPEED [MAIN MENU] > [GYM] > [TRAINER] > [DIST / SPEED] Set distance for 10 km and speed for 10km/hr which means you have to keep your speed over 10km/hr. 1. You could change DIST / SPEED to set up your goal. 2. Finished setting, press ‘’Up or Down button’’ to select ‘’Start’’ and then press ‘’Enter button’’ to start. 3. Your training performance will shown on the device including REST DISTANCE, CURRENT PROGRESS (BEHIND OR AHEAD), YOURSELF PERFORMANCE AND TRAINER PERFORMANCE. 4.
SQ-100 2. Finished setting, press ‘’Up or Down button’’ to select ‘’Start’’ and then press ‘’Enter button’’ to start. 3. Your training performance will shown on the device including REST DISTANCE, CURRENT PROGRESS (BEHIND OR AHEAD), YOURSELF PERFORMANCE AND TRAINER PERFORMANCE. 4. Press Enter button for 2seconds will exit this training.
SQ-100 7.1.4 PACE / DIST [MAIN MENU] > [GYM] > [TRAINER] > [PACE/DIST] Set speed 10km/hr and time 00:01:00 means you have to keep 10km/hr to training till 1 minute. 1. You could change SPEED / TIME to set up your goal. 2. Finished setting, press ‘’Up or Down button’’ to select ‘’Start’’ and then press ‘’Enter button’’ to start. 3. Your training performance will shown on the device including REST DISTANCE, CURRENT PROGRESS (BEHIND OR AHEAD), YOURSELF PERFORMANCE AND TRAINER PERFORMANCE. 4.
SQ-100 2. The setting is according to the specified record. 3. Your training performance will shown on the device including REST DISTANCE, CURRENT PROGRESS (BEHIND OR AHEAD), YOURSELF PERFORMANCE AND TRAINER PERFORMANCE. 4. Press Enter button for 2seconds will exit this training. REALLY WANT TO STOP? 7.2 MULTISPORT [MAIN MENU] > [GYM] > [MULTISPORT] You could set running, biking, training time/ speed on SQ-100 to train yourself.
SQ-100 2. Press ‘’start multisport’’ 3. When you press ‘’UP’’ button for 3 seconds, the training item will transit to next item and keep record your training data. 4. The message will show on display and let you know the next item is going to keep recording. 5. Till you going to stop training, press ‘’ OK’’ button and display shows ‘’ PAUSE’’ 6. Rest training data and save? Press ‘’YES’’ . 7. All training data back to zero for going next new training data.
SQ-100 7.3 INTERVAL TRAIN 7.3.1 CREATE WORKOUT 1. Several activities likes hockey or soccer need this kind particular training. To select CREATE WORKOUT to create a new workout. 2. To insert interested session into the program. 3. The training program will be built up with the sequent training sessions. 4. Once finished, select CONFIRM to save and start training. 5. The training program will be listed in LIST ALL for the further training. 7.3.2 LIST ALL 1.
SQ-100 2. Press ‘’START’’ to start the training 3. You may press ‘’LAP’’ button to switch to next training item directly. 4. When the all sessions finished, system will pop message to ask to save training data. 7.3.3 DELTE ALL You can delete all the training data stored in the device. 8. NAVIGATION 8.1 ADD MAP MODE / REMOVE MAP MODE [MAIN MENU] > [NAVIGATION] > [ADD/REMOVE MAP MODE] You can use this feature to display or not display the map mode.
SQ-100 8.2 ROUTES 8.2.1 LIST ALL [MAIN MENU] > [NAVIGATION] > [ROUTES] > [LIST ALL]] 1. Get routes data from software ‘’Training Gym Pro’’. 2. The map information of routes will show on the display for your guiding. Select ‘’FOLLOW’’ to get training. It will guide you automatically. You may press ’’ENTER’’ or ‘’ESC’’ to go next or last waypoint. 3. Chose ‘’ Backward’’ or ‘’ Forward’’ to start your route. 4. DO YOU RECORD RUNNING DATA? Press YES 5. The screen will show map.
SQ-100 8.2.2 DELETE ALL [MAIN MENU] > [NAVIGATION] > [ROUTES] > [DELETE ALL] 1. A confirmation dialog box will appear. 2. Use Up and Down button to highlight "YES" and press OK. 3. All routes data in memory will be deleted. 8.2.3 ROUTES SETTING [MAIN MENU] > [NAVIGATION] > [ROUTES] > [ROUTE SETTING] 1. SWITCH DISTANCE: The R radius of coverage R setting, if the coverage is cover specified point, system will automatically guide the next point. 2.
SQ-100 3. When you finish the modification, input a “enter sign” character or press the ‘’Esc /Lap button’’ to exit. 4. Move highlight to "CONFIRM?" and press ‘’Enter button’’. The location data will be stored in the memory 8.4 FIND WAYPOINT 8.4.1 LIST ALL [MAIN MENU] > [NAVIGATION] > [FIND WAYPOINT] > [LIST ALL] 1. Use Up and Down button to scroll to the Waypoint you wish to go to and press ‘’Enter button’’. 2. Highlight "GOTO?" item and press ‘’Enter button’’. 3.
SQ-100 8.4.2 DELETE ALL [MAIN MENU] > [NAVIGATION] > [FIND WAYPOINT] > [DELETE ALL] 1. A confirmation dialog box will appear. 2. Use Up and Down button to highlight "YES" and press OK. 3. All waypoints in memory will be deleted. 8.5 RETURN TO START /STOP GOTO [MAIN MENU] > [NAVIGATION] > [RETURN TO START / STOP GOTO] 1. You can use this feature to navigate you back to the start point of the latest saved training data. 2.
SQ-100 10. CONFIGURATION 10.1 USER PROFILE [MAIN MENU] > [CONFIGURATION] > [USER PROFILE] 1. You can input your personal information in the user profile. 2. The data fields include "username", "gender", "birth date", "weight" and "height". 3. The system will do the calories calculation base on the information you provide. Please input the correct value. 10.2 SET CUSTOM PAGE [MAIN MENU] > [CONFIGURATION] > [SET CUSTOM PAGE] 1. Modify the screen field number. 2.
SQ-100 10.3 SET SYSTEM [MAIN MENU] > [CONFIGURATION] > [SET SYSTEM] BEEPER You can set beeper on or off TOD MODE There are two selections could be enter to watch mode by 5. It means watch mode will be entered after 5minutes when system is stand by. OFF means always in operation mode. DISPLAY * Backlight Set the backlight to stay on or automatically turn off after a period of time once you press Power button to activate the backlight.
SQ-100 * Time Zone 1. Use Up and Down button to scroll to the item and press OK to modify it. 2. * You can select your local time zone. Daylight Saving 1. Use Up and Down button to scroll to the item and press OK to modify it. 2. You can select the daylight saving if necessary, and then system will display the correct time for you. ALARM You can set the alarm clock for WEEKEND, WEEKDAY, DAILY…or OFF. And then set up the time you want clock to ring you. 10.
SQ-100 2. CUSTOM means you can set your own heart rate zone by yourself. You can select any percentage or bmp for viewing. 3. CUSTOM means you can set your own heart rate zone by yourself. 10.6 GPS SETTINGS [MAIN MENU] > [CONFIGURATION] > [GPS SETTINGS] WAAS/EGNOS You can turn on/off the "WAAS/EGNOS" feature. GPS The GPS function can be turned off for saving battery power. If the battery power is pretty low, the system will also ask you if you want to turn off the GPS function.
SQ-100 10.7 MAP MODE SET DIRECT TO NORTH: In Map Mode, system always orients to North on twelve o’clock direction. BIRD EYE VIEW: System always changes its orientation upon practical direction. 10.8 FACTORY RESET [MAIN MENU] > [CONFIGURATION] > [FACTORY RESET] This feature allows you to restore the SQ-100 back to factory default status. In another words, the training data, waypoint, and user profile will be erased. 10.9 SYSTEM UPGRADE [MAIN MENU] > [CONFIGURATION] > [SYSTEM UPGRADE] 1.
SQ-100 11. GLOSSARY Relates to data being transmitted from SQ-100. Activity is a history or log Activity of events. Activity data includes time or distance updates. Waypoints are sets of coordinates that identify a point in physical space. For the purposes of terrestrial navigation, these coordinates usually include Waypoint longitude and latitude, and sometimes altitude (particularly for air navigation). Trackpoint The current moving trace.
SQ-100 12. TROUBLESHOOTING & FAQ 1.) Q: What should I do if the watch would not power on? A: Press the OK + Down and Power buttons at the same time. You will be able to turn it on in the firmware upgrade mode. Please follow the regular firmware update procedure. 2.) Q: What should I do if the firmware upgrade fails? Note: Do not power down your SQ-100 A: (1) Please go over the process again. (2) Choose the proper firmware file. 3.
SQ-100 10.) Q: How to edit and upload waypoints through the software? A: To Edit Waypoints, see steps below: (1) From Track Records, select the training file that you want to browse. (2) Click Waypoints in the function bar and you will see all the waypoints. Right-click on one of the waypoints to edit its contents. (3) Press the Save button when you're done. To Upload Waypoints, refer to the procedures below: (1) Select the waypoints that you want to transfer to the device.
SQ-100 FCC Notices This device complies with part 15 of the FCC rules. Operation is subject to the following two conditions: (1) This device may not cause harmful interference, and (2) This device must accept any interference received, including interference that may cause undesired operation. FCC RF Exposure requirements: This device and its antenna(s) must not be co-located or operation in conjunction with any other antenna or transmitter.
SQ-100 13. GUARNTEE Please keep the proof of purchase for this device for the entire duration of the guarantee period, as it must be produced in the event of any claim. You (as the end user) receive a 36-month guarantee from the date of sale. The article has been manufactured using the most modern production methods and subjected to strict quality controls. Please contact only the manufacturer (not the dealer where you purchased it) in the event of any defects during the guarantee period.
SQ-100